Quantcast
Channel: Electro help
Viewing all 2033 articles
Browse latest View live

PLASMA DISPLAY PANEL FAULTS - OVER 150 SCREEN-SHOTS

$
0
0


Good Black Level
Good Gray Level
   Products powered by electricity should be serviced or repaired only by experienced professional technicians. Any attempt to service or repair the product or products dealt with in this information by anyone else could result in serious injury or death.

FAULTS DUE TO DISPLAY MODULE
For comparison only


PANASONIC TH-103PF10WK - TH-103PF10TK - TH-103PF10RK - HOW TO ENTER SERVICE MODE & ADJUSTMENTS

$
0
0


CAT [Computer Aided Test ] MODE MENU
How to access CAT mode:
  • Press & Hold the Volume Down Button on the side of the unit, and press the Status Button on the remote control thrice; within 2 seconds, will place the unit to CAT mode.
CAT MODE MENU
  • To exit the CAT mode, access the ID mode and switch off the main power.
IIC MODE
  • Select the IIC mode by Up / Down button on the remote control at the front page of CAT mode and then press the Action button on the remote control.
HOW TO USE IIC MODE
  • Select the alignment subject by ▲/▼ buttons on the remote control.
  • Select the alignment item by ◄/► buttons on the remote control.
  • Adjust optimum settings by Volume ▲▼ buttons on the remote control.
  • The data is memorized when press the 'R' button on the remote control, or change the alignment subject or items.
  • Subject and item are mentioned on “IIC mode structure”.
  • To exit the IIC mode, press the R button on the remote control.
OSD
CD MODE
  • Select the CD mode by ▲/▼ button on the remote control at the front page of CAT mode and then press the Mute button on the remote control more than 3 seconds.
Microcomputer software version (IC4002), this version can be upgrade by
  • replace of new version IC
  • Loading the new version software from loader tool, TZSC07036.
  • The data is memorized when switch off the Main Power.
  • To exit the CD mode, press the R button on the remote control.
Memory data change:

SD MODE
  • Select the SD mode by ▲/▼ button on the remote control at the front page of CAT mode and then press the Action button on the remote control.
  • To exit the SD mode, press the R button on the remote control.
OSD
MS MODE
  • Select the MS mode by ▲/▼ button on the remote control at the front page of CAT mode and then press the Mute button on the remote control more than 3 seconds.
  • To exit the MS mode, press the R button on the remote control.
  • Caution:  Market Select should be set after exchange of DN-Board.
Destination number.
Default setting: North America.
ID MODE
  • Select the ID mode by▲/▼  button on the remote control at the front page of CAT mode and then press the Mute button on the remote control more than 3 seconds.
  • To exit the ID mode, press the R button on the remote control.
IIC mode structure (following items value is sample data)
CLICK ON PICTURES TO ZOOM

PANASONIC TH-103PF10WK - TH-103PF10TK - TH-103PF10RK - SELF CHECK FUNCTION - LED BLINKING CHART - TROUBLESHOOTING

$
0
0


SELF CHECK
Self-check is used to automatically check the bus line controlled circuit of the Plasma display.
  • To get into the Self-check mode, press the volume down button on the customer controls at the side of the set, at the same time pressing the OFF-TIMER button on the remote control, and the screen will show.
  • If the IIC ports have been checked and found to be incorrect, Or not located then " - - " will appear in place of " OK ".
  • “ 01 “ in the line of the “ PTCT ” means the number ofblinks of the Power LED is 1.
  • “ H09 “ in the line of the “ PTCT ” is the error code.
  • To exit Self Check mode, switch off the main power.

Note: The line of the “ PTCT ” displays when you get into the Self-check mode for the first time only after the Power LED blinks.
POWER LED BLINKING TIMING 
  • When an abnormality has occurred to the unit, the protection circuit operates and resets to the stand by mode. At this time, the defective block can be identified by the number of blinks of the Power LED on the front panel of the unit.
About blinking LED


TROUBLESHOOTING FLOW CHART
No Power
  • No lit.
  • Green is lit then turns red blinking a few seconds later.
  • Only red is lit.
No Picture

Local screen failure
  • Plasma display may have local area failure on the screen.  In Fig is the possible defect P.C.B. for each local area.

SANYO 32XH4 - 32" LCD TV - HOW TO ENTER SERVICE MODE - INITIAL DATA SETTING

$
0
0

SERVICE MODE ENTRY
This set has an On-screen Service Menu System included in the CPU that allows remote operation for most of the service adjustments.
On-screen Service Menu System
Quick operation is needed to enter Service Mode.
How to enter the Service Menu
  • Press and hold the MENU button on Side Controls.
  • Keep pressing the MENU button and press the NUMERIC "1"button on the remote control, and the service mode menu will be displayed.
SERVICE MODE MENU
DATA VALUE ADJUST
  • To adjust data: Select “DATA” line by pressing ▲▼ button.
  • Press [ + ] or [ - ]button to adjust data.
To exit service mode
  • Press MENU button on the Side Controls or remote control.
  • Turn the TV off by pressing the POWER ON/OFF button on the Side Controls or remote control.
  • Note: The all adjusted data in service mode will be memorized into EEPROM automatically.
INITIAL DATA SETTING
This adjustment is controlled by the CPU (IC7200) through the IIC Bus Data Line in the chassis, and those adjustment data are memorized the memory IC (IC8002).
Therefore, Main board or the memory IC (IC8002) is replaced, these data will be disappeared. Readjust should be made. Initial data is provided in the CPU ROM, when the memory IC (IC8002) is replaced with new one.
CPU ROM data is loaded into the memory. Initial data is provided to operating the monitor basically. For operating the monitor quality performance, further adjustment is required following chassis electrical adjustment.
  • Receive good quality signal.
  • Enter the Service Mode.
  • Confirm data value to be the same as the Service Adjustment Data Table. If it is different, change to correct data
  • Exit the Service Mode.
WHITE BALANCE ADJUSTMENT
Condition
Picture Mode: STANDARD
Color Temperature: NORMAL
Pre-heating Time: More than 10 minutes
  • Enter the Service Mode.
  • Select "Source ALL" by pressing or button, and select "Properties White" by pressing or button.
  • Set R,G,B value to “FF” by pressing NUMERIC buttons.
To adjust Red : Press 1 (data value up) and 4(data value down).
To adjust Green : Press 2 (data value up) and 5 (data value down).
To adjust Blue : Press 3 (data value up) and 6 (data value down).
  • Decide one item in three items to a fixed value (For example, let R be fixed value), select item of other 2 colors (Example, G orB), and adjust to produce a normal black and white picture in highlight areas.
  • (Note:At this time, Adjust the other 2 colors data less than fixed data.)
  • Exit the Service Mode. [After adjustment, confirm white balance again by normal picture.]

AKIRA 21BSS3VE - 21BSS3WN - HOW TO TROUBLEHOOT - CPU DOES NOT WORK - NO RASTER - NO SOUND - HORIZONTAL LINE Etc:-

$
0
0

NO RASTER
  • This failure is mainly caused by big-power circuit such as power supply, horizontal scanning, and vertical scanning.
  • The detail checking and repairing steps are as follow.
NO PICTURE - NO SOUND
  • The failure shows that the set does not display the picture but it has noise wave or blue background or OSD on the screen. This means that the circuits of power supply, horizontal scanning, vertical scanning and video amplification are normal and they are not considered in the repairing. The failures are mainly in the small signal processing circuits.
Before checking these circuits, a kind of practical test method is introduced .It is called Signal-input way The detail is described as follow:
  • We can use the resistance function of an analog multimeter, connect the red pole (negative in ohm scope) on the circuit board ground, then touch softly the test point with another pole (black pole) in ohm scope meanwhile observe the reactivity on the output device.
Note: In the TV test, we mainly observe the noise wave on the CRT and listen to the noise voice liking as Ka....Ka from the loudspeakers.
No Picture
{Click on charts to Zoom}
No Sound
  • In this kind of failure, first of all we should observe if there is the picture on the CRT . It proves the small signal circuit to work correctly with the picture on the CRT and we only check the sound signal processing and sound amplification circuit. The repairing method (B1) may be referred without picture.
The detail checking and repairing steps are as follow.
Note: Before repairing, assure that the volume is on and the state of set is in TV.
ONE HORIZONTAL LINE ACROSS THE MIDDLE OF THE SCREEN
If vertical deflection circuit does not work, this kind of failure will happen. In deflection yoke, there only has horizontal sweeping. The electron beam in the CRT only moves in the horizontal orientation so form this failure. (While checking horizontal and vertical deflection circuit s failure, we have better to use an oscilloscope.)
ONE VERTICAL LINE DOWN THE MIDDLE OF THE SCREEN
This is a dangerous failure. It probable causes flash-over and smoking inside the set. Don t let your TV work for a long time as this failure appears.   Because the electron beam can not move in the horizontal orientation, the failure should be in the horizontal deflection circuit. We mainly check the open-circuit fault in horizontal deflection circuit. The detail checking and repairing steps are as follow:
CPU DOES NOT WORK
In television, remote-control system is similar with the computer system. In theory, it can work if it holds two conditions as follow:
  • The power supply: In general, it is 5V, the error is not above 10% and the disturbance pulse is as small as possible.
  • The clock pulse: In TB 1238 circuit, the clock pulse is generated by pin31/ pin32 of N701 and a 8M crystal oscillator. Television s remote-control system also needs reset circuit that can preset the values in internal register.  The circuit around pin33 of N701 is called auto-reset circuit. If CPU detects errors in resetting, it will come to the state of program protected.
The detail checking and repairing steps are as follow:
NO ON-SCREEN DISPLAY
This failure is usually cause by the circuit of character generated and located. Most of reasons are that the horizontal and vertical flyback pulse signals do not come to CPU. We can make sure about this failure by measuring the wave of the character in an oscilloscope.
The detail checking and repairing steps are as follow:

SONY KV-TG21M61 – SONY TG21M90 [RM-952] - SELF DIAGNOSIS - LED BLINKING CODES

$
0
0

SELF DIAGNOSIS
   The units in this manual contain a self-diagnostic function. If an error occurs, the STANDBY/TIMER lamp will automatically begin to flash.
   The number of times the lamp flashes translates to a probable source of the problem. A definition of the STANDBY/TIMER lamp flash indicators is listed in the instruction manual for the user’s knowledge and reference. If an error symptom cannot be reproduced, the remote commander can be used to review the failure occurrence data stored in memory to reveal past problems and how often these problems occur.
DIAGNOSTIC TEST INDICATORS
   When an errors occurs, the STANDBY/TIMER lamp will flash a set number of times to indicate the possible cause of the problem. If there is more than one error, the lamp will identify the first of the problem areas.
   If a + B overcurrent is detected, stoppage of the vertical deflection is detected simultaneously.  The symptom that is diagnosed first by the microcontroller is displayed on the screen.
Result for all of the following diagnostic items are displayed on screen. No error has occurred if the screen displays a “0”.
Diagnostic Item
Description
No. of times
STANDBY/TIMER
lamp flashes
Self-diagnostic
display/Diagnostic
result

Probable Cause
Location
Detected
Symptoms
Power does not
turn on
Does not light

# Power cord is not plugged in.
# Fuse is burned out F4601 (F)
# Power does not come on.
# No power is supplied to the TV.
# AC power supply is faulty

# +B overcurrent
(OCP)
# Horizontal
deflection
overdrive
2 times
002:000 or
002:001~255
# H.OUT Q511 is shorted.
(A board)
# Power does not come on.
# Load on power line is
shorted.
# Has entered standby state
after horizontal raster.
# Power line is shorted or power supply is stopped

# White balance
failure (no
PICTURE)
# Vertical deflection stopped

4 times
004:000 or
004:001~225
# -13V is not supplied.
(CV Board)
# IC 503 faulty (A board)
# Vertical deflection pulse
is stopped
Micro reset

101:00 or
101:001~225
# Discharge CRT
(CV Board)
# Static discharge
# External noise
# Power is shut down shortly, after this return
back to normal.
#  Detect Micro latch up.

DISPLAY OF STANDBY/TIMER LIGHT FLASH COUNT
Diagnostic Item Flash Count
  • +B overcurrent/overvoltage =>  2 times
  • Vertical deflection stopped  => 4 times
  • One flash count is not used for self-diagnostic
STOPPING THE STANDBY/TIMER FLASH
Turn off the power switch on the TV main unit or unplug the power cord from the outlet to stop the STANDBY/TIMER lamp from flashing.
SELF-DIAGNOSTIC SCREEN DISPLAY
For errors with symptoms such as “power sometimes shuts off” or “screen sometimes goes out” that cannot be confirmed, it is possible to bring up past occurrences of failure for confirmation on the screen:
To Bring Up Screen Test
  • In standby mode, press buttons on the remote commander sequentially in rapid succession as shown below:
  • Screen display => channel [5] => Sound volume [-]=> Power ON [Note that this differs from entering the service mode (Mode Volume [+])
SELF DIAGNOSTIC SCREEN DISPLAY
Numeral "0" means that no fault has been detected
HANDLING OF SELF DIAGNOSTIC SCREEN DISPLAY
  • Since the diagnostic results displayed on the screen are not automatically cleared, always check the self-diagnostic screen during repairs. When you have completed the repairs, clear the result display to “0”.
  • Unless the result display is cleared to “0”, the self-diagnostic function will not be able to detect subsequent faults after completion of the repairs.
Clearing the result display
  • To clear the result display to “0”, press buttons on the remote commander sequentially as shown below when the diagnostic screen is being displayed. {Channel [8] => 0 }
Quitting Self-diagnostic screen
  • To quit the entire self-diagnostic screen, turn off the power switch on the remote commander or the main unit.
  • +B overcurrent [OCP] : Occurs when an overcurrent on the +B(135) line is detected by Q500. If Q604 go to ON and the voltage to pin 50 of IC301 more than 3.5V when V.SYNC is more than seven verticals in a period, the unit will automatically turn off.
  • Vertical deflection stopped: Occurs when an absence of the vertical deflection pulse is detected by Pin 17 and IC001 shut down the power supply.
  • White balance failure: If the RGB levels do not balance or become low level within 5 seconds, this error will be detected by IC301. TV will stay on, but there will be no picture. [RGB levels of the AKB detection Ref pulse that detects IK]

SONY KV-28LS60 - SONY KV-32LS60 - How to Enter Service Mode - SELF DIAGNOSIS - How to Disassemble

$
0
0

SELF DIAGNOSTIC SOFTWARE
The identification of errors within the AE-6B chassis is triggered in one of two ways :-
1: Busy or 2: Device failure to respond to IIC. In the event of one of these situations arising the software will first try to release the bus if busy (Failure to do so will report with a continuous flashing LED) and then communicate with each device in turn to establish if a device is faulty. If a device is found to be faulty the relevant device number will be displayed through the LED (Series of flashes which must be counted) See table 1, non fatal errors are reported using this method.
Each time the software detects an error it is stored within the NVM.
TABLE-1
ERROR MESSAGE
LED CODE

NO ERROR
00
Reserved
01
Over current protection [OCP]
02
Over voltage protection [OVP]
03
No vertical sync
04
IKR error
05
IIC bus block and/or data lines low at power on
06
NVM no IIC bus acknowledge at power on
07
Horizontal protection
08
Tuner no acknowledge at power on
09
Sound processor error
10
Reserved
11
Scan rate error
12
DAC error
13
Back end error
14
Dynamic convergence error
15
PIP error
16
HOW TO ENTER INTO TABLE-2
  • Turn on the main power switch of the TV set.
  • Program Remote Commander for Operation in Service Mode.
  • Press ‘VIDEO’ ‘VIDEO’ > ‘MENU’ on the Remote Commander.
  • Using the Remote Commander, Scroll to the ‘Error Menu’item using the down arrow key, then press the right arrow key.
  • The following table will be displayed indicating the error count.
To clear the error count data press ‘80’ on the Remote commander.
DISASSEMBLY
Remove the rear cover fixing screws indicated. Take care when removing the rear cover not to damage the speaker cables [Disconnect the speaker connector] as speakers are fitted inside the rear cover.
Before completely removing the rear cover disconnect the speaker connector which is located on the inside.
To remove lift the main bracket rear slightly and slide the chassis away from the beznet. Ensure that the interconnecting leads are released from their purse locks to prevent damage being caused.
When refitting the chassis ensure that the main bracket is located in the beznet guide slots before sliding the chassis forwards. Refit the interconnecting leads in their respective purse locks.
Position the chassis as indicated to access the solder side.
To remove the G Board release the clips circled and ease the board gently away from the support bracket. Removal of the D Board follows the same procedure.
   To remove the M Board gently release the two clips with a screwdriver and remove the board from its socket vertically.
   If the M Board needs to be removed for testing when the chassis is placed in its service position, it would be necessary to use an extender board and extension cable as indicated above.  The Extender board and extension cable are available.
Ensure that wires do not touch heat sinks and high temperature hotspots. All wires must be kept at a minimum distance of 20 mm away from the EHT lead.
TO ENTER SERVICE MODE
  • To enter into the ‘Service Mode’ press ‘VIDEO’ button twice and ‘MENU’ on the Service Commander.
Service adjustments to this model can be performed using the supplied remote Commander RM-932.
  1. Press the VCR/TV/DVD button until the TV LED lights.
  2. Press and hold the yellow button for approx. 5 seconds until the TV LED flashes quickly.
  3. Press 99999. All three LED’s should light.  The remote commander is now set to Service Mode.
  4. To return the remote commander to normal operation mode repeat steps 1. and 2. then press 00000. All three LED’s should light.
  5. The remote commander is now set to normal mode.
SETTING THE TV INTO SERVICE MODE
  • Program the remote commander for operation in Service Mode as described above.
  • Turn on the TV main power switch.
  • Press the video standby button on the remote commander twice.  ‘TT’ will appear in the upper right corner of the screen.  Other status information will also be displayed.
  • Press ‘MENU’ on the remote commander to obtain the above menu on the screen.
  • Move to the corresponding adjustment item using the up or down arrow buttons on the Remote Commander.
  • Press the right arrow button to enter into the required menu item.
  • Press the ‘Menu’ button on the Remote Commander to quit the Service Mode when all adjustments have been completed.
Note :   After carrying out the service adjustments, to prevent the customer accessing the ‘Service Menu’ switch the TV set OFF and then ON.

SONY KV-28LS60 - SONY KV-32LS60 - Default Data Values to Factory Mode - How to enter Service Mode [Factory Mode] - Test Mode-2

$
0
0


FACTORY SET DATA VALUES
Geometry
Dynamic Convergence
IF adjust
Service
DAC
Sound
ERROR MENU
DEFLECTION SYSTEM ADJUSTMENT
  • Program the Remote Commander for operation in Service Mode, and enter into the ‘Geometry’ service menu.
  • Select and adjust each item in order to obtain the optimum image.
Geometry [Default Data]

TEST MODE - 2
  • Test Mode 2 is available by programming the Remote Commander for operation in Service Mode, then pressing the ‘VIDEO’ button twice, OSD ‘TT’ appears. The functions described below are available by selecting the two numbers.
  • To release the ‘Test mode 2’, press 00, 10, 20 ... twice or switch the TV set into Stand-by mode.
  • In ‘TT Menu’ mode, it is possible to remove the Menu from the screen by pressing the Speaker Off button once.
  • Pressing the Speaker OFF button a second time will cause the Menu to reappear.
  • The function is kept even when the menu is not displayed on screen.
{CLICK ON PICTURES TO ZOOM}
SERVICE MODE [SETTING THE REMOTE CONTROL AS SERVICE REMOTE]

Service adjustments to this model can be performed using the supplied remote Commander RM-932.
  1. Press the VCR/TV/DVD button until the TV LED lights.
  2. Press and hold the yellow button for approx. 5 seconds until the TV LED flashes quickly.
  3. Press 99999. All three LED’s should light.  The remote commander is now set to Service Mode.
  4. To return the remote commander to normal operation mode repeat steps 1. and 2. then press 00000.
  5. All three LED’s should light.  The remote commander is now set to normal mode.
SETTING THE TV INTO SERVICE MODE
Program the remote commander for operation in Service Mode as described above.
  • Turn on the TV main power switch.
  • Press the video standby button on the remote commander twice.  ‘TT ’ will appear in the upper right corner of the screen.  Other status information will also be displayed.
  • Press ‘MENU’ on the remote commander to obtain the following menu on the screen.

  • Move to the corresponding adjustment item using the up or down arrow buttons on the Remote Commander.
  • Press the right arrow button to enter into the required menu item.
  • Press the ‘Menu’ button on the Remote Commander to quit the Service Mode when all adjustments have been completed.
Note:  After carrying out the service adjustments, to prevent the customer accessing the ‘Service Menu’ switch the TV set OFF and then ON.


AKAI LCT26Z4AD - LCT26AE [USA] - HOW TO UPGRADE SOFTWARE - HOW TO UNLOCK V-CHIP PASSWORD - [Update process of MT537X] - Factory Mode

$
0
0

V-CHIP PASSWORD
If you forget your V-Chip Password:
Using the “U.S.Movie Ratings” item
  • After entering the “Program Block” menu, press or button to highlight the “U.S.    Movie Ratings” item.
  • Press or Enter button to enter.
  • Press or button to select an item, then press the Enter button to lock (display) or unlock (display). Using the “U.S.Movie Ratings” item.
For Movie previously shown in theatres:
  • G  (general audience)
  • PG  (parental guidance suggested)
  • PG-13 (13 years and older)
  • R  (Restricted)
  • NC-17 (18 years and older)
  • X  (Adult)
  • If you set PG-13: G and PG movies be available, PG-13, R, NC-17, and X will be blocked.
  • Press the Menu button to exit the sub-menu.
Unlocking programs temporarily
  • If you try to watch a program that    exceeds the TV Guideline you set, the system enters program lock    mode. You can either unlock the    program temporarily or select a    non-locked program to watch.
  • To temporarily unlock the program, press the Number buttons (0~9) to enter your 4-digit password.
  • If the correct code is entered, the program lock mode is released and the normal picture appears.
Process of update MT537X
  • Connect the Plasma/LCD TV and PC with the Software Upgrade Board.
  • Store the MtkTool into the PC.

Parts List
Software upgrade board x 1.  
RS232 null cable x 1 for PC.  
RS232 – VGA cable.  
USB cable x 1.
Installation for ATV upgrade 
Connect RS232 cable (#2) to PC serial port.
Connect another side of RS232 cable to the board.
Connect RS232-VGA cable (RS232 side) to the board.
Connect RS232-VGA cable (VGA side) to the TV.
Connect USB cable to the board.
Connect another side of USB cable to PC.
Downloading
  • Turn on AC power of the TV and then press the button “standby” of the remote control . The image could be found on the screen of the TV while the color of the power indicator is green .
  • Execute MTKtool and select the chipset as MT537X. (the software of MTKtool will be sent to your side).
  • Select current COM port. (please try to check the COM port of your PC).

  • Choose the bit rate as 115200.
  • Select the update binary by pressing browse button. For example, the binary file name is PDP42XX_V06_LGX3SMC_20061230.bin.(this update firmware will be sent to your side).

  • Press Upgrade button and start update process.
  • The update process is successful as the progress bar is 100%. After the update process is ok, turn off power and wait indicator light is off. Turn on power and TV can work.

Checking
It is needed to check the version of the firmware for MT5371 which has been download into the TV.
  • Press Menu button of the remote control, following input “5371”of the remote control and OSD menu for Factory Setting is appeared on the screen.
  • Use the remote control and select the item of “Version Info” and then press “Enter” button of the remote control. It is easy to be found the version of the current
  • Firmware for MT5371 is as the following : “Model Name : PDP42Z5TA / Version:V17_LGX3SMC_20070119 ”

AKAI LCT-2662 - HOW TO UNLOCK V-CHIP PASSWORD - MAIN POWER SUPPLY CIRCUIT [SCHEMATIC] DIAGRAM - Software Update Procedure

$
0
0

PASSWORD RESET
  • Omnipotence  V-Chip Password: 8205.
  • Press MENU button.
  • Press LEFT RIGHT buttons to highlight "MISC" Menu.
  • Press Up, Down buttons to highlight "Parentald".
  • Press ENTER button to pop up "Input your Password Please".
  • Use the Number buttons (0~9) to enter an omnipotence Password.
  • Press ENTER button to confirm and your can select "CHANGE PASSWORD".
  • Suggest: Change to your familiar Password again.
SOFTWARE UPGRADE
Connect the RS-232C input jack to an external control device (such as a computer) and software upgrade.
  • Power Switch OFF.
  • Connect the serial port of the control device to the RS-232 jack on the LCD-TV back panel. RS-232C connection cables are not supplied with the LCD-TV.
  • Power Switch ON. The power indicator on the front of the panel should now display red, means that the LCD-TV is in standby mode.
  • Copy the software (MTKTOOL) to the computer.
  • Open the software (MTKTOOL.EXE)
  • Select MTK 8205 and Point "browse" on the interface of the MTKTOOL.exe.
  • Select the file which will be update.
  • Point "update" on the interface of the MTKTOOL.exe.
  • Waiting for the upgrade programming, when it is finished, the bar will display 100%.
  • After the up grader is finished, shut down the power switch, take out the RS-232C connection after the power indicator is extinguished.
  • Note: After upgrading, the first time of power on will be some long.
POWER SUPPLY [SMPS] SCHEMATIC
CLICK ON PICTURE TO ZOOM

AKAI PDP-4206EA PLASMA TV - PCBs - LOCATION & FUNCTIONS - BASIC OPERATIONS OF A PLASMA DISPLAY - FAULTS DUE TO CIRCUIT BOARDS - HOW TO SEPARATE COF

$
0
0

PARTS POSITION
1. Power:
  • Input voltage: AC 110V~240V, 47Hz~63Hz. Input range: AC 90V(Min)~265V(Max) auto regulation.
  • To provide power for PCBs.
2. Main board: 
To converter TV signals, S signals, AV signals, Y Pb/Cb Pr/Cr signals, DVI signals and D-SUB signals to digital ones and to transmit to Control board.
3. Control board: 
Dealing with the digital signal for output to panel.
4. Y-Sustainer / Z-Sustainer board:
  • Receiving the signals from Control and high voltage supply.
  • Output scanning waveform for Module.

5. Y-Drive board: 
Receive signal from Y sustainer, output horizontal scanning waveform to the panel.
6. X (left and right) extension board: 
Output addressing signals.
7. Tuner/Audio Board:
  • Amplifying the audio signal to the internal or external speakers of which selected.
  • To convert TV RF signal to video and SIF audio signal to Main board.
8. ATSC Board: 
Receiver and converter ATSC TV signal to transmit to main board.
BASIC OPERATIONS
  • After turning on power switch, power board sends 5Vst-by Volt to Main IC MT8205 waiting for ON signals from Key Switch or Remote Receiver.
  • When the ON signal from Key Switch or Remote Receiver is detected,MT8205 will send  ON Control signals to Power. Then Power sends (5Vsc, 9Vsc, 12Vsc, 24V and RLY ON, Vs ON) to PCBs working. This time VIF will send signals to display back light, OSD on the panel and start to search available signal sources. If the audio signals input, them will be amplified by Audio AMP and transmitted to Speakers.
  • If some abnormal signals are detected (for example: over volts, over current, over temperature and under volts), the system will be shut down by Power off.
FAULTS due to COF damage
COF is the most important component in the PDP module.  Even a little imperfection of COF can make a serious screen problem.
COF

X/BD
Receiving LOGIC signal from CONTROL B/D and make ADDRESS PULSE (generates Address discharge) by ON/OFF operation, and supplies this waveform to COF (data).
HOW TO SEPARATE COF
Z Sustain B/D
Make SUSTAIN PULSE and ERASE PULSE that generates SUSTAIN discharge in panel by receiving LOGIC signal from CONTROL B/D.  This waveform is supplied to panel through FPC(Z).
# composed with IPM,FET,DIODE, electrolytic capacitor ,E/R coil.
# IPM (Intelligent Power Module). ## E/R(Energy recovery)
FPC SEPARATING
Y drive B/D
  • This is a path to supply SUSTAIN ,RESET waveform which made from Y SUSTAIN B/D to panel through SCAN DRIVER IC.
  • Supply a waveform that select Horizontal electrode (YSUSTAIN electrode) sequentially.  Potential difference is 0V between GND and Vpp of DRIVER IC in SUSTAIN period. Being generated potential difference between GND and Vpp only in SCAN period.
  • In case of 42” V6 use DRIVER ICIC 8 EA (TOP, BOTTOM: each 4EA)
Y SUSTAIN B/D
Generates SUSTAIN,RESET waveform, Vsc(SCAN)voltage and supplies it Y DRIVER B/D.
Composed with IPM,DIODE, electrolytic capacitor ,FET.
CONTROL BOARD
Creates signal processing (Contour noise, reduction ISM,..) and an order of many FET on/off of each DRIVER B/D with R,G,B each 8bit input.
Use 3.3V/5V 2 kinds of power.
DC/DC CONVERTER
Being impressed 5V, Va ,Vs, DC/DC converter makes 5V,Va,Vs,Vset_up,Vsc which is essential for each B/D.
There is no DC/DC B/D in model 40/42 (1 POWER B/D).
50 / 60 embedded DC/DC B/D separately because of high power consumption.
FPC (Flexible Printed Circuit)
  • Supply a driving waveform to PANEL by connecting a PAD electrode of PANEL with PCB(Y and Z).  There is two type of this for Y B/D. One is single-sided, another is double-side. These are having pattern on it. For Z B/D, there is no pattern , single-sided, and Beta type (all of copper surface).
FFC (Flat Flexible Cable)
For connecting a Logic signal between B/D and B/D.
There is 0.5mm pitch,50pin type 1mm pitch ,30pin type
IPM(Intelligent Power Module)
Composition
HEATSINK,CAPACITOR
DIODE
IC LINEAR
RESISTORTANSISTOR,FETS.
Description
Attached at Z B/D and Y B/D, make Sustain waveform.
Sustainer : supply a square wave to panel to make a video.
COF (Chip On Film)
  • Supply a waveform which made from X B/D to panel and select a output pin that is controlled by COF when be on or off.
  • 96 output pin per IC. The more the resolution higher, the less spare space where can set IC on it in B/D. without using IC PACKAGE, we can use a BARE IC , so we can get IC with LOW COST.  Because we do not solder IC on PCB directly, a soldering defect rate decrease.

AKAI LT-32Q5LFH - 32" WIDE TFT LCD TV - SERVICE MODE & ADJUSTMENTS - FACTORY DEFAULT SETTINGS

$
0
0

SERVICE MODE
  • Press 5 Seconds MENU buttons on both TV set and Remote Controller at the same time to get into SVC mode.
  • Press the PR ▲▼ button several times to find SVC Data.
  • Input the corresponding SVC data referring to Table below with the VOL ◄/► key.
  • Press TV/AV button to exit SVC mode. 
FACTORY SETTINGS
                                                         Do not change the “(   )” item.
WHITE BALANCE CHECKING
After memory IC replacement, white balance should be checked.
ADJUSTMENT INSTRUCTION WITH DEFAULT FACTORY DATA
CLICK ON PICTURES TO ZOOM

LT-32Q5LFH - AKAI LCD TV - DISASSEMBLE PROCEDURE & TROUBLESHOOTING FLOW CHART

$
0
0

TROUBLESHOOTING [No Raster]
No sound; Picture OK
No Operation
CLICK ON PICTURES TO ZOOM
DISASSEMBLY
Back Cover
Metal plate & Rear chassis
LCD Panel Chassis

AKAI PT4250AX/SMS Rear Projection TV - HOW TO ENTER SERVICE MODE - W/B ADJUST - LENS FOCUS ADJUSTMENT - BEAM ALIGNMENT

$
0
0


SERVICE MODE
  • Turn on the TV, and then select "STANDARD" on the picture adjustment mode.
  • Turn off the TV (STAND-BY).
  • Enter the service mode by pressing the remote control keys in the following sequence : [MUTE => 1 => 8 => 2 => POWER]
Initial SERVICE MODE DISPLAY 
Service Mode Control Keys
  • Direction keys / => Item Selection by Moving the Cursor
  • Direction keys / => Data Increase/Decrease for the Selected Item.
  • Press the Add key to exit.
W/B [White Balance] ADJUSTMENT
  1. Select the "STANDARD" Video Mode.
  2. Input 100% white pattern.
  3. In the stand-by mode, press the remote-control keys in the following sequence: [MUTE => 1 => 8 => 2 => POWER]
  4. Warm up the TV for at least 30 minutes.
  5. Input a 10-step signal.
  6. R-cut off, B-cut off, and G-cut off by pressing the ▲▼ / ◄►keys.
  7. Adjust the low light with viewing the dark side of the screen.
  8. Select R-drive, G-drive, and B-drive by pressing the ◄► / ▲▼keys.
  9. Adjust the high light with viewing the light side of the screen.
  10. If necessary, redo screen adjustments and 6~9.
  11. Press the Add key to exit.
Lens Focus Adjustment
  • Set the Screen to "STANDARD". (Contrast : 100 / Brightness : 50)
  • Set the pattern to Crosshatch.
  • Adjust the electric focus before beginning.
  • Adjust the DY tilt (TILT) before beginning.
  1. Loosen the lens screw for easier adjustment.
  2. Press Mute, 1, 8 and 3, sequentially to enter Convergence Mode.
  3. Display only the Green pattern by using the +100, 0, and Previous Channel Keys in order to turn the R, G, and B patterns On/Off respectively.
  4. Turn the Green Lens clockwise/Counterclockwise to adjust for optimum status.
  5. (Repeat if unsuccessful, varying the VR of the front Focus Pack.)
  6. Perform steps 1~3 for the R and B Lenses. [Note: Green determines picture quality; pay close attention for exact adjustment]

BEAM ALIGNMENT
  • Select the "STANDARD" Video Mode.
  • Warm up the set at least for 10 minutes.
  • Enter the Convergence mode by pressing the remote control buttons in the following sequence. [MUTE => 1 => 8 => 3]
  • Set the Beam Alignment Adjustment CY to Zero magnetic field area.
  • Press the 7- digit button for a while, on the remote control, and a vibrating dot-pattern appears.
  • Adjust the Focus-pack VR for defocusing.
  • Mute the other patterns (R/B) other than G-PATTERN. (Use "+100" / "PRE-CH" Key on the remote control.)
  • Adjust the 2, 4 polarities of VM-COIL as shown in figure below.
  • Adjust the G-Focus until any light around the core disappears.
  • Adjust G-Focus so that the surrounding flash can disappear from the spot.

  • After G-Focus adjustments are complete, adjust R-Focus as above procedures.
  • The B-CRT adjustments can be omitted because the variance of beam focus is small. (Only Vm-coil is mounted.)
  • Adjust the Focus-pack VR for fine focusing.
  • Press the 7- digit button for a while, on the remote control, and the mode changes to the Convergence Adjustment mode.
  • Press the "S.MODE" Key on the remote control to return to normal viewing.
Since this RPTV uses Samsung Technology, remote control to Samsung is used to adjust the parameters.
REMOTE CONTROL KEY FUNCTIONS IN CONVERGENCE MODE
For default data values check next post here.

AKAI REAR PROJECTION TV - PT4250AX - [RPTV] - HOW TO OPEN AND REPLACE ASSEMBLIES - TROUBLESHOOT

$
0
0

OPENING BACK COVER
Remove all indicated screws on the rear side of the Set.
Repair or replace the required Assembly
REPAIRING AND REPLACING CRT-PCB
Remove all indicated screws and open the Rear Cover.
Remove the front panel and Power control.
Repair the front PCB-CRT or replace it after removing the attached connectors.
REPLACING CRT
The Back Cover is detached as illustrated below (refer to the Opening Back Cover).
Remove the screws indicated and detach the Top Cover.
Remove the Dust Cover that prevents dust from entering into the screen.
Before proceeding, disconnect all the DY and Connectors connected to the assembly.
Remove the 4 corner screws from the CRT and replace the CRT.
REPAIR - NO SOUND
REPAIR - NO VIDEO [SOUND NORMAL]
CLICK ON PICTURES TO ZOOM


PT4250AX/SMS - AKAI REAR PROJECTION TV - FACTORY SET DATA VALUES - OPTION SETTING

$
0
0

DEFAULT DATA VALUES [Factory out status]
+ DVI connection item is corresponded to DVI application model. (HCR4245W)
To know how to enter service mode, check previous post here.
Deflection
Video adjust - 1
CLICK ON TABLES TO ZOOM IN
Video adjust - 2
Video adjust - 3
Video adjust - 4
Video adjust - 5
Video adjust - 6
Option

HOW TO CONTROL TV BY PERSONAL COMPUTER - SHARP LC-32GA8 – LC-32BV8 – LC-37GA8 – LC-37BV8 - LCD TV

$
0
0


PC CONTROL OF TV
   When a program is set, the TV can be controlled from the PC using the RS-232C terminal. The input signal (PC/video) can be selected, the volume can be adjusted and various other adjustments and settings can be made, enabling automatic programmed playing.  Attach an RS-232C cable cross-type (commercially available) to a 9 pin D-sub/MINI-DIN (optional:AN-A1RS) for the connections.
NOTE:A person who is accustomed to using PCs should use this operation system.
Communication conditions
   Set the RS-232C communications settings on the PC to match the TV’s communications conditions. The TV’s communications settings are as follows:
  • Baud rate: 9,600 bps
  • Data length: 8 bits
  • Parity bit: None
  • Stop bit: 1 bit
  • Flow control: None.

Communication procedure
   Send the control commands from the PC via the RS-232C connector.  The TV operates according to the received command and sends a response message to the PC.  Do not send multiple commands at the same time. Wait until the PC receives the OK response before sending the next command.
COMMAND FORMAT
PARAMETER
Input the parameter values, aligning left, and fill with blank(s) for the remainder. (Be sure that four values are input for the parameter.)
When the input parameter is not within an adjustable range, “ERR” returns.
COMMANDS
CLICK ON PICTURES TO ZOOM IN
NOTE: 
If an underbars  (_) appears in the parameter column, enter a space.
If an asterisk (*) appears, enter a value in the range indicated in brackets under CONTROL CONTENTS.

SHARP LC-32GA8 – LC-32BV8 – LC-37GA8 – LC-37BV8 - HOW TO DETECT LAMP ERROR - COUNTER MEASURES - HOW TO ENTER PUBLIC MODE

$
0
0

LAMP ERROR DETECTION
For 37” LCD TV: Functional description
   This LCD colour television has a function (lamp error detection) to be turned OFF automatically for safety when the lamp or lamp circuit is abnormal.
If the lamp or lamp circuit is abnormal, or some other errors happen, and the lamp error detection is executed, the following occur.
  • The main unit of television is turned OFF 5 seconds after it is turned ON. (The power LED on the front side of TV turns from green to red.)
  • If the situation “1” happens 5 times sequentially, television cannot be turned ON. (The power LED remains red.)
Countermeasures
   When television is turned OFF by the lamp error detection mentioned above, it enters the adjustment process with the power LED red. Entering the adjustment process turns OFF the error detection and turns ON TV. This enables the operation check to detect errors in the lamp or lamp circuit.
Check whether “L ERROR RESET”  indicates the lamp error detection was executed. After confirming that the lamp or lamp circuit is normal, reset the lamp error counter pushing “OK” in the R/C.
After resetting counter the label “***OK***” appears on Screen.
Reset standby cause error list
   After confirming that the lamp error counter has been erased, select “STAND BY CAUSE RESET” on point 3, of the adjustment process and select ON using the right cursor. For execute press “OK” in the R/C and the label “***OK***” appears on Screen.
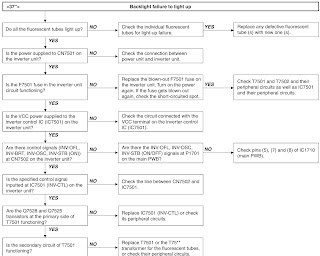
For 32” LCD TV:  Functional description
   This LCD color television has a function (lamp error detection) to be turned OFF automatically (Inverter unit) for safety when the lamp or lamp circuit is abnormal.
If the lamp or lamp circuit is abnormal, or some other errors happen, and the lamp error detection is executed, the following occur. The Inverter circuit stops but the rest of TV continues working. The power led is green.
Countermeasures
Proceed to repair the inverter unit to solve the problem that produces the lamp error.
Reset standby cause error list
For 32” this is not necessary because the lamp error detection is not operative by software.
HOW TO ENTER PUBLIC MODE
  • Turn on the power and enter in the Adjustment Process mode (ADJ1 or Service Mode) as usual.
  • In the [INIT], of Service, turns ON the Public Mode option.
  • Turn off TV by pressing Main Power switch.
  • While pressing “VOL+”and “P▲” keys at the same time, press Main Power switch for more than 2 seconds.
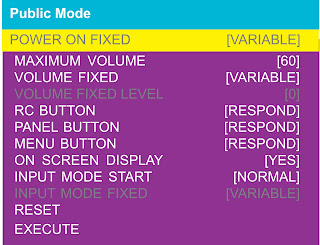
After this sequence the TV will turn on showing the Public Mode setting screen as follows:
  • Is possible to select each item of function by pressing cursor UP/DOWN keys on the remote control or CH / keys on the LCD TV.
  • The setting position of each item of functions is made by pressing cursor RIGHT/LEFT keys on the remote control or VOL(+)(-) keys on the LCD TV.
  • Select EXECUTE position after you set all function, and press cursor RIGHT/LEFT keys on the remote control or VOL(+)/(-) keys on the LCD TV for confirmation.
Public Mode Settings.
  • POWER ON FIXED [VARIABLE / FIXED].  When it is set to “FIXED” the TV is impossible to be switch off by Main Switch or Remote Control.
  • MAXIMUM VOLUME [0  => 60].  Is possible to set the maximum volume at limited level.
  • VOLUME FIXED [VARIABLE / FIXED].  Is possible to fix the sound volume at limited level. When “FIXED” is selected the sound volume before limited is fixed.
  • VOLUME FIXED LEVEL [0  => 60].  If “FIXED” has been selected, is possible to set a fixed volume at the level that is chosen.
  • RC BUTTON [RESPOND / NO RESPOND].  If “NO RESPOND” is selected, the remote control keys are inoperative.
  • PANEL BUTTON [RESPOND / NO RESPOND].  If “NO RESPOND” has been selected, the set’s keys remain deactivated (Except POWER key).
  • MENU BUTTON [RESPOND / NO RESPOND].  If “NO RESPOND” has been selected, “MENU” key, of remote control, is inoperative.
  • ON SCREEN DISPLAY [YES /NO].  If “NO” has been selected, the On Screen Display does not appear.
  • INPUT MODE START [ NORMAL=>TV (X) =>INPUT1 => INPUT2 => INPUT3 => INPUT4 =>INPUT5 à Toggles]. When any other item than “NORMAL” has been selected, the sets will start in a selected input mode at the next power-on.
  • INPUT MODE FIXED [VARIABLE /FIXED].  If “FIXED” has been selected, any channels and input modes other than those selected at the start mode cannot be picked up.
  • RESET:  Cancel all Public Mode settings. (It returns to the factory settings)
  • EXECUTE:  Select this item, and press cursor RIGHT/LEFT keys on the remote control or VOL(+)/(-) keys on the LCD TV for confirmation the functions settings.

LC-32GA8 – LC-32BV8 – LC-37GA8 – LC-37BV8 - SHARP LCD TV - RS-232C METHOD - SOFTWARE UPDATE PROCEDURE

$
0
0

SOFTWARE UPDATE
There are 3 methods to update software in the VCTp: I2C method, RS-232C HyperTerminal and RS-232C Tera Term method.
RS-232C method is allowed when the TV is working properly and the action should be only software upgrade.
I2C method is required when the VCTp flash is empty or corrupted (it means, any software inside IC running).
RS-232C Method Description (HyperTerminal).
The hardware tools requirement are:
  • A Modem-null (Cross type) DB9 female to DB9 female cable.
  • An adaptor DB9 male to mini-Din 9 pin male cable (Sharp Code: QCNWGA015WJPZ)
  • Make the connections as indicated in the figure:

Before using RS-232C updating method is necessary to configure a Terminal PC software. HyperTerminal has been selected as a Terminal software because it’s include in all Windows versions as an accessory, and you can find it inside “Accessories\Communications” folder. For this reason, please follow carefully the next steps:
  • First time HyperTerminal is used, it’s necessary to configure some settings. Follows next action to configure two connection: low speed (9600bps) and high speed (115200bps).
  • Create a New Connection file with name “P55_9600bps”.
  • Select a free COM port and select the Port Settings properties as follows:
  • Click on “File\Properties” menu for selecting the General and ASCII properties as follows:
  • Select “New Connection” in the File Menu.
  • Answer “Yes” to close current connection and “Yes” to save session “P55_9600bps”.
  • Create a new connection with the name “P55_115200bps”.
  • Select a the same COM port used in item 2 and select the Port Settings properties as follows
  • Select the same General and ASCII properties as item 3.
  • Close HyperTerminal session, answering  “Yes” to close current connection and  “Yes” to save session “P55_115200bps”.
  • To start updating session, click over “P55_9600bps” icon that you can find in the “START\All programs\Accessories\Communications\HyperTerminal\HyperTerminal” folder and follow next procedure:
  • Check the connection between TV set and PC, sending a wrong command, as for example: “aaa”. TV set returns an “ERR” label as an syntaxes ERROR (Not correct order or sequence).

  • Send the command “DWMD” to enter TV set in Download Mode. The TV set answer sending same symbol continuously. If this symbol character doesn’t appear, don’t worry and pass to next step.
  • Close this connection and open “P55_115200bps” connection clicking over the “P55_115200bps” that you can find in “START\All programs\Accessories\ Communications\HyperTerminal\HyperTerminal” folder.
  • Using “Transfer\Send file…” menu, select desired file (.bin format) and the transmission protocol (Xmodem) as show below:

  • After press “Send” button the updating process starts as follows:
  • When flash update process finishes, the “Flash Programming Complete” label appears in the screen.

VERY IMPORTANT: During the updating time, please don’t use the PC for other purposes, in order to abolish communication problems between TV set and PC. If TV set was not updated properly, the TV won’t have the software to start-up again, and you must follow the “I2C method” to update another time the TV set.

HOW TO TROUBLESHOOT - No Picture -No Sound - Back-light Failure - LCD failure - SHARP - LC-32GA8 – LC-32BV8 – LC-37GA8 – LC-37BV8 - LCD TV - Troubleshooting Flowchart

$
0
0

TROUBLESHOOT
POWER SUPPLY CHECK
CLICK ON TABLES TO ZOOM IN
NO SOUND
NO PICTURE
BACK-LIGHT FAILURE
LCD FAILURE

Viewing all 2033 articles
Browse latest View live