REMOVE KEYBOARD – ACER ASPIRE 7000 – 9300 – 7510 TravelMate _
Password Bypassing & BIOS Recovery
For RD and CSD to debug easily, AS7000/9300 &TM7510provides one hardware PIN pad for bypassing Password Check, and one Hotkey to enable BIOS Recovery.
1. PIN pad: To short PIN pad to bypass password check.
2. Hotkey to enable BIOS Recovery: Fn+ESC, then Power Button, AC+DC coexistence is strongly recommended.
Bypassing Password Check :: If the user has set Password ( power-on or setup password) for security reason, BIOS will check password during POST or when entering the BIOS setup menu. However, if it is necessary to ignore the password check, the user may enable short PIN Pad to bypass password check.
BIOS Recovery :: Boot Block is a special block of BIOS. It is used to boot up the system with minimum BIOS initialization. The user can enable this feature to restore the BIOS to a successful one if previous BIOS flashing process fails.
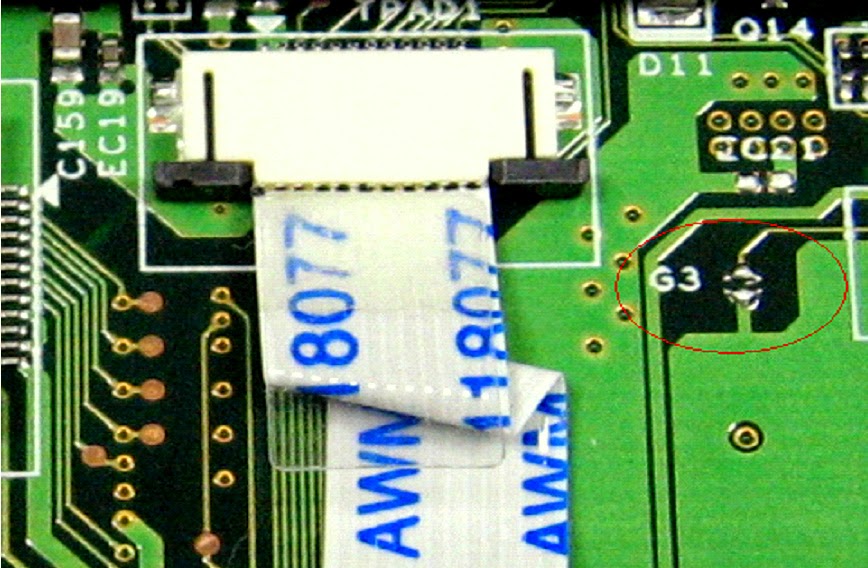
PIN pad Location :: AS7000/9300 & TM7510 provides one hardware Pin pad under the keyboard. RD/CSD can enable this function by shorting this pad. The Pin Pad location should look as the figure.
PIN Pad :: Bypassing Password Check, Keep shorting G3 (2 triangle pad) as above PIN pad and then powering on the system will force the BIOS to clear Supervisor and User passwords. That means both the power-on and setup passwords are all cleared.
HDD password clean: It uses on DOS environment. To decode HDD password error code for unlock hard disk.
A\> unlock6 XXXX 00
XXXX -HDD password error code
Unlock6.exe v1.1 2 May 2003
Choice what kind of the password to be generated:
0) Exit
1) Scan code
2) Upper case ASCII Code
3) Lower case ASCII Code
Enter your choice 2 <- chose 2
XXXXXX
XXXXXX
XXXXXX
Those passwords are master password.
Restore BIOS by the Crisis Disk
Enter this function by Fn+ESC, and Power Button. To use this function, it is strongly recommended to have the coexistence of AC and Batter powers. If this function is enabled, the system will force the BIOS to enter a special BIOS block, called Bootblock. RD/CSD can use this special BIOS code to recover the BIOS to a successful one if previous BIOS flashing process fails. However, before doing this, one Crisis Disk should be prepared in WinXP. Detailed steps are as the followings,
1 Prepare the Crisis Disk in WinXP (Crisis Disk will be released when BIOS V1.00 is released)
2 Insert the Crisis Disk to a USB floppy drive which is attached to the failed machine.
3 On the power-off state, press Fn+ESC and press button. The system should be powered on with Crisis Recovery process.
4 BootBlock BIOS starts to restore the failed BIOS code. Short beeps should be heard when flashing.
5 If the flashing process is finished, a long beep should be heard.
# Power down the system when Step 3.5 is finished.
If the crisis recovery process is finished, the system should be powered on with successful BIOS.
RD/CSD can then update the BIOS to a workable on by regular BIOS flashing process.
Intermittent Problems
Intermittent system hang problems can be caused by a variety of reasons that have nothing to do with a hardware defect, such as cosmic radiation, electrostatic discharge, or software errors. FRU replacement should be considered only when a recurring problem exists. When analyzing an intermittent problems, follow the procedures below
1. Run the advanced diagnostic test for the system board in loop mode at least 10 times.
2. If no error is detected, do not replace any FRU.
3. If any error is detected, replace the FRU. Rerun the test to verify that there are no more errors.
Removing the Keyboard
1. Open the notebook as shown.
2. Remove the middle cover. Though it is combined tightly, detach it from the main unit carefully. Do not pull it abruptly.
3. There are four latches securing the keyboard.
4. Push those latches by the screw driver as shown and the keyboard will pop up a little.
5. Remove the keyboard and reverse it.
6. Carefully pull the keyboard FFC lock, and then disconnect the keyboard FFC.


