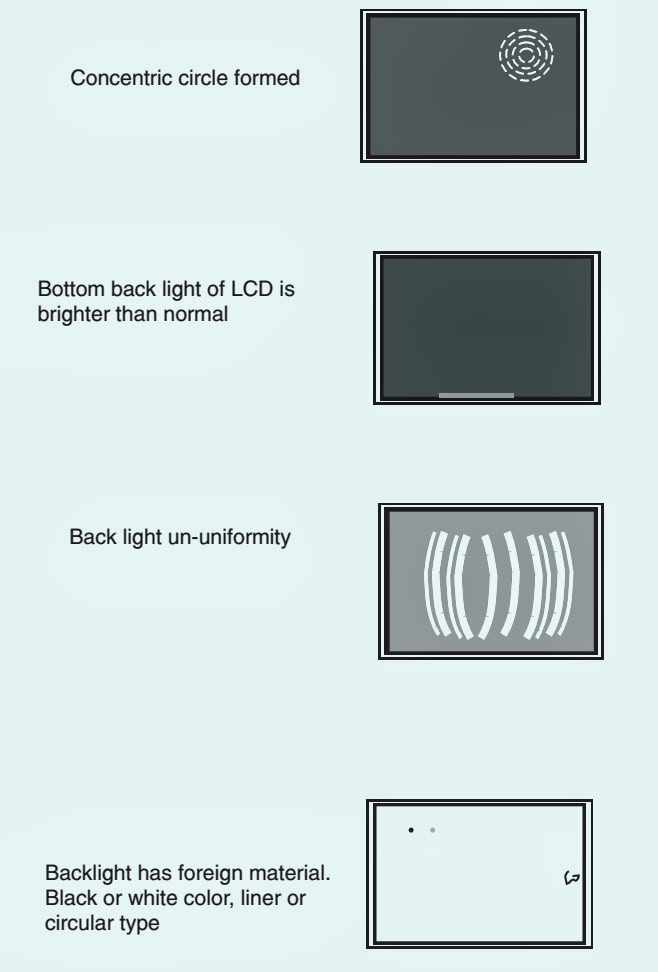
↧
PHILIPS 32PFL3507 - 42PFL3507 - POWER SUPPLY [SMPS] SCHEMATIC (Circuit Diagram)
↧
SERVICE MODE - ERROR CODES - LED BLINKING CODES - PHILIPS 32PFL3507-37PFL3507-42PFL3507 - LCD TVs
SERVICE MODE
How to Activate SDM [Service Default Mode]
To activate SDM, use the following methods:
• Press the following key sequence on the RC transmitter: “062596”, directly followed by the “Home” button. After activating this mode, “SDM” will appear in the upper left corner of the screen.
How to Exit SDM
• Switch the set to Stand-by by pressing the standby button on the remote control transmitter or on the television set.
• Via a standard customer RC-transmitter: key in “00”-sequence.
Note: If the TV is switched “off” by a power interrupt while in SDM, the TV will show up in the last status of SDM menu as soon as the power is supplied again. The error buffer will not be cleared.
How to Activate SAM [Service Alignment Mode]
To activate SAM, use one of the following methods:
• Press the following key sequence on the remote control transmitter: “062596”, directly followed by the “INFO” button. Do not allow the display to time out between entries while keying the sequence.
• Or via ComPair.
After entering SAM, the following items are displayed, with “SAM” in the upper right corner of the screen to indicate that the television is in Service Alignment Mode
How to Store SAM Settings
To store the settings changed in SAM mode (except the RGB Align settings), leave the top level SAM menu by using the POWER button on the remote control transmitter or the television set. The mentioned exceptions must be stored separately via the STORE button.
How to Exit SAM
Use one of the following methods:
• Switch the set to STANDBY by pressing the mains button on the remote control transmitter or the television set.
• Via a standard RC-transmitter, key in “00” sequence.
The Blinking LED Procedure.
The software is capable of identifying different kinds of errors. Because it is possible that more than one error can occur over time, an error buffer is available, which is capable of storing the last five errors that occurred. This is useful if the OSD is not working properly. Errors can also be displayed by the blinking LED procedure. The method is to repeatedly let the front LED pulse with as many pulses as the error code number, followed by a period of 1.5 seconds in which the LED is “off”. Then this sequence is repeated.
Example (1): error code 4 will result in four times the sequence LED “on” for 0.25 seconds / LED “off” for 0.25 seconds. After this sequence, the LED will be “off” for 1.5 seconds. Any RC command terminates the sequence. Error code LED blinking is in red color.
Example (2): the content of the error buffer is “12 9 6 0 0” After entering SDM, the following occurs.
• 1 long blink of 5 seconds to start the sequence.
• 12 short blinks followed by a pause of 1.5 seconds.
• 9 short blinks followed by a pause of 1.5 seconds.
• 6 short blinks followed by a pause of 1.5 seconds.
• 1 long blink of 1.5 seconds to finish the sequence.
• The sequence starts again with 12 short blinks
Additionally, the entire error buffer is displayed when Service Mode “SDM” is entered.
ERROR CODES
Error codes are required to indicate failures in the TV set. In principle a unique error code is available for every:
• Activated (SW) protection.
•Failing I2C device.
• General I2C error.
The last five errors, stored in the NVM, are shown in the Service menu’s. This is called the error buffer. Theerror code buffer contains all errors detected since the last time the buffer was erased. The buffer is written from left to right. When an error occurs that is not yet in the error code buffer, it is displayed at the left side and all other errors shift one position to the right. An error will be added to the buffer if this error differs from any error in the buffer. The last found error is displayed on the left. An error with a designated error code never leads to a deadlock situation. It must always be diagnosable (e.g. error buffer via OSD or blinking LED or via ComPair). In case a failure identified by an error code automatically results in other error codes (cause and effect), only the error code of the MAIN failure is displayed.
How to Read the Error Buffer
You can read the error buffer in three ways:
• On screen via the SAM/SDM/CSM (if you have a picture).
Example:
– ERROR: 000 000 000 000 000: No errors detected
– ERROR: 013 000 000 000 000: Error code 13 is the last and only detected error
– ERROR: 034 013 000 000 000: Error code 13 was detected first and error code 34 is the last detected (newest) error.
• Via the blinking LED procedure (when you have no picture).
Option Settings
The microprocessor communicates with a large number of I2C ICs in the set. To ensure good communication and to make digital diagnosis possible, the microprocessor has to know which ICs to address. The presence / absence of these MT5366 ICs is made known by the option codes.
After changing the option(s), save them by pressing the OK button on the RC before the cursor is moved to the left, select STORE and press OK on the RC.
The new option setting is only active after the TV is switched “off” / “stand-by” and “on” again with the mains switch (the NVM is then read again).
Option Code Overview
Enter SAM mode to check the option codes. They could not be edited in the NVM.
Display Code Overview
Press the following key sequence on a standard RC transmitter: “062598” directly followed by MENU and “xxx”, where “xxx” is a 3 digit decimal value of the panel type: see column “Display Code” in Table. After resetting the Display Code, restart the set immediately.
Display code overview Table
Reset of Repaired SSB
A very important issue towards a repaired SSB from a Service repair shop (SSB repair on component level) implies the reset of the NVM on the SSB. A repaired SSB in Service should get the service Set type “00PF0000000000” and Production code “00000000000000”. Also the virgin bit is to be set. To set all this, you can use the ComPair tool or use the “NVMeditor” and “Dealer options” items in SAM (do not forget to “store”).
After a repaired SSB has been mounted in the set (set repair on board level), the type number (CTN) and production code of the TV has to be set according to the type plate of the set. For this, you can use the NVM editor in SAM. The loading of the CTN and production code can also be done via ComPair (Model number programming).
In case of a display replacement, reset the “Operation hours display” to “0”, or to the operation hours of the replacement display.
SSB Indentification
SSB’s of this chassis are identified by a “715” code on the SSB. 715Axxxx-Nnn-MMM-OOOO
• 715main category, Printed Wiring Board
• Axxxxsub category, sequential coding number
• NnnVersion code
• NDevelopment number
• nnProduction number
• MMMMounting variation code
• OOOOOptional variation code
Make sure when replacing an SSB the SSB identification codes match the replacement board.
↧
↧
PHILIPS 107S2 CM2300 – 17 INCH AUTO-SCAN COLOR MONITOR - POWER SUPPLY [SMPS] SCHEMATIC [Circuit Diagram] - DISASSEMBLE PROCEDURE
SMPS SCHEMATIC
DISASSEMBLY
Rear Cover Removal
Remove right and left lib on the back cover
Open 4 lids with "-" type screwdriver.
Remove 4 screws at the bottom cabinet with "+" type screwdriver,
Remove out back cover.Video Panel Removal
Cutoff all wire cable ties
Remove GRD wire between video shield and CRT rack.
Remove 1 screw between mains board rack and video shield
cutoff 1 cable tie on LOT wire
Remove GRD wire (1604)from video PCB to CRT rack.Main Panel Removal
Disconnect the degaussing coil (1113) from Main panel.
Remove the video panel from CRT.
Remove the "screw" of I/F cable from Main panel.
Disconnect the CRT ground "M312" from Video panel.
Disconnect the Hi-Pot cap from CRT.
Disconnect yoke wire from "M401".
Disconnect concellation connector(1402).
Slide the main panel out of bottom tray.
Connect yoke wire to "M401".
Connect concellation connector(1402).".
Place Main panel in service position as shown in Fig.1.
Mount Video panel again on CRT.
To connect Hi-Pot cap again.
To connect "M312" again.
CLICK ON THE PICTURES TO MAGNIFY
↧
HP & PHILIPS L1730R - 17 INCH LCD COLOR MONITOR - SCHEMATIC - POWER - BACK-LIGHT
↧
HP L1730R - 17 INCH LCD MONITOR - SERVICE MODE - PANEL DEFECTS
SERVICE MODE [FACTORY MODE]
Turn OFF the monitor.
[Push "Menu"& "Plus" buttons at the same time and hold it] + [press 'Power" button until comes out "Windows screen"] => then release all buttons.
Press "Menu" button bring up factory mode indication as shown below.
PANEL DEFECTS
Failure mode of LCD panel.
It is not necessary to repair circuit board. Simply replace LCD panel.CLICK ON THE PICTURES TO MAGNIFY
↧
↧
AOC 2216SA - 22 INCH LCD MONITOR SCHEMATIC - POWER - BACK-LIGHT INVERTER
↧
SONY SDM-N50 - LCD MONITOR SCHEMATIC - POWER AND INVERTER - LED BLINKING CODES
SMPS SCHEMATIC
SMPS PWB_PRINT SIDE
BACK-LIGHT INVERTER_SCHEMATIC
SMPS PWB_PRINT SIDE
BACK-LIGHT INVERTER_SCHEMATIC
CLICK ON THE PICTURES TO MAGNIFY
SELF DIAGNOSISThis monitor is equipped with a self-diagnosis function. If there is a problem with your monitor or computer (s), the screen will go blank and the (power) indicator will either light up green or flash orange. If the (power) indicator is lit in orange, the computer is in power saving mode. Try pressing any key on the keyboard or moving the mouse.
If the (power) indicator is green
1 Turn off the AC power switch and disconnect the video signal cables from the INPUT1 and INPUT2 connectors of the media engine.
2 Press the AC power switch twice to turn the monitor off and then on. If all four color bars appear (white, red, green, blue), the monitor is working properly. Reconnect the video input cables and check the condition of your computer(s).
If the color bars do not appear, there is a potential monitor failure. Inform your authorized Sony dealer of the monitor’s condition.
If the (power) indicator is flashing orange
Press the (power) switch twice to turn the monitor off and then on.
If the (power) indicator lights up green, the monitor is working properly.
If the (power) indicator is still flashing, there is a potential monitor failure. Count the number of seconds between orange flashes of the (power) indicator and inform your authorized Sony dealer of the monitor’s condition. Be sure to note the model name and serial number of your monitor. Also note the make and model of your computer and graphic board.↧
TV POWER SUPPLY - [SMPS] SCHEMATIC - USING STRW6756
↧
VINCENT SV-382SCLR - SURROUND SOUND AMPLIFIER - SCHEMATIC (Circuit Diagram)
↧
↧
PHILIPS 14PT218A - 20PT228A - 20PT428A - 20PT528A - SCHEMATIC - Power (SMPS) - Video Output - Horizontal Output
↧
VIEWSONIC VA2012w - LCD MONITOR - HOW TO DISASSEMBLE
DISASSEMBLY
CLICK ON THE PICTURES TO MAGNIFY
The LCD module is designed so that the CCFL in it is supplied by a Limited Current Circuit(IEC60950 or UL1950). Do not connect the CCFL to hazardous Voltage Circuit.
Panel Source Identify
(1) ID label - The panel code “Q” for QDI panel and “T” for Hannstar panel should be shown on the lower right side of ID label.
(2) UPC label - The panel code “Q” for QDI panel and “T” for Hannstar panel should be shown on the lower right side of UPC label.
(3) Main board - The panel code “Q” for F/W version sticker or silkscreen should show QDI panel and “T” for Hannstar panel on the main board.
The MB board is a two-layer, single-landed. 12V DC power from the power adapter enters the board through connector CN6. Other connectors on the board are for audio speaker and button board .The VGA cable is a signal cable that contains video signal, sync signal and DDC signal from PC VGA adapter. This system board consists of 4 functional areas: flat panel controller, flash ROM, power regulator and Audio amplifier.
Flat panel controller… NT68563HF (IC2)
The heart of the system board is the scalar chip of NT68563HF. The scaler is a highly integrated flat panel display controller that interfaces analog, digital, and video inputs. It combines a triple ADC, a DVI compliant TMDS receiver, a multi-color on screen display (OSD) controller and many other functions in a single chip. It provides user a simple, flexible and cost-effective solution for various flat panel display products. The NT68563HF operates at frequencies up to 205MHz (analog only), suitable for LCD monitor up to UXGA resolution. The NT68563HF also build-in noise reduction function to provide more stable video quality, spread spectrum to provide low EMI solution, sRGB for video color space convert, post pattern for manufacture test.↧
PHILCO PH32M4 - LCD TV - SCHEMATIC - MAIN POWER SUPPLY [SMPS] (Circuit Diagram)
↧
PHILCO PL3217 - LCD TV - SMPS [MAIN POWER SUPPLY] - SCHEMATIC (Circuit Diagram)
↧
↧
NORDMENDE N2121 - VIDEOCON N2121 - SCHEMATIC [Circuit Diagram]
↧
AKAI PDP-4206EM - PLASMA TV - SCHEMATIC - POWER [SMPS] Circuit Diagram
↧
PHILIPS CTVs - MODEL - CHASSIS - LOT [Line Output Transformer - part Numbers]
MODEL | CHASSIS | IC USED | LOT NUMBER |
20GR1055 | GR1AXLA | TMP47C634N-R442 | 4822 140 10369 |
20GR1355 | GR1AXLA | TMP47C634N-R442 | 4822 140 10369 |
20GR1356 | GR1AXLA | TMP47C634N-R442 | 4822 140 10369 |
20GX1550/77 | ANUBIS S | PCA84C844P/151 V2.9 | 4822 146 21814 |
20GX1555/77 | ANUBIS S CC | P83C055BBP/155 V3.6 | 4822 146 21814 |
20GX1850/77 | ANUBIS S | PCA84C844P/151 V2.9 | 4822 146 21814 |
20GX1855/77 | ANUBIS S CC | P83C055BBP/155 V3.6 | 4822 146 21814 |
20GX8550/77 | ANUBIS S DD | PCA84C844/214 V1.9 | 4822 140 10525 |
20GX8558/77 | ANUBIS S DD | PCA84C844/214 V1.9 | 4822 140 10525 |
20PT138 | L7.1A | P83C055BBP/188 | 4822 140 10612 |
20PT148 | L7.1 AV/ FRENTE | P83C055BBP/188 | 4822 140 10612 |
20PT224B/77B | L9.2A MONO 2PARL. | SAA5543PS/M4/1073 V1.1 | 3128 138 20661 |
20PT2381/77B | L7.1A 2PARL. | P83C055BBP/188 | 4822 140 10612 |
20PT2682/77B | L7.2A | P83C566BDR/017 | 4822 140 10634 |
20PT2822/77B | L7.2 C/CLOSED CAPTION | P83C570AAR/039 | 4822 140 10634 |
20PT324B/77B | L9.2A MONO ECONOMICO | SAA5543PS/M4/1073 V1.1 | 3128 138 20661 |
20PT334A/77B | L9.2A MONO 2 PARLANTES | SAA5543PS/M4/1073 V1.1 | 3128 138 20671 |
20PT324A/PL | L9.2A MONO 1PARLANTE | SAA5543PS/M4/1073 V1.1 | 3128 138 20661 |
20PT328B/77R | L01.2L PAL B x AV | TDA9580H/N1/3/0573 Y V2.0 | 3128 138 20662 |
20PT424A/77B | L9.2A MONO 2PARLANTES | SAA5543PS/M4/1073 V1.1 | 3128 138 20661 |
20PT424A/PL | L9.2A MONO 2PARL. BRASIL | SAA5543PS/M4/1073 V1.1 | 3128 138 20661 |
20PT424A/77B | SAA5543PS/M4/1073 V1.1 | 3128 138 20661 | |
20PT428A/77R | L01.2L PAL B x AV | TDA9580H/N1/3/0573 Y V2.0 | 3128 138 20662 |
20PT529A/77R | L01.2 2K2 | TDA9570H/N1/A/0814 Y | 3128 138 20662 |
20PT3331/77R | L03 | TDA9370PS/N2/AL/1382V1.3 | 2422 531 02598 |
20PT4331/77R | L03 | TDA9370PS/N2/AL/1382V1.7 | 2422 531 02598 |
20PT524A/77B | L9.2 ESTEREO PAL"B"xAV | SAA5543PS/M4/1073 V1.1 | 3128 138 20661 |
21GR1260 | GR1AXLA | TMP47C634N-R442 | 4822 140 10421 |
21GR1366 | GR1AXLA | TMP47C634N-R442 | 4822 140 10421 |
21GX1560/77B | ANUBIS S | PCA84C844P/151 V2.9 | 4822 146 21814 |
21GX1565/77B | ANUBIS S CC | P83C055BBP/155 V3.6 | 4822 146 21814 |
21GX1865/77B | ANUBIS S CC | P83C055BBP/155 V3.6 | 4822 146 21814 |
21PT128A | ANUBIS S DD | PCA84C844/214 V1.9 | 4822 140 10557 |
21PT1381 | CHAIS L7.1A | P83C055BBP/188 | 4822 140 10638 |
21PT2622 | L7.2A C/CLOSED CAPTION | P83C570AAR/039 | 4822 140 10637 |
21PT263 | PV4.0AA | TMP87CM36N-3415 | 4822 140 10569 |
21PT2682 | L7.2A | P83C566BDR/017 | 4822 140 10637 |
21PT334A/77B | L9.2A MONO 2PARLANTES | SAA5543PS/M4/1073 V1.1 | 3128 138 20671 |
21PT534A/77B | L9.2A ESTEREO PALBxAV | SAA5543PS/M4/1073 V1.1 | 3128 138 20671 |
21PT538A/77R | L01.2L PAL B x AV | TDA9580H/N1/3/0571 Y V2.0 | 3128 138 21321 |
21PT836A/77R | L9.1A BRASIL FLAT | SAA5543PS/M4/183 V1.3 | 4822 219 10771 |
21PT838A/77R | L01.1L REAL FLAT | TDA9583H/N1/3/575 Y V2.0 | 3128 138 21391 |
21PT839B/77R | L01.2 2K2 | TDA9570/N1/A/0816 | 2422 531 02519 |
21PT5432/77R | L01.1LAC-2K3 | TDA9570H/N1/AL/1012Y | 2422 531 02519 |
25GX1882/77T | ANUBIS BB 2PARLANTES | P83C055BBP/155 V3.6 | 4822 140 10511 |
CON REFORMA | |||
25PT4622 | L7.3A (µPV1) | P83C570AAR/038 | 4822 146 10961 |
L7.3A (µPV2) | LLS-LATAM V1.0 | ||
25PT463A/77B | PV4 para 25" | TMP87CM36N-3415 | 4822 140 10583 |
25PT544A/77B | L9.1A ESTEREO 10W | SAA5543PS/M4/1073 V1.1 | 4822 140 10667 |
25PT548A/77R | L01.1L PAL B x AV | TDA9583H/N1/3/575 Y V2.0 | 3128 138 21341 |
25PT848A/77R | L01.1L REAL FLAT | TDA9583H/N1/3/575 Y | 3128 138 21391 |
25PT848A/PL | L01.1L REAL FLAT BRASIL | TDA9583H/N1/3/575 Y V2.0 | 3128 138 21391 |
25PT5531/77R | L01.1LAC-2K3 | TDA9583 L3LLS3-64K | 2422 531 02471 |
25PT5541 | L04 | ||
28MK2490 | MK2 | TMP47C634N-R467 | 4822 140 10431 |
28PW858A/77R | A10 REAL FLAT D-WIDE | PLACA SSB | 2422 531 98025 |
28PW6431/77R | L01.1LAC-2K3 | TDA9583H/NI/31/1164Y | 2422 531 02472 |
28PW6532/77R | L01.1LAC-2K3 | TDA99H/N1/41/1224V1.8 | 3128 138 21921 |
29GX1890 | ANUBIS S BRASIL 3PARL. | P83C055BBP/155 V3.6 | 4822 140 10506 |
29GX1892 | ANUBIS S BRASIL 2PARL. | P83C055BBP/155 V3.6 | 4822 140 10506 |
29PD860A/77R | A10+DVD ASD1 | PLACA SSB | 3128 138 21041 |
29PT461 | MD1.1 | TMP87C538N-3442 V4.5 | 4822 140 10565 |
29PT4622/77R | L7.3A (V1) | P83C570AAR/038 | 4822 146 10963 |
L7.3A (V2) | LLS-LATAM V1.0 | ||
29PT458A/77R | L01.1L PAL B x AV | TDA9580H/N1/3/0574 Y V1.9 | 3128 138 21391 |
29PT554A/77B | L9.1A ESTEREO | SAA5543PS/M4/1073 V1.1 | 4822 140 10666 |
29PT558A/77R | L01.1L PAL B x AV | TDA9580H/N1/3/0571 Y V2.0 | 3128 138 21391 |
29PT654A/77R | A8 BRASIL R. FLAT | P83C770AAR/46 | 4822 146 11046 |
29PT656A/77B | A10 R. FLAT S/PIP | PLACA SSB | 3128 138 21041 |
29PT658A/77R | L01.1L REAL FLAT PAL B x AV | TDA9583H/N1/3/0575 Y V2.0 | 3128 138 21411 |
29PT752A/77B | A8 C/PIP (µP V2) | P83C770AAR/46 | 4822 140 10649 |
A8 C/PIP (µP V1) | P83C770AAR/40 | ||
29PT854A/77R | A8 BRASIL R. FLAT | P83C770AAR/46 | 4822 146 11046 |
29PT856A/77B | A10 FLAT FULL M-LINK | PANEL SSB | 3128 138 21041 |
*** PANEL PIP *** | |||
29PT4631/77R | L01.1LAC-2K3 | TDA9570H/N1/AL/1012Y | 2422 531 02472 |
29PT5632/77R | L01.1LAC-2K3 | TDA9583H/N1/31/1164Y | 2422 531 02472 |
29PT5642/77 | LO4 | ||
29PD6932/77R | L01.1LAC-2K3+DVD | TDA9599H/N1/41 | 2422 531 02472 |
32PW878A/77R | A10 REAL FLAT D-WIDE | PLACA SSB | 2422 531 98025 |
32PD880A/77R | A10 REAL FLAT+DVD D-WIDE | SAA5645HL/M1 | 2422 531 98025 |
32PW6532/77R | L01.1LAC-2K3 | TDA9599H/N1/41/1165Y | 3128 138 21921 |
32PD6932/77R | L01.1LAC-2K3+DVD | TDA9599H/N1/41 | 3128 138 21921 |
33PT574A/77B | L9.1A BRASIL ESTEREO | SAA5543PS/M4 | 4822 140 10672 |
33PT578A/77R | L01.1L PAL B x AV | TDA9583H/N1/3/0575 Y V2.0 | 3128 138 21411 |
33PT772A/77B | CHASSIS A8 C/PIP (µP V2) | P83C770AAR/46 | 4822 146 11046 |
A8 C/PIP (µP V1) | P83C770AAR/40 | ||
37PT782A/77B | A8 BRASIL TRC PLANO | P83C770AAR/46 | 4806 140 17084 |
37PT786A/77B | A10 BRASIL TRC PLANO | PLACA SSB | 3128 138 21041 |
P83C770AAR/46
4806 140 17084
37PT786A/77B
A10 BRASIL TRC PLANO
PLACA SSB
3128 138 21041
↧
SMPS SCHEMATIC - TOSHIBA TV 2987 - USING STR - G8656
↧
↧
HOW TO ENTER SERVICE MODE - BLAUPUNKT W215 – LCD T.MSD309.8B - 40 INCH LCD TV
SERVICE MODE [FACTORY MODE]
Press Menu button, then press >1->1->4->7 in turn to enter the Factory Menu.
Press ▼/▲ button to select the item which you want to adjust then press OK button to enter, press ◄/ ► button to adjust.
Press EXIT button to exit Factory Menu.FACTORY SETTINGS
CLICK ON THE TABLES TO MAGNIFY
↧
AOC L32W351 - 32" LCD TV - POWER SUPPLY [SMPS] - SCHEMATIC (Circuit Diagram)
↧
APEX - AT 2408-S - CTV - SMPS [POWER SUPPLY] - SCHEMATIC [CIRCUIT DIAGRAM]
↧