Quantcast
Channel: Electro help
Viewing all 2033 articles
Browse latest View live

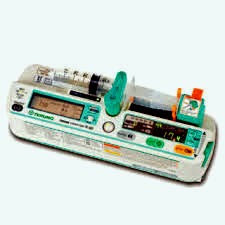
TERUMO TE331 - TE332 -Terufusion Syringe Pump - E2PROM INITIALIZE and AGING

$
0
0
TERUMO TE-331 – TE332 Terufusion Syringe Pump. How to initialize E2PROM.
Medical (Electronic)  Equipment.
E2PROM INITIALIZING
RAM data is erased and E2PROM is refreshed by ROM data [default data at factory].  This operation resets all the settings to the default.  Readjust required.
  1. Set the internal DIP switches 1 and 2 to ON and OFF respectively.
  2. While holding down the [STOP] switch, press the On/Off switch.  The display first shows “888.8”, then “FACt”, and a short beep follows.  Release the switches and check the display has changed to “”dIAg”; which stands for Diagnosis.  Note:  If you press the On/Off switch without pressing the Stop switch “Er91” appears on the 7 segment display.  Turn off the pump, and repeat the procedure above.  If you do not release the switches at the beep, the display changes to ‘Er 8”.  Once ‘Er 8’ appears, you have to turn off the pump, and repeat the procedure above.
  3. When “dIAg” is displayed, press the Display Select switch  3 times.  Check the display shows “CLEA” which stands for clear.
  4. Press ‘Stop ‘switch, and the display shows “E or J”.  E is for Europe, and J is for Japan.
  5. Press and hold 'PURGE’ switch about 1.5 seconds to choose ‘E for Europe’.
  6. Initialization of E2PROM starts.  The display changes to ‘Eur’.  As the initialization proceeds, first “      “, then “00     “,and “000“, lastly “0000” appears on the display.the switch for Japan is the Start.  If the Start switch is pressed, “JP” appears on the display.
  7. When successfully completed, can hear a short beep and see the display of “good”.
  8. In case of failure, “bAd” is displayed.  Then the display returns to “CLEA”.
  9. Press On/Off switch to Exit the initializing E2PROM mode.
Aging.
  1. Set the DIP switches 1 and 2 to On and Off, respectively.
  2. While holding the Stop switch, press On/Off switch.  The display first shows “888.8”, then “FACt” and a short beep follows.  Release the switches and check the display has changed to “dLAg” which stands for Diagnosis.  Note: If you press the On/Off switch without pressing the ‘Stop’ switch “Er91” appears on the 7 segment display.  Turn off the pump, and repeat the procedure above.  If you do not release the switches at the beep, the display changes to “Er 8”.  Once “Er 8” appears, you have to turn Off the pump and repeat the procedure above.
  3. When “dIAG” is displayed, press the Display Select switch 4times.  Check the display shows “Aging”, which stands for Aging.
  4. Press Start switch, and Aging starts.
  5. When completed, press the On/Off switch to Exit the Aging Mode.
The following actions should be recognized while aging is performed.
* Motor rotates [slider moves approximately 9mm/h].
* All LED elements connected flash at 1 Hz / 50% duty.
* While the motor is rotating the minimum purge sound comes out.
Attention You can stop aging at any time by pressing the ‘Stop’ switch, and start again by pressing the Start switch.
* The motor stops if occlusion is detected with the load on the slider at approx. 4606N=4.7kgf.

JBL MS-A5001 - SCHEMATIC - POWER AMPLIFIER and SMPS (Power Supply)

$
0
0
JBL Digital Signal Processing Amplifier - MS-A5001 - SMPS & Power Amplifier _ Schematic.
IRS20957STRPbF – IRF6645TRBPF – TL4941 – IRF3205
POWER AMP: SCHEMATIC
SMPS SCHEMATIC
CLICK ON THE SCHEMATICS TO ZOOM IN

PIONEER DDJ-ERGO-V_HOW TO ENTER SERVICE MODE - HOW TO DO A FACTORY RESET

$
0
0
Service Mode Entry & Factory Reset procedure_Pioneer DDJ ERGO V _ DJ Controller
SERVICE MODE
(1) How to Program for USB Controller copy mode
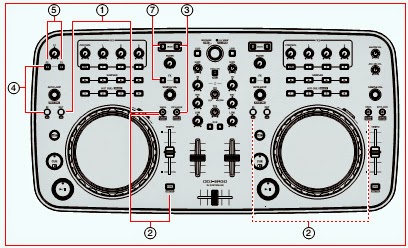
* While simultaneously holding the LOOP OUT and VINYL buttons on the Deck A/C side pressed, set the Power switch of the unit to ON.
* Data for the TUSB firmware in the MAIN_UCOM will be copied to the EEPROM.
* During copying, the FUNCTION LED is lit.
(2)Firmware Update
* Set the Power switch to ON without pressing any other buttons.
* Data for all areas in the ROM, excluding those for the boot area, will be rewritten. 
(3)Version of the Firmware Confirmation [with hardware alone]
* While simultaneously holding the DECK A and KEYLOCK buttons on the Deck A/C side pressed, set the Power switch of the unit to ON.
* The version number will be indicated with the LEDs on the controller, with no need for starting up any application.
(4) Service Mode
* While simultaneously holding the LOOP IN and F2 buttons on the Deck A/C side pressed, set the Power switch of the unit to ON.
* In this mode, you can check if each element on the controller can operate and each LED can light properly, with no need for starting up any application.
(5)JOG Load measurement modes.
* While simultaneously holding the F2 and F3 buttons on the Deck A/C side pressed, set the Power switch of the unit to ON.
* This mode is for judging if the load value for the JOG dial while it is being turned is OK.
(6)Point of sale demonstration modes.
Demonstrations with lighting of the LEDs (illumination) are automatically performed at shops even if no PC application is started.
This mode will be established if no reception via MIDI is performed for 1 minute after the controller is turned ON.
(7) Factory Reset (To return the settings to the factory default values)
* While simultaneously holding the DECK C and FX 1 buttons on the Deck A/C side pressed, set the  Power switch of the unit to ON.  The VINYL mode ON/OFF and Normal/Active mode are reset to the initial settings.
FACTORY RESET MODE [Details]
* To enter this mode, while simultaneously holding the DECK C and FX 1 buttons on the Deck A/C side pressed, set the Power switch of the unit to ON.  (Hold the two buttons pressed until the opening display terminates.)
* During Factory Reset mode, the VINYL LEDs on both sides are lit. 
* When you exit this mode, the LEDs go dark.
To check whether the initial settings are restored.
Checking VINYL ON/OFF
* After the unit is turned on and the opening illumination is finished, if the VINYL LED is lit, it is set to ON (OK).
Checking of Normal/Active Mode
Check the following, after starting the application on the connected PC.
* Load a piece of music onto any of the decks (Deck A, B, C, or D).
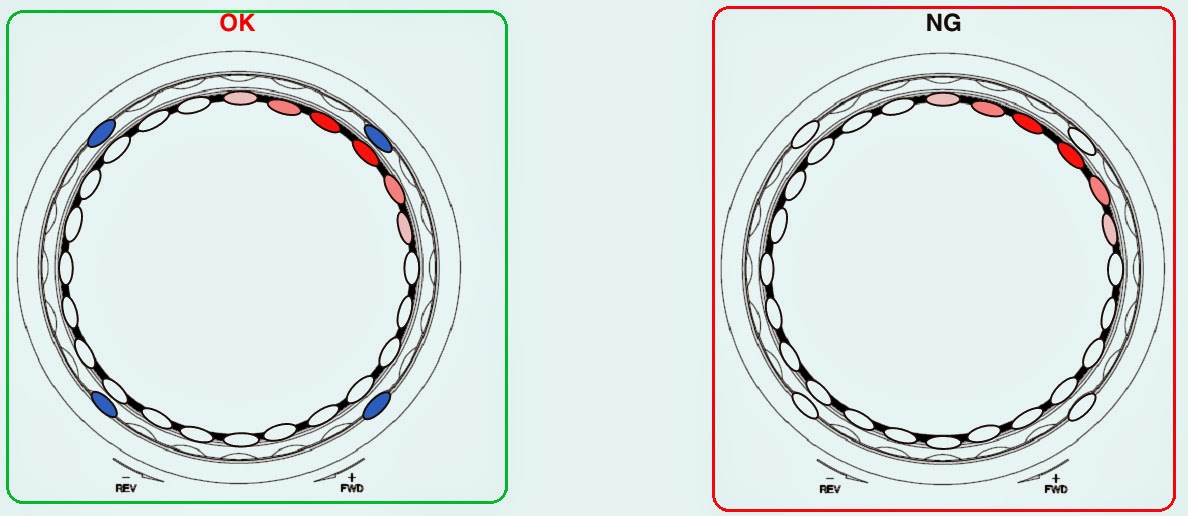
* Check that blue LEDs on the JOG dial are lit (Active mode)
Checking Method with the Controller Alone.
* Establish Version Confirmation mode, by turning the unit ON while simultaneously holding the DECK A and KEY-LOCK buttons on the A/C deck side pressed.
Checking VINYL ON/OFF
Check the same as described.
Checking of Normal/Active Mode
Check that blue LEDs on the JOG dial are lit (Active mode).  (LED indication is the same as described)

HOW TO UPDATE FIRMWARE - PIONEER DDJ-ERGO-V _ DJ Controller

$
0
0
Firmware Upgrade Procedure _ Pioneer DDJ-ERGO-V _ DJ Controller
FIRMWARE UPGRADE
The device which updates a firmware is MAINUCOM.
USB connection of the controller is made at PC/MAC, and it updates by performing the update program of exclusive use.
Download the zipped updater file for the latest firmware from Niis then execute the unzipped file on the PC.
The file-names for the updater are shown below.
Fielname
Windows: DDJ-ERGOvXXX.zip
Mac: DDJ-ERGOvXXX.dmg
Filename after the thawing
Windows: DDJ-ERGOUpdater_verXXX.exe
Mac: DDJ-ERGOUpdater_verXXX.app
Note: xxx is version number. If it is Ver1.00, it is DDJERGOv_100.zip/DDJERGOv_100.dmg
CAUTION: When you update, please terminate all DJ applications, such as VIRTUAL DJ
CLICK ON THE PICTURES TO MAGNIFY
* Starting/Selection of a language (English is chosen.)
* Check of a version (Click START)
* End.  (Click OK).  Controller is re-started automatically.
Confirming the Firmware Version (MAIN_UCOM) and confirming the Mode setting (VINYL mode and jog dials' illumination mode)
* To enter this mode, while simultaneously holding the DECK A and KEYLOCK buttons on the Deck A/C side pressed, set the Power switch of the unit to ON. (Hold the two buttons pressed until the opening display terminates.)
* The version number of the firmware (MAIN_UCOM) will be indicated with LED-lighting patterns that are switched every 3 seconds in integral part and decimal fraction part.
* In the blocks that are indicated with the red frames in the figures, the number of lit LEDs indicates the corresponding number.
1 Integral part of the version number (LEDs on DECK A lit)
[x. xx]
2 Decimal fraction part of the version number (LEDs on DECKs A and B lit)
[x . xx]
Numeric expressed with the number of lit LEDs
  In addition to the above-mentioned firmware-version indication, the setting statuses of VINYL mode and Illumination mode for the Jog dial are indicated with other LEDs.
For details, see the Factory Reset Mode; described by previous post here.

ERROR CODES - PIONEER DDJ-ERGO-V _ DJ Controller

$
0
0
Error Codes Display & Jog Dial Rotation Load Adjustments _ Pioneer DDJ-ERGO-V DJ Controller
ERROR CODES DISPLAY
  When abnormalities are detected during the time of carrying out power supply ON, or operation, it displays by LED.
How to Enter JOG Load Measurement Mode
* To enter this mode, while holding the F2 and F3 buttons on the Deck A/C side pressed, set the Power switch to ON.
* During this mode, the KEYLOCK LEDs on both sides are lit.  (Hold the two buttons pressed until the opening display terminates.)
* The load (light or heavy) on the JOG dial when it is turned can be objectively judged in this mode.
How to Measure
# When the JOG dial is rotated swiftly in this mode, the maximum speed and time required for slowdown, as defined below, are measured. When the maximum speed reaches 7 times normal speed or higher, time required for slowdown is calculated then evaluated as to whether or not it is within the specified range, then the result will be indicated by the LEDs.
# Either rotation direction, clockwise or counterclockwise, is okay.
Maximum speed
Maximum speed with normal speed defined as when one rotation takes 1.8sec
Time required for slowdown: Time required for the rotation speed to slow down from 3 times to 1.5 times normal speed.
To measure the time required for slowdown, the maximum speed must be 7 times normal speed or higher.
If the maximum speed does not reach 7.0 times normal speed, the JOG LEDs flash three times as a warning.
The number of measurements up to the fourth time is indicated by the LEDs.
First measurement finished: HOT CUE 1 lit
Second measurement finished: HOT CUE 2 lit
Third measurement finished: HOT CUE 3 lit
Fourth measurement finished: HOT CUE 4 lit
Judgment
After four measurements of time required for slowdown are finished, the mean value of the four measurement results is calculated and judged as to whether or not it is within the specified range. The result will be indicated with the LEDs.
The specified range is 100 ± 40 msec.
OK: VINYL lit
NG (lighter): LOOP OUT lit
NG (heavier): LOOP IN lit
The 5th time or subsequent measurement can be performed, but the number of times of measurement is not indicated with the LEDs. The mean value of the results of all the measurements is calculated, and its result will be indicated with the LEDs.
POWER-SAVING MODE
If a drop in voltage for VBUS power is detected, a power-saving mode will be automatically established, limiting the headphones maximum output level.
Two types of power-saving mode are provided, as shown below.
CLICK ON THE PICTURES TO ZOOM IN

PHILCO (PHILIPS) - PH32S86DG – LED LCD TV - POWER SUPPLY REGULATOR and AUDIO OUTPUT - SCHEMATIC

$
0
0


Power Supply Regulator Circuit & Audio Output circuit_ PHILCO [PHILIPS] PH32S86DG – LED LCD TV 

ICs used [TPA3020 (Audio Output) – D7537R (Power Control)
SMPS SCHEMATIC
AUDIO OUTPUT SCHEMATIC
CLICK ON THE SCHEMATICS TO MAGNIFY

SANYO PLASMA DISPLAY - PDP-42WV1AS - SERVICE MODE - BATTERY REPLACEMENT

$
0
0
How to Enter and Exit the Service Mode _ Sanyo Plasma Display _ PLASMA MONITOR PDP-42WV1_PDP-42WV1S (EUROPE, ASIA)
PDP42WV1A_ PDP-42WV1AS (U.S.A.)
SERVICE MODE
CAUTION
The each circuit has been made by the fine adjustment at factory. Do not attempt to adjust the following adjustments except requiring the readjustments in servicing otherwise it may cause loss of performance and product safety.
Before Adjustment
This adjustment is done to enter Service Mode by Remote Control Unit.
Quick operation is needed to enter Service Mode.
(1) Turn the monitor on.
(2) Press and hold the MENU button on the monitor.
(3) Keep item (2) and press the STATUS button and release the both buttons.
(4) Within 2 seconds after item (3), press the MUTE button to appear the Service Mode Display.
To return to the Normal Mode
Once turn the Monitor off by pressing “POWER” button on the monitor or remote control unit and turn it on again.
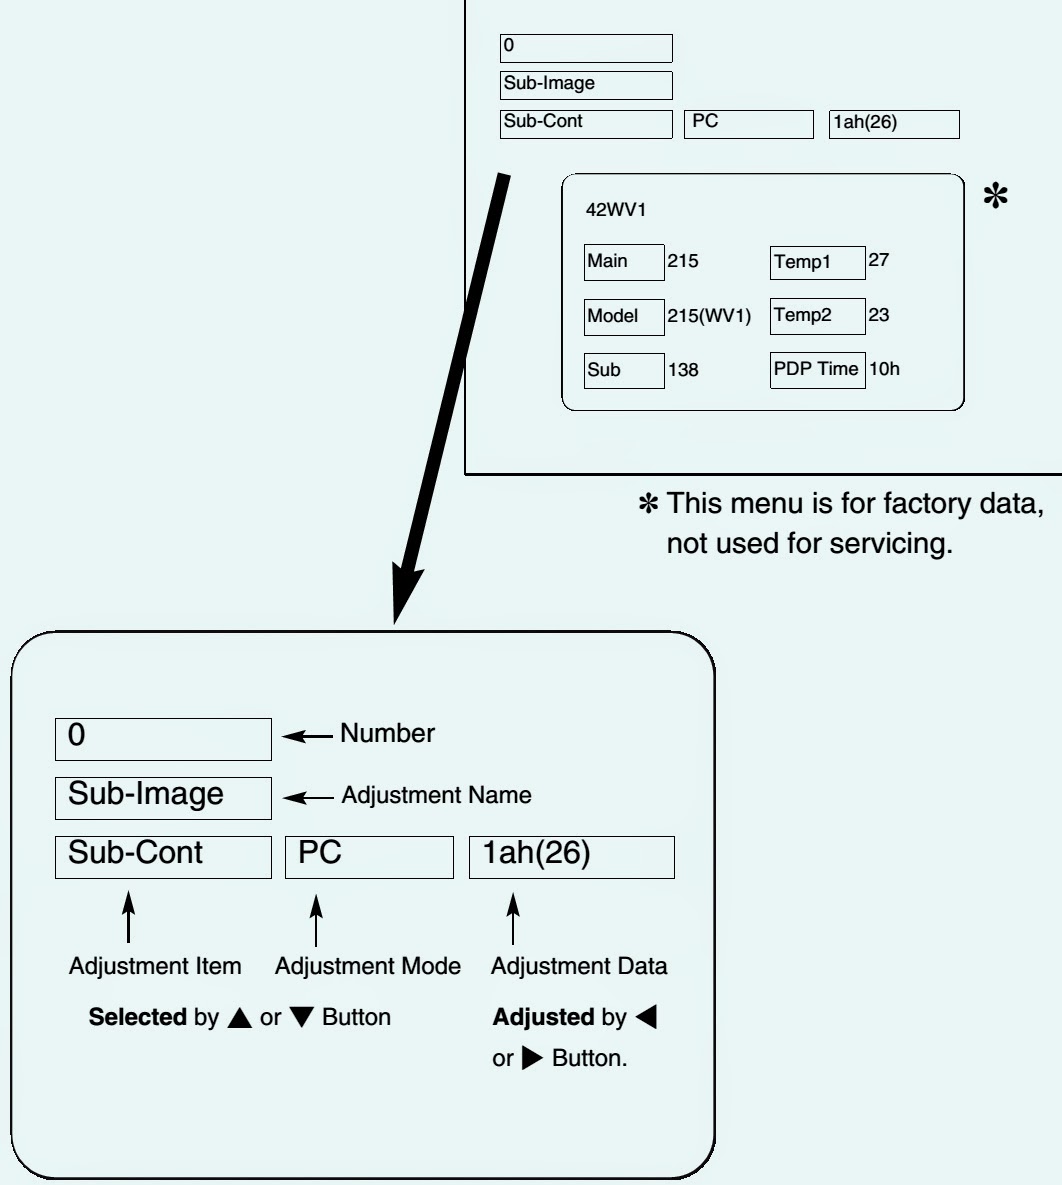
SERVICE MODE DISPLAY
To adjust
* To select adjustment item, press ▲/▼ button on the remote control unit.
* To adjust data, press ◄/► button on the remote control unit.
* Select adjustment item by button.
* Adjustment item is displayed in order. To reverse adjustment item, press button.
* Adjust the data by ◄/►button.
To exit the Service Mode.
To exit the service mode, press POWER ONOFF button on the monitor or remote control unit.
[The all data adjusted in service mode memorizes into non-volatile memory IC.]
BATTERY REPLACEMENT
Plasma Monitor is used a battery for Clock Function. {Danger of explosion if battery is incorrectly replaced.  Replace only with the same or equivalent type.}
The battery is fixed to Main Board with Battery Holder.
* Remove the battery from battery holder to bent hooks slightly.
* Mount a new battery by correct polarity and bent hooks back.
Parts No.: 645 059 8302
Chassis No. PDP-42WV1-00 (PDP-42WV1)
Chassis No. PDP-42WV1S-00 (PDP-42WV1S)
Chassis No. J3T-42WV1A00 (PDP-42WV1A)
Chassis No. J3T-42WV1AS00 (PDP-42WV1AS


SHARP -32LE240M - LC-32LE340M - SERVICE MODE - FACTORY SETTING - HOTEL MODE

$
0
0
LC32LE240M - LC 32LE340M
Factory setting
AC power is plug off after shipment setting is done.
CAUTION: Do not plug on again after shipment setting is done. If do, please re-do the shipment setting. Do not off with remote control.
[Do inspection for LC-32LE240M/340M (for Philippines) using NTSC signal.]
PUBLIC MODE SETTING PROCEDURE
There are the following two ways to get the public mode setup screen displayed.
1) Press the “INPUT” and “VOL (+)” keys on the set at once and turn on the power.
2) Get the password input screen displayed.
Procedure
*   The input starts with the leftmost digit.
*   Use the numeric keys [1] thru [9] and [10/0] keys on the remote controller.
The other keys are not acceptable.
With a numeric-key input, “–” will change to “*”. The input position will move one digit to the right.
With all the 3 digits entered, the password will be verified.
3) The 3-digit password is now verified.
The password [0] [2] [7] provides for the public mode screen. (This screen comes on with whatever adjustment process settings.)  With any other passwords, the screen changes to the normal mode.
Second Method
In the adjustment process mode, turn on “PUBLIC MODE”. Also press the “CH (^)” and “VOL (+)” keys on the set at once and turn on the power.
How to Exit Public Mode
There are the following ways to quit the public mode setup screen.
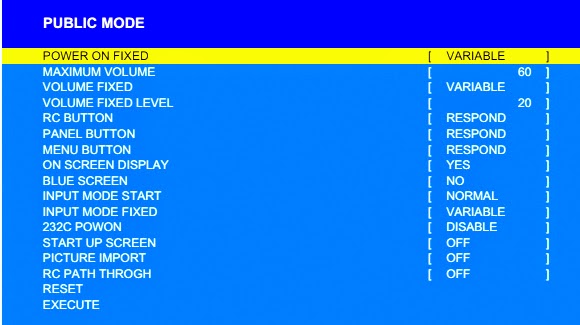
Public Mode Menu
The guidance is not displayed onscreen.
Setup procedure
* To move the cursor up and down, use the “cursor UP/DOWN” key (remote controller) and “CH ▲/▼ key (remote controller and set).
* To change the settings, use the “cursor RIGHT/LEFT” key (remote controller) and “VOL (+)/(–)” key (remote controller and set).
* To save new settings, keep the cursor at “Execute” and use the “cursor RIGHT/LEFT” key (remote controller) and “VOL (+)/(–)” key (remote controller and set).
To get the setting items details; go to >>


MARANTZ PM6010-OSE - SCHEMATIC [Circuit Diagram] _ Integrated Amplifier

$
0
0
Integrated Amplifier_Used semiconductors _ 2SC5198_2SA1941_AN7062P_NJM2068_TMP47C200BN
IDLING CURRENT ADJUSTMENT
  Before switching the power ON, set the master volume control to the minimum position and the balance volume to the center positions. Also set semi-fixed resistors R755(Lch) and R756(Rch) on PCB P701 to the center positions.
  Each of the cement resistors R767(Lch) and R768(Rch) on the PCB P701 is provided with three test points.  Connect a digital voltmeter, set for the DC voltage input, to the test points at the two extremities of the three test points of R767 or R768.
  After the setup above, switch the power ON, and adjust semi-fixed resistors R755(Lch) and R756(Rch) on PCB P701 according to the digital voltmeter reading. The target setting value is 10 mV(50 mA) for both the Lch and Rch.
SCHEMATICS [CLICK ON THE PICTURES TO ZOOM IN]
SYSTEM CONTROL

PHILCO [PHILIPS] - PH14B CTV _CIRCUIT DIAGRAM

$
0
0
PHILCO [PHILIPS] - PH14B CTV - SCHEMATIC
Used  Semi conductors - FSCQ0765RT(STR at Power Control)_24C08(Memory IC)_OM8370(Main ststem chroma jungle)_AN17821(Audio Output IC)_TC4053(Input Selector IC)
SCHEMATIC [FULL] _ Click on the pictures to magnify
SMPS [split]

AOC A240 WD - LCD MONITOR - SMPS and BACK-LIGHT INVERTER - SCHEMATIC

$
0
0
Power Supply_Sub-Power Supply & back-light Inverter Circuit Diagram_AOC Monitor A240WD
SMPS [power Supply Schematic] _ Click on the schematics to Magnify
Sub Power & Back light Inverter

SONY KLV-32S550A - KLV-26S550A – HOW TO DISASSEMBLE – LED BLINKING CODES

$
0
0

SONY KLV-32S550A - KLV-26S550A –DISASSEMBLE – LED BLINKING CODES 
KLV-32S550A (RM-GA016) – [GE, ME, Philippines, (Blue)  Russia, South Africa]
KLV-32S550A/T (RM-GA016) [GE, ME, Philippines, (Brown)  Russia, South Africa]
KLV-37S550A (RM-GA016) [GE, India, Iran, ME, Philippines, Russia, Thailand, Tunisia]
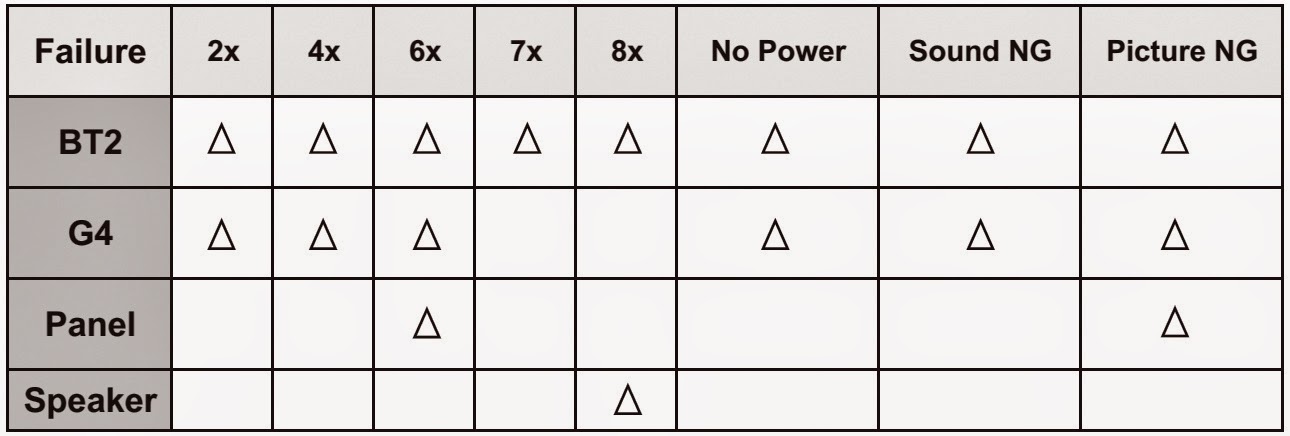
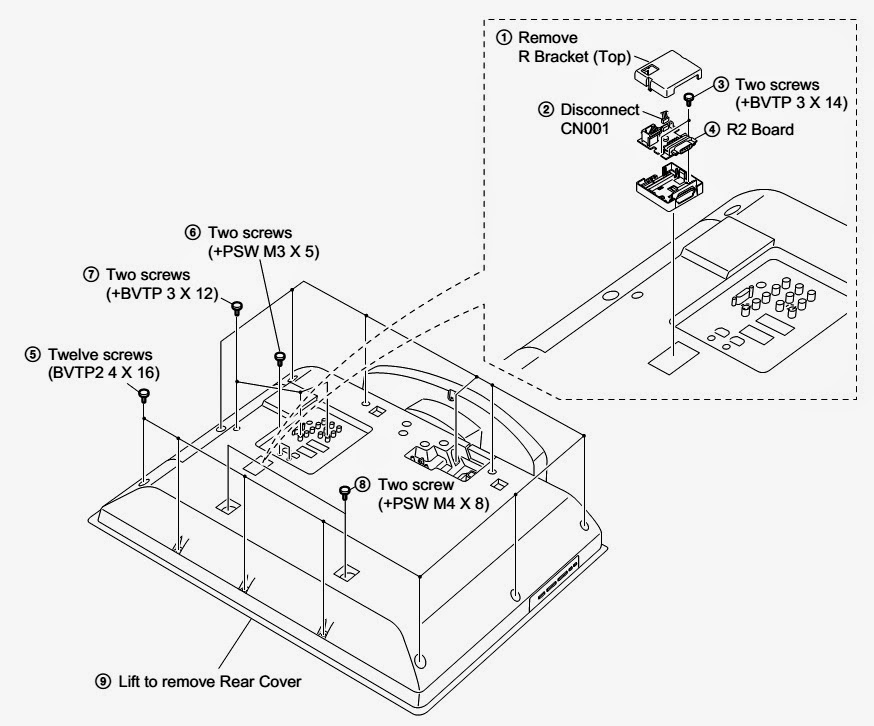
LED BLINKING CODES – SELF DIAGNOSIS FUNTION – REMOVAL OF BACK COVER & SCREW SIZES.
Blinking codes: Triangle chart
KLV-26S550A, 32S530A, 32S550A, 32S550A/L, 32S550A/T
KLV-37S550A
R2 Board and Rear Cover Removal. [KLV-26S550A/1, 26S550A/3]
R2 and Rear Cover Removal [KLV-32S550A/1, 32S550A/3]
Removal of Rear Cover Procedure
Removal of Switch Unit
Push and slant towards inner side of set to remove Switch Unit correctly.

SONY KLV-26S550 - KLV-32S530 - KLV-37S550 - Factory reset AND Hotel Mode Asjustments

$
0
0
Sony KLV-26S550A-KLV-32S530A_KLV-32S550A_KLV-32S550A/L_KLV-32S550A/T_KLV-37S550A [Factory reset – Hotel Mode]
Preset "Test" button on remote commander.
* Press the following buttons simultaneously on the remote commander RM-GA016 for a few seconds.
* Once completed, the below button operates as a TEST button.
Resetting the User Menu- Factory Reset
* While TV on standby mode, press the following sequence on the Remote commander.
* Select SERVICE with 2 or 5 On the Remote Commander.
* Select AUTO SET FACTORY with 1 or 4 On the Remote Commander.
* Select data value with 3 or 6 On the Remote Commander to 0 to current condition. Refer to
Service Items Table.
* Press <POWER> to exit.
SERVICE ITEMS
[Board & Panel Replacement: When replacing the BT board and Panel readjust the W/B.]
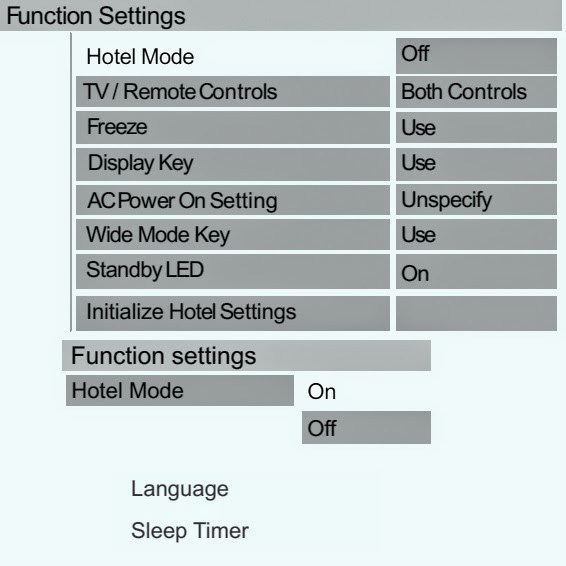
Hotel Menu Mode. {KLV-26, 32, 37 S550A - RM-GA016}
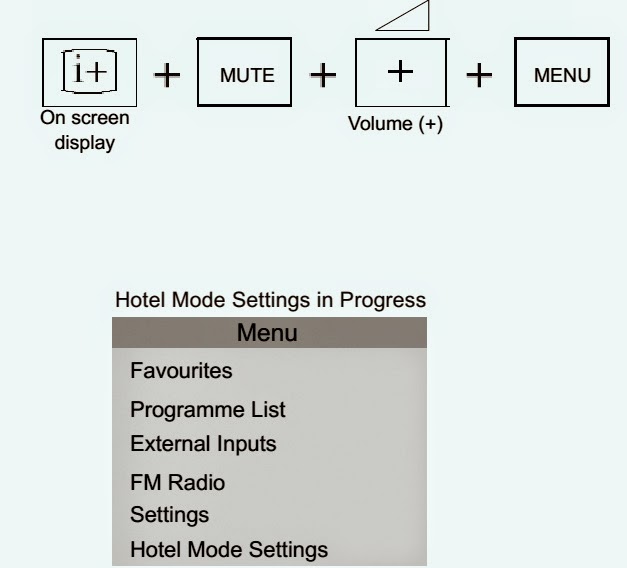
* While TV set is on standby, press the following sequence on the remote commander (RM-GA016).
* When the TV turns on, the indication "Hotel Mode Settings in Progress" appears on the bottom center of the screen.
* Press 'Menu' on the remote commander.
* Press UP / DN to select 'Hotel Mode Settings' and press (+).
The following menu appears on the screen.
* Press Right / Left  to select 'Hotel Mode'. Then press (+).
* Now press Left / Right  then Up / Dn  to select 'ON' and press (+). [The TV set resets and restarts.]
* Now press 'Menu' on the remote commander.
The following menu confirms the hotel mode is ON. (see all the screen display)
Exiting Hotel Menu Mode.
* While TV set is ON, press the following sequence on the remote commander (RM-GA016).
* The TV set restarts and show "Hotel Mode Settings in Progress" on the bottom center of the screen.
* Now press 'Menu' on the remote commander.
* The following menu confirms the hotel mode is OFF.

AIWA CSD-EX110 – SCHEMATIC (Circuit Diagram)

$
0
0
AIWA - CSD-EX110 – SCHEMATIC (Circuit Diagram) – Compact Disc Stereo Radio Cassette Recorder
CLICK ON THE PICTURES TO MAGNIFY

VIEWSONIC - VS10859 MONITOR - FLICKER ADJUSTMENT - Spare part list

$
0
0
Model - VS10859
Product name: VA2012wb-1-W _ VA2012w/wb-2-W _ VX2025wm-W
LED flicker appeared when change the power saving mode to normal picture in ORT test. In order to solve the abnormal phenomenon, power BD modified.
* Before change:
Power board P/N: AS08B532009
Description: PWR MODULE (DTA) EADP-64CF B,90~264V GP. [Rev: A]
* After change:
Power board P/N: AS08B532009
Description: PWR MODULE (DTA) EADP-64CF B, 90~264V GP. [Rev: B]
* Before change: 
Power board P/N: AS08B532009, Description: PWR MODULE (DTA) EADP-64CF B, 90~264V GP Rev: Transformer P/N:MV-CE 5048A ,circuitry qty:4,Diode ZD1:7.5A.
* After change: 
Power board P/N: AS08B532009, Description: PWR MODULE (DTA) EADP-64CF B,90~264V GP Rev: B Transformer P/N:MV-CE 5048B circuitry qty:5,Diode ZD1:12A.
Click on the pictures to Magnify
Spare Part List


Item
Description
Ref. P/N
Location
1
Accessories:
Power  cable
DM333181801
Power cable
2
Audio cable
DDW9ZAPA009
Audio cable
3
VGA cable
DDL7VDPC005
VGA cable
4
Board Assembly:
Power board
AS08B532009
Power board
5
main board QDI  21W0VAMB002
1SW0VAMB009
Main board for QDI
6
main board AUO  21W0VAMB002
1SW0VAMB025   
Main board for AUO
7
Button board  23W0VABB009
1SW0VABB003
Button board
8
Inverter board
AS023360D18
Inverter board
9
Cabinets:
Front bezel assy black
34W0VALB000
front bezel ass'y
10
back cover assy black
25W0VALC007
back cover assy
11
Cables:
Cable MB-LCD
DD0L9VLC023
Cable MB-LCD
12
Cable MB-BB
DDW0VABU007
Cable MB-BB
13
Cable MB-INV
DD0W0EIV008
Cable MB-INV
14
Documentation:
User manual + CD wizard
HGW0VA01013
User manual
15
Electronic
Components:
 20" QD20AL01 REV.01 GP
AA20AL01004
QDI LCD panel
16
20" QD20AL01 REV.01 A- GP
AA20AL01012
QDI LCD panel 2nd source
17
 20"AUO M201EW01 V.0 GP
AAM201EW007
AUO LCD panel
18
LCD 20" M201EW01 V.0 GP
AAM201EW058
AUO LCD panel 2nd source
19
Speaker assy
DN0TE130F01
speaker assy
20
Miscellaneous:
Screw
MF30040IJB3
SCREW F 3.0*4.0-I(MC) GP
21
Screw
MF30060BBJ6
SCREW M3.0*6, B(NI) GP
22
LCD film
JXW0ZB01019
LCD FILM
23
Screw
MF40140IJ29
SCREW F4.0*14-I(BNI) GP
25
RUBBER PLUG VESA
GAL9V002014
RUBBER PLUG VESA

HINGE COVER
EBW0VA03020
HINGE COVER W0VA
27
Packing Material:
EPE bags
HAL0T002019
EPE bags
28
Carton
HFW0VA03015
carton
29
End cap (L)
HBW0VA01019
cushion
30
End cap (R)
HBW0VA02015
cushion
31
Plastics:
Stand assy
26W0VASA016
Stand ASSY

base assy
38W0VABS010
base assy


VIEWSONIC G90fB-4 Model No. VS10794 - 19” Digital Controlled Color Monitor - Schematic Full

$
0
0
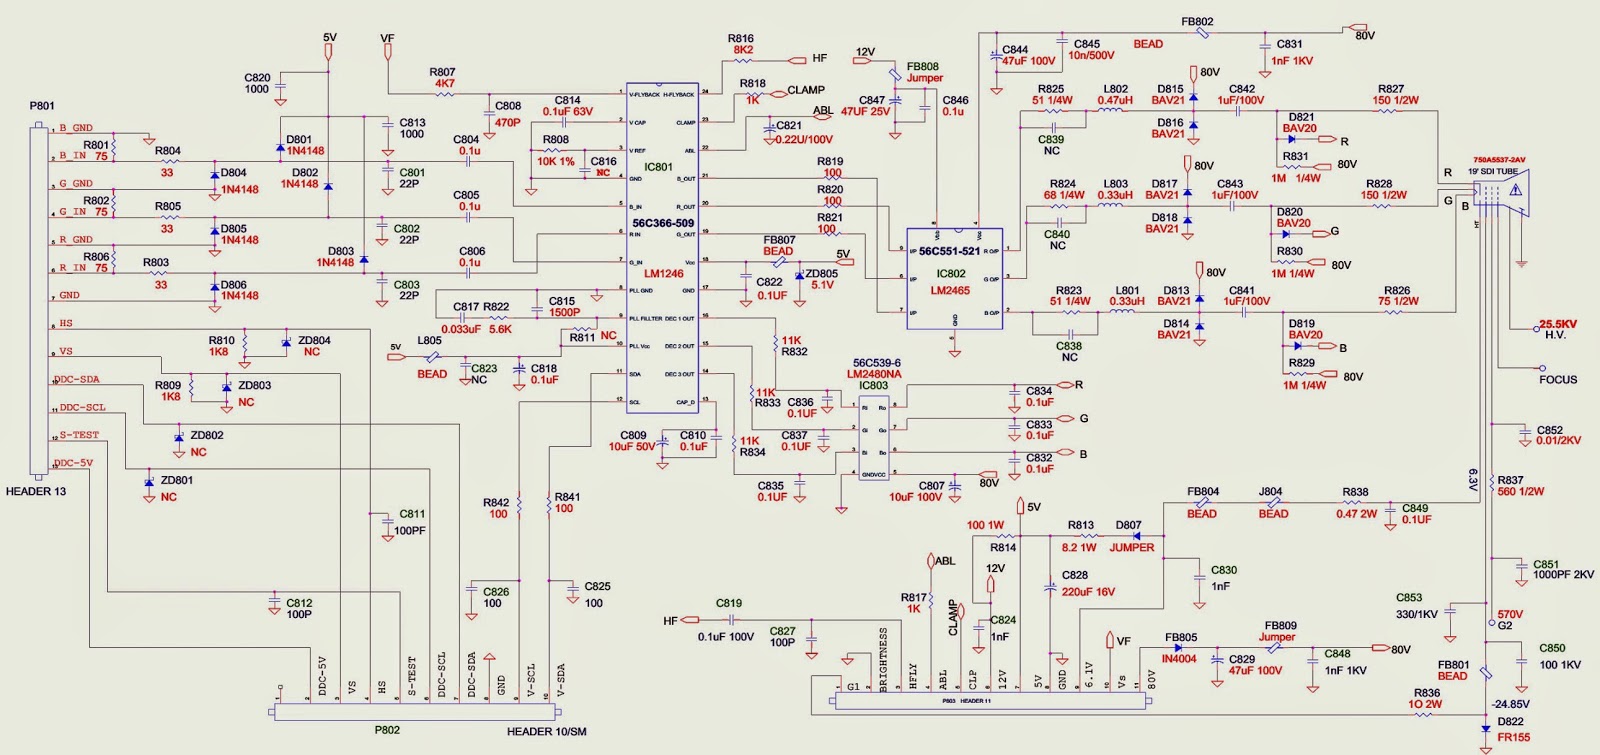
Viewsonic G90fB-4 Model No. VS10794 - 19” Digital Controlled Color Monitor_Circuit Diagram_[Full]
CPU 
SMPS
OUTPUT
VIDEO
CLICK ON THE SCHEMATICS TO ZOOM IN


TEXAS RANGER – TR-127GK / DK CIRCUIT DIAGRAM

$
0
0

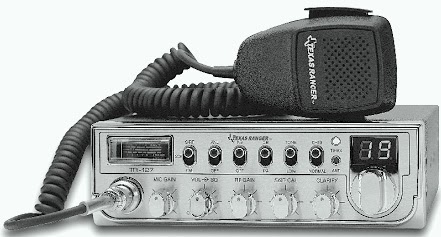
Texas Ranger TR-127GK/DK_Texas Ranger 40 Channel AM CB Mobile Radio

PWB_COMPONENT LAYOUT
PWB_FOIL SIDE
SCHEMATIC
CLICK ON THE PICTURES TO ZOOM IN

HOW TO UPGRADE THE ROM - HTC DIAMOND - RUU (Re-Flash Upgrade Utility)

$
0
0
HTC DIAMOND - ROM Re-flash Procedure. [ROM upgrade thru RUU (Re-flash Upgrade Utility)]
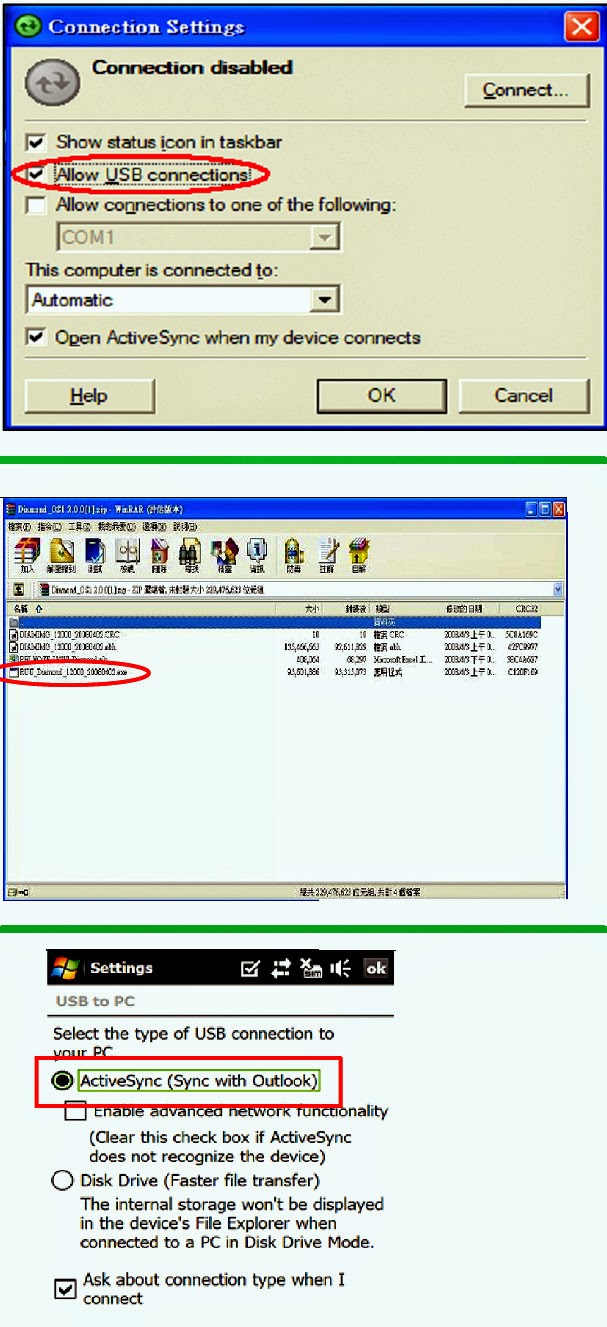
Connect device to PC
1. Setting and allow USB connections in Microsoft ActiveSync.
2. Connect your device and desktop/ or laptop via USB cable.
3. Check the pop-up message from Microsoft ActiveSync when device is synchronized with PC.
Download OS Image from SDO
4. Download OS image from SDO. http://htcscm10.htc.com.tw/SDO
5. Un-zip the file and execute RUU program.
6. Select the type of USB connection with “ActiveSync” mode in the settings of menu.
7. Hold the volume down key then press power button to trigger the boot loader mode.
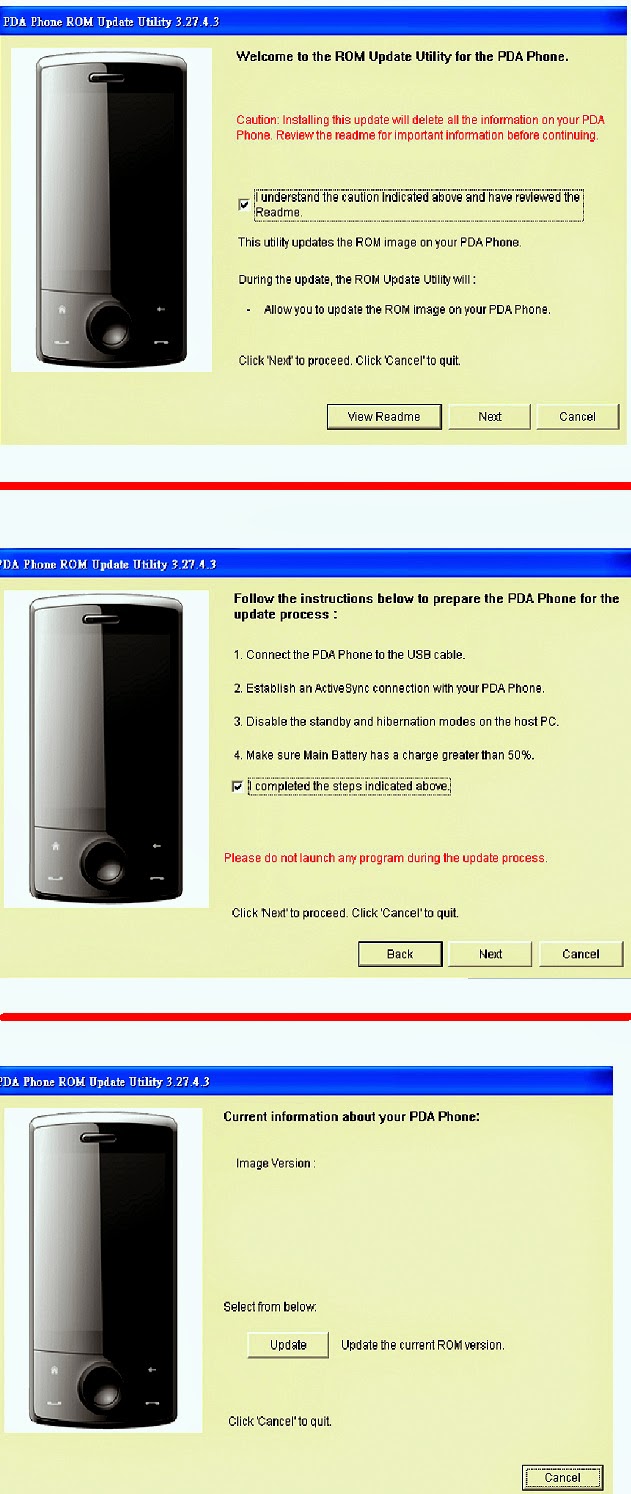
8. Read the pop-up message form ROM update utility and select the “I understand…” checkbox.
9. Click “Next” to proceed.
10.  Read the pop-up message form ROM update utility to follow and perform the instructions and select the “I completed…” checkbox.
11. Click “Next” to proceed.
12. Current image version confirmation.
13. Click “Update” to proceed.
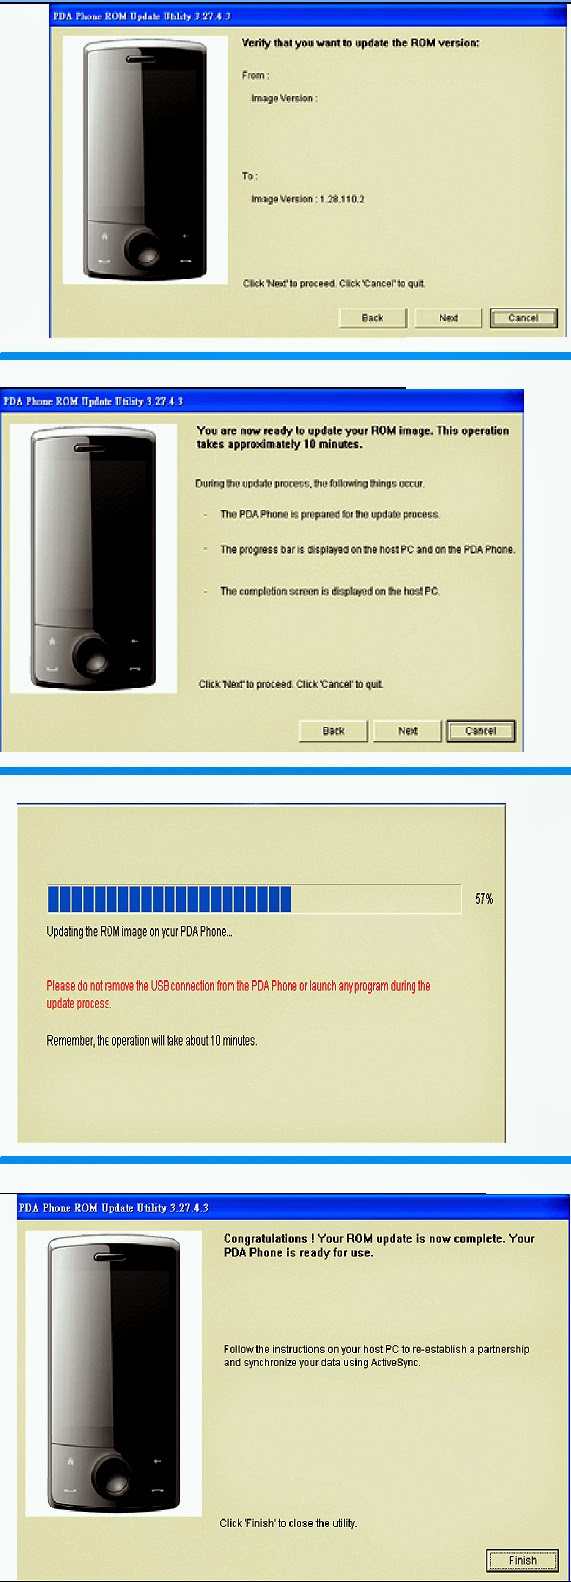
14. Double verify the ROM revision which you want to update before re-flash procedure.
15. Click “Next” to proceed.
16. Read the information from pop-up message and the OS update procedure will takes 10 minutes long.
17. Click “Next” to proceed.
18. You can see the update progress from your PC and in your device.
19. The OS upgrade is finished, click “Finish” to close the utility.
Click on the pictures to Magnify

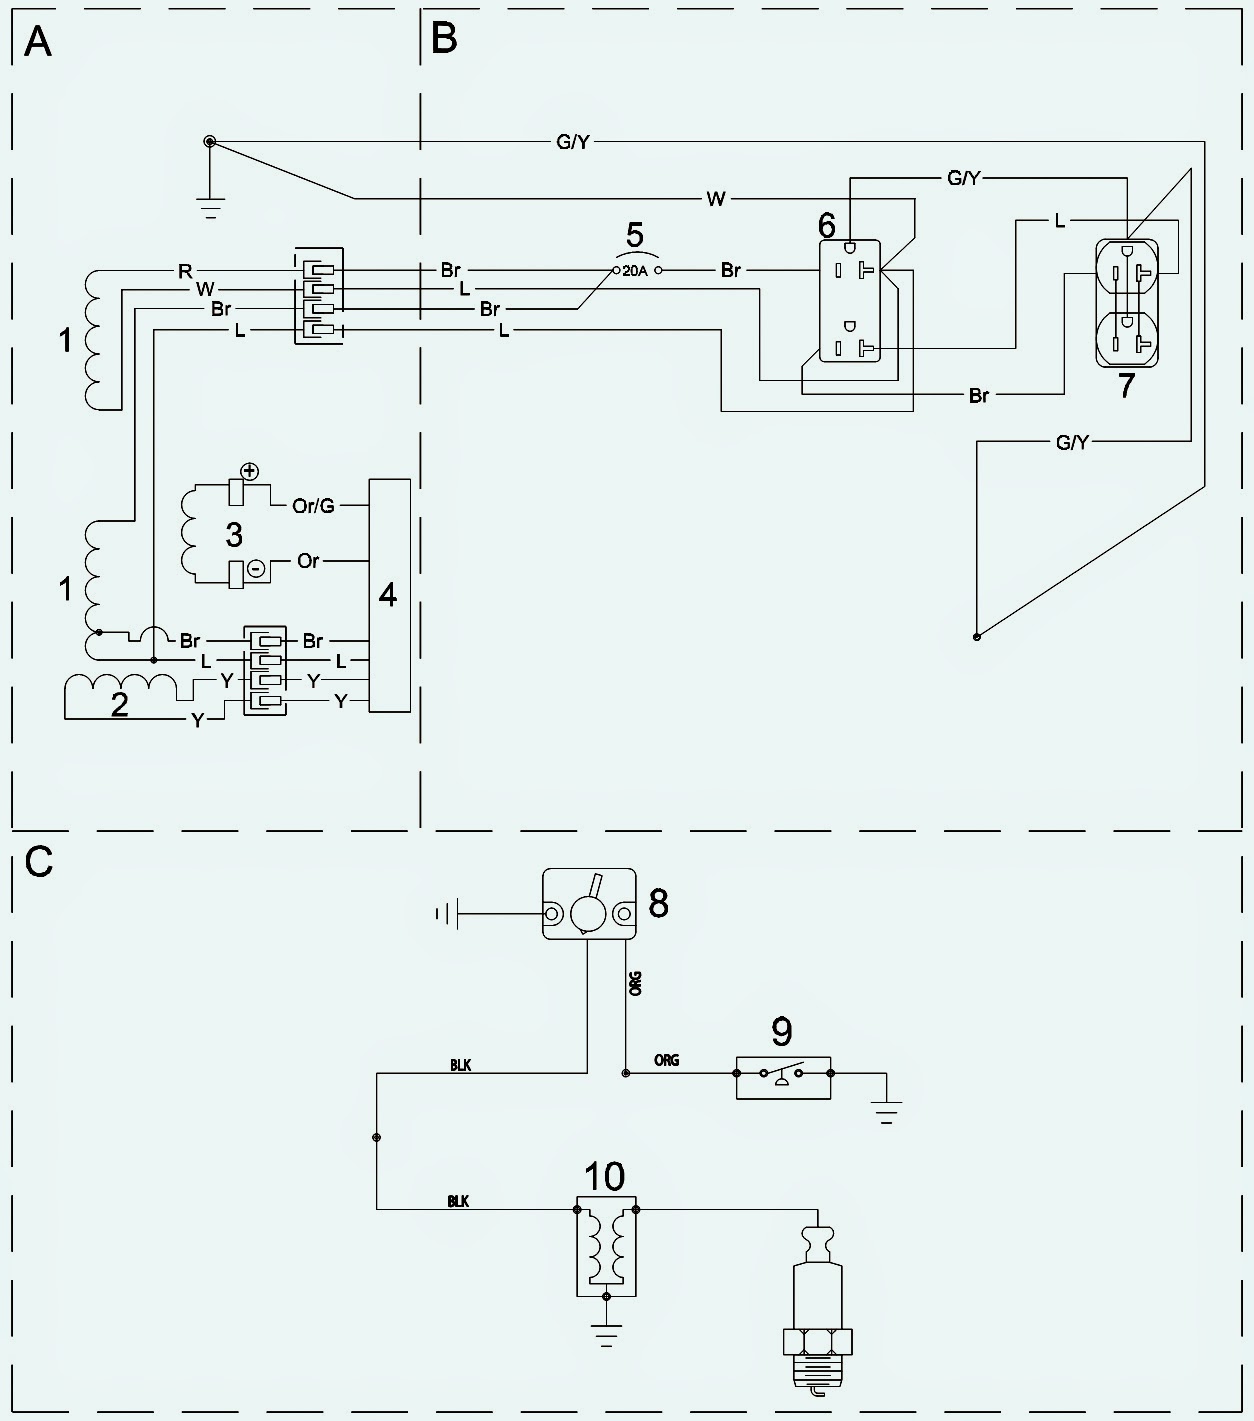
HOW TO ADJUST Carburetor & Engine Speed - WACKER NEUSON GENERATOR - GP 3800, GP/GPS 5600, GP/GPS 6600

$
0
0
CARBURETOR ADJUSTMENT
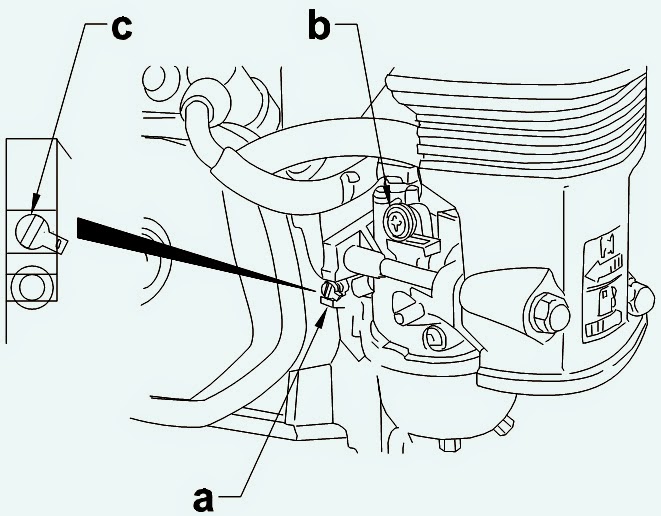
* Start the engine and allow it to warm up to operating temperature.
* Set the pilot screw (a) two turns out.
* With the engine idling, turn the pilot screw (a) in or out to the setting that produces the highest rpm.
* After the pilot screw is adjusted, turn the throttle stop screw (b) to obtain the standard idle speed.
Note:  On some engines the pilot screw is fitted with a limiter cap (c) to prevent excessive enrichment of the air-fuel mixture in order to comply with emission regulations. The mixture is set at the factory and no adjustment should be necessary. Do not attempt to remove the limiter cap. The limiter cap cannot be removed without breaking the pilot screw.
Adjusting Engine Speed
Generators require a fixed engine speed to maintain the correct voltage. Engine speed is controlled by a governor which automatically adjusts to varying loads on the engine to maintain a constant speed.  There is no throttle control.
To set the engine to the proper speed:
Turn the speed adjusting screw (b) in or out to obtain a no-load speed.
NOTICE: Setting the engine speed too high or too low may damage tools and other appliances attached to the generator.
Electrical Schematic - GP 2600
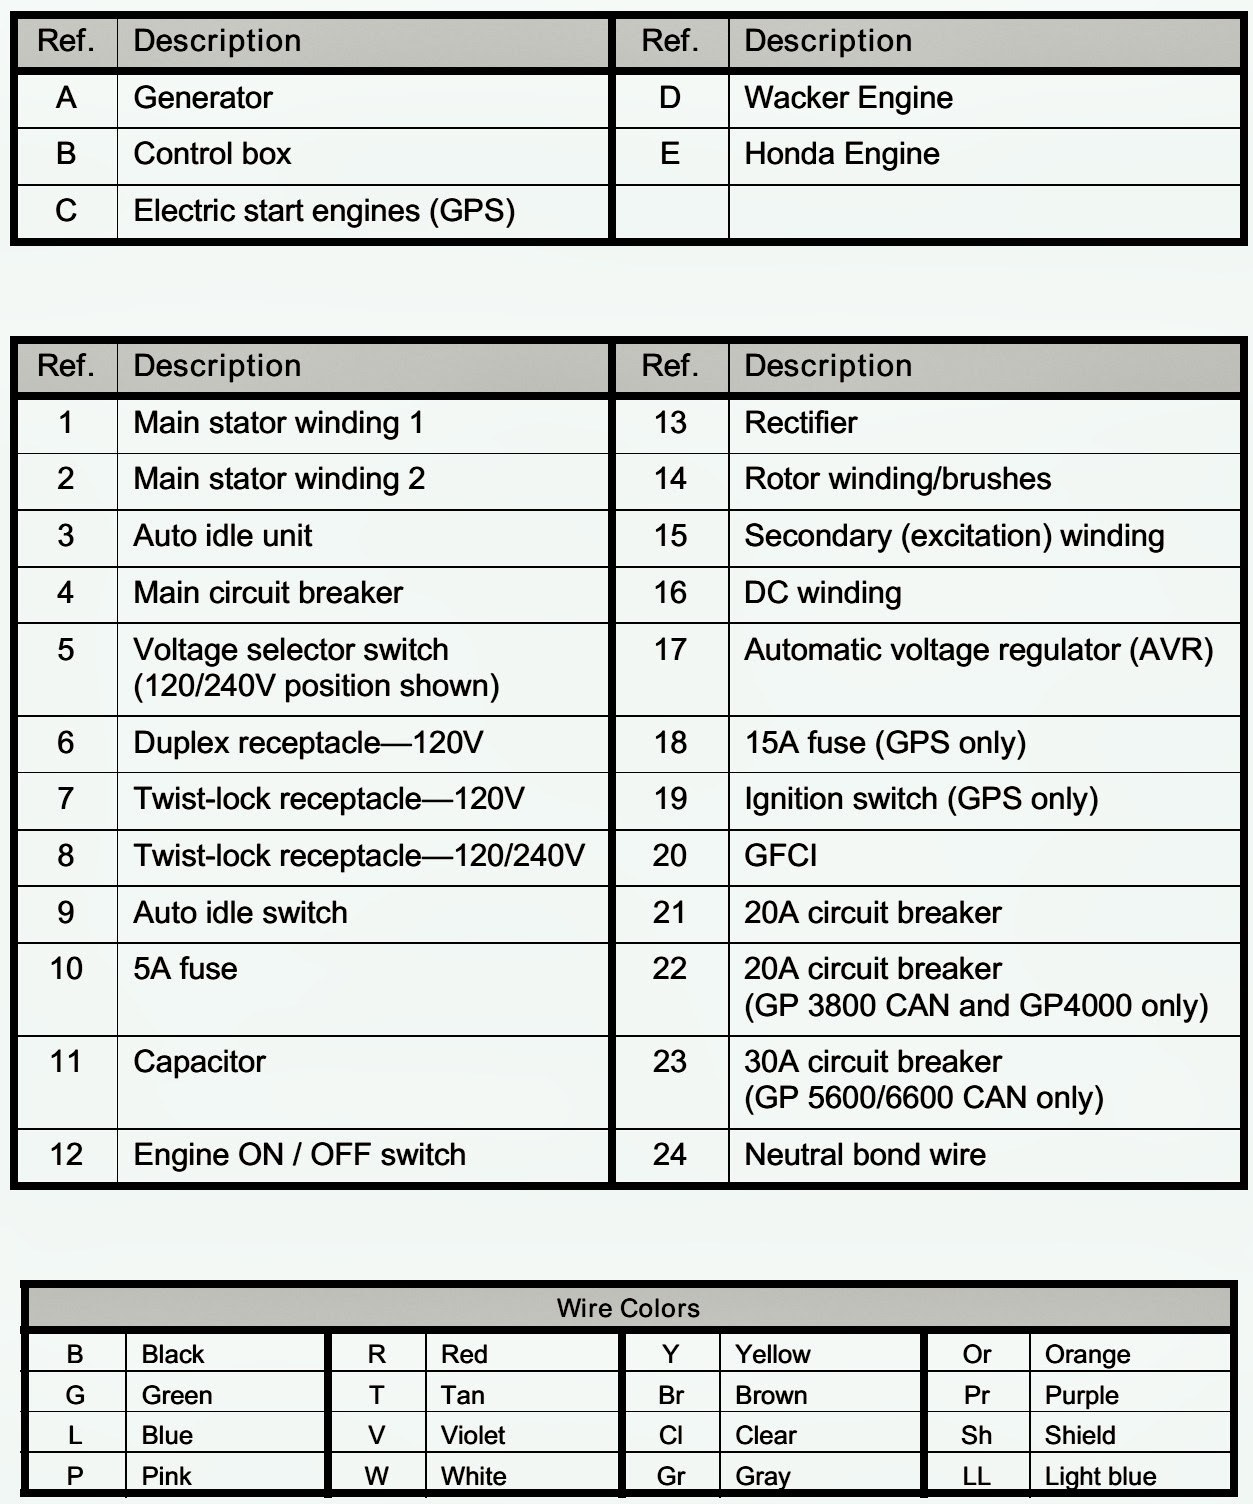
Electrical Schematic - GP 3800, GP/GPS 5600, GP/GPS 6600 CAN Models
Components - GP 3800, GP/GPS 5600, GP/GPS 6600 CAN models
CLICK ON THE PICTURES TO ZOOM IN

WACKER NEUSON Generator TROUBLESHOOTING

$
0
0
WACKER NEUSON Generator _  How to check voltage at plug – voltage at generator terminals strip
 TROUBLESHOOTING
  If a generator problem is not an obvious engine or wire fault, the cause of  the  problem  will  be  associated  with  one  of  two  things:
  A malfunctioning generator or faults in the circuit supplying voltage to the receptacles.  By  starting  the  troubleshooting  procedures  at  the generator output terminal strip (z) you can determine whether the problem  lies  within  the  generator  or  the  circuit  supplying  the receptacles.  For troubleshooting a no-voltage condition, you’ll need to rule out problems with the stator windings (1) and the rotor windings (13). For a low-voltage condition (any voltage less than 120V), you’ll need to rule out problems with the stator and rotor windings, a malfunctioning voltage regulator (16), and problems with the brushes (13) and/or the excitation winding (15). For a high-voltage condition, you’ll need to rule out a malfunctioning voltage regulator and/or problems with the voltage regulator’s sensing wires (y).
  For troubleshooting the receptacle circuits, you’ll need to rule out problems  with  the  main  circuit  breaker  (3),  the  individual  circuit breakers  (5,  6,  and  7),  and  the  wiring  that  connects  all  the components.  For troubleshooting a malfunctioning auto idle circuit, you’ll need to rule out a blown fuse (9) and problems with the idle solenoid, the DC winding (15), the rectifier (12), the auto idle switch (8), the auto idle unit (2), and the wiring that connects all the components.  For troubleshooting a malfunctioning anti-after fire circuit, you’ll need to rule out a faulty DC winding (15), a blown fuse (9), a faulty engine ON/OFF switch (11), or a faulty capacitor (10).
Checking Continuity
Conduct continuity tests when the engine is shut down.  When checking continuity, use the Ohm setting on your multimeter.  Place a lead of the multimeter on one end of the wiring or component and the other lead on the opposite end. If your meter reads “OL” or “OPEN”, there is no continuity and the wiring or component must be repaired or replaced.
Note:  Some multimeters also have an audio signal setting for determining continuity. This setting may also be used.
If  your  meter  reads  less  than  1.0  Ohm,  or  the  audio  signal sounds, the wiring or component has continuity and should be OK.
If your meter reads more than 1.0 Ohm, the wiring is faulty and must be repaired or replaced.
Checking Resistance
Conduct resistance checks when the engine is shut down.  Use the Ohm setting on your multimeter.  Conduct resistance checks when the machine is as close to 21°C (70°F) as possible. Higher temperatures can affect resistance values.  Most digital multimeters have some internal resistance. To obtain your
multimeter’s internal resistance, simply cross the two leads of your multimeter and read the display. When conducting a resistance check, subtract  your  multimeter’s  internal  resistance  from  the  value  you measure to obtain the true resistance of the component you are checking
Checking Voltage
Conduct voltage checks when the engine is running.  Use the Volt setting on your multimeter. To prevent damage to your instrument, start with the highest scale available on your multimeter.  Adjust to a lower scale as readings dictate.  Use extreme caution when checking voltage to reduce the risk of
electric shock.
Checking Voltage at Generator Terminal Strip
Remove the two screws (a) that secure the end cover to the generator and remove the end cover.
Start the engine.
Using the AC voltage setting on the multimeter, measure the voltage between the wire with the yellow marking (b) and the wire with the red marking (c). There should be 120V±10%. [If zero (0) volts is measured, it indicates a problem with main winding 2 or the rotor winding.  If 120V±10% is measured, main winding 2 and the rotor are functioning; continue]
Using the AC voltage setting on the multimeter, measure the voltage between the wire with the green marking and the wire with the black marking. There should be 120V±10%. [If zero (0) volts is measured, it indicates a problem with main winding 1.  If 120V±10% is measured, main winding 1 and the rotor are functioning; any problems with the receptacles receiving voltage are in the circuit to the receptacles.]
Checking Voltage at Plug - GP 2500A, GP 2600
By starting the troubleshooting procedures at the generator output plug (d), you can determine whether the problem lies within the generator or the circuit supplying the receptacles. To check the voltage at the output plug, carry out the following procedures:
Remove the two screws which secure the end cover to the generator and remove the end cover.
Start the engine.
Using the AC voltage setting on the multimeter, measure the voltage between the red wire and the white. There should be 120V±10%. [If zero (0) volts is measured, it indicates a problem with main winding 2 or the rotor winding.  If 120V±10% is measured, main winding 2 and the rotor are functioning; continue.]
Using the AC voltage setting on the multimeter, measure the voltage between the brown wire and the blue wire.  There should be 120V±10%  [If zero (0) volts is measured, it indicates a problem with main winding 1.  If 120V±10% is measured, main winding 1 and the rotor are functioning; any problems with the receptacles receiving voltage are in the circuit to the receptacles]
CLICK ON THE PICTURES TO MAGNIFY 

Viewing all 2033 articles
Browse latest View live


<script src="https://jsc.adskeeper.com/r/s/rssing.com.1596347.js" async> </script>