Quantcast
Channel: Electro help
Viewing all 2033 articles
Browse latest View live

PHILIPS HTS 8140 [Home Theater System] - HOW TO OPEN DVD DOOR PANEL- REPLACING A DEFECTIVE LOADER

$
0
0

OPENING DVD DOOR PANEL

  • Find a big paper clip, straighten it and mark at 3 cm from the tip as shown here.
  • Remove the stand assembly 155. There will be a small hole at the bottom of the cabinet. Put the straightened part of the clip into the hole until the mark reaches just above the surface of the cabinet. When the tip of the straightened paper clip touches the interlock inside, it will release the door. Press and hold the paper clip and pull out the door gently in the direction as shown.
REPLACEMENT OF DEFECTIVE LOADER
  • Dismantling of the loader to access the ESD protection point if necessary.
  • Solder the ESD protection point.          
  • Disconnect flex foil cable from the defective loader.
  • Put a paper clip on the flex foil to short-circuit the contacts.
  • Replace the defective loader with a new loader.
  • Remove paperclip from the flex foil and connect it to the new loader.
  • Remove solder joint on the ESD protection point.

The laser diode of this loader is protected against ESD by a solder joint, which short-circuits the laser diode to ground.
For proper functionality of the loader this solder joint must be remove after connection loader to the set.
  • ESD protection point is accessible from top of loader.
TYPE-1
  • ESD protection point is accessible from bottom of the loader.
TYPE-2


PHILIPS HTS-8140 - HOME THEATER SYSTEM - SOFTWARE UPGRADE [1 of 2]

$
0
0

SOFTWARE UPGRADE PROCEDURES
Normal Upgrade Process (via CD upgrade disc). Burning of firmware.
  • Download the latest software release package (BEA and Servo software) and extract the files from ZIP archive.
  • Start the CD burning software and create a new CD Project (Data disc) with the following settings.
a. File System:  ISO9660
b. Format:  MODE 2/XA
c. Recording format:  Single Session (Track at once), Finalized CD.
  • Place the extracted content of the zip-archive into the root directory of the new CD project.
  • Burn the data onto a blank CDR or CDRW.
Note: ISO9660 is mandatory, UDF discs are not supported.  The final CDROM must not contain any other data except the file from the zip-archive.
Procedure to upgrade the firmware via CD upgrade disc.
  • Power up the set and open the DVD Door.
  • Insert the prepared upgrade CDROM and close the DVD Door.
The OSD will display:
“Upgrade file detected”
File Copying->Upgrading”
  • The DVD Door will then open automatically to allow the upgrade disc to be taken out.
  • Take out the upgrade disc. It may take one or two minutes to complete the ERASE and WRITE process.
  • When the upgrade process is successfully completed, the DVD Door will automatically close and the set will go to standby mode.
Special Upgrade Process (via programming interface board to target module) [Preparing Hardware and Software Interface Components]
Required Hardware
The general block diagram for hardware setup is:
The required hardware interface components are:
  1. Service PC with One free USB port     
  2. USB A to B Cable*
  3. Programming interface board (12NC 9965 200 34643)           
  4. 6 pin FFC Cable
The USB cable is desirable to be version 2.0 and support high-speed data transfer rates.
PROGRAMMING INTERFACE BOARD
DIP SWITCH SETTINGS
DIP Switch 1102 in Programming Interface Board should be used to configure hardware settings for special upgrade process.
The On position is marked as shown in figure. The Off position is usually the opposite of the On position. Use a  screwdriver with a small head, or a pair of tweezers to move the switch into the On or Off position.
DIP SWITCH SETTINGS
JUMPER HEADER SETTINGS AND CABLE CONNECTIONS
  • Programming Interface Board has 3-Pin Jumper Header 1110 for supplying +3V, +5V or no power to the target module in Special Software Upgrade Process.
  • For IPOD Software Upgrade to MPEG Board and CEC Software upgrade to HDMI Board, +5 V pin and the middle pin of the jumper header 1100 must be shorted by a jumper as shown.
Note: Active Subwoofer Power Box will use its own power supply while upgrading power box software. So the jumper header 1100 should be left open without any jumper.
Required Software in service PC & MORE details by next post >>  

PHILIPS HTS-8140 - SOFTWARE UPDATE PROCEDURE - TO CHANGE TUNING GRID - TRADE MODE ENABLE & DISABLE - [2 of 2] CONTN:

$
0
0


SOFTWARE UPDATE [Contn] [ 2 of 2].  See the previous post too.
Required Software in service PC
The following application and driver software are required to be configured and installed in service PC:
  • Flash Programmer (Flash MCU Programming Software)
  • PL-2303 USB-to-Serial Driver.
  1. The Flash Programmer, Flash MCU Programming Software, is used as a terminal program to download the software to the target module via interface programming board.
  2. To run the Flash Programmer on the Service PC, the service PC should be IPM PC/AT or PC/AT compatible with OS: Microsoft Windows 2000 or Windows XP.
  3. As the Flash Programmer software uses serial COM Port configuration for communicating to programming interface board, a USB-to-Serial Driver must be installed for the programming interface board. After installing the USB-to-Serial Driver, the programming interface board connected to service PC via USB cable will appear as a “Prolific USB-to-Serial Comm Port (COMx)” in service PC.
  4. Use file “The Flash Programming Software Kit 9965 100 17380.zip” (See figure 7) for the preparation of required software in service PC.
Installing USB-to-Serial Driver in service PC
  • Extract “PL-2303 Driver Installer” from “Flash Programming Software Kit.zip” into a destination folder in service PC. PL-2303 Driver should appear as an icon in destination folder as shown.
  • Double-click the icon to run the InstallShield Wizard and follow the on-screen instructions then to install the driver.
  • When the driver installation is completed, go to Control Panel -> System -> Hardware tab -> Device Manager-> Ports (COM & LPT). If the interface programming interface board is connected to service PC via USB cable, it should appear as “Prolific USB-to-Serial Comm Port (COMx)” in Device Manager.
  • Take note of the COM Port number to use it for setting the Flash Programmer Communication configuration. 
Note: the USB-to-Serial Comm Port will not show up in Device Manager if the programming interface board is not connected to service PC via USB cable.
Preparing Flash Programmer Software
  • Open zip file “Flash Programmer.zip” from “Flash Programming Software Kit.zip” and extract all the files as shown in figure 9. A folder “Flash Programmer” and 8 setup files should appear in the destination folder as shown.
  • The required program, “FlashProg.exe” should be found in “Flash Programmer” folder as shown.
Preparing the Flash Programmer
Configuring the work environment features
To use the flash programmer application to download the software upgrade to the target board, the following work environment features must be configured:
  • The setup file to be used
  • The target device name
  • The COM port and data transfer rate
Follow the procedure below to configure the work environment features:
  • Run the flash programmer”FlashProg.exe”. The Flash Programmer main window will appear. Go to Setup -> Setup File as shown.
  • Setup dialog box will then pop up. Go to “Setup File” tab, “Browse” the folder that contains the setup files as shown in figure.
For example, if the target board is MPEG Board for downloading the IPOD software, then the setup file should be HTS8140_IPOD_V1.0.ini.
  • Go to Device tab as shown in figure 14. Choose the MCU series and type for the target module as described in to table. Click “Apply” to confirm selection. The MCU type will appear in “Chosen Device” box.
For example, if the target board is MPEG Board for downloading the IPOD software, then the target device is TMP91FW60 in series 900/L1. After clicking “Apply” button, the chosen device TMP91FW60 should appear in the Chosen Device box.
  • Go to communication tab as shown in figure. Choose the USB-to-Serial COM Port number from the COM port drop down list.
For example if the target module is MPEG board for downloading IPOD software, then the data rate should be 19200 bps
Note: The COM port number for USB-to-Serial COM Port will not appear in the drop down list in the Communication tab of the Setup dialog box if the programming interface board is not connected to service PC via USB cable.
Select the Data Rate as described in table.
Procedure to upgrade the firmware via Programming Interface Board
  • Download the software upgrade file into service PC. The software upgrade files should be placed into the same folder as the setup files (*.ini) to make it easier to locate in Flash Programmer software for downloading them to the target module.
  • Connect the programming interface board to the Service PC via USB Cable.
  • Connect the target module to the programming interface board. Configure DIP switching settings, and jumper settings. (see previous post here)
  • Run the Flash programmer application and configure work environment feature
MPEG Board download set up (IPOD software upgrade)
Hints:
  • Dismantle the Main Unit, and take out the MPEG Board 1010.
  • Connect 6-pin cable from connector 1109 on Programming Interface Board to connector 1300 on MPEG Board,
  • Set DIP switch pin 2 (Boot) = ON (refer to table 1),
  • Connect jumper to apply +5 V to target module.
HDMI Board downloads setup.
Hints:
  • Dismantle the Main Unit, and take out the HDMI Board 1060.
  • Connect 6-pin cable from connector 1109 on Programming Interface Board to connector 1201 on HDMI Board,
  • Set DIP switch pin 1 (Boot) = ON  
  • Connect jumper to apply +5 V to target module.
  • Go to the “Object File” tab in Setup Dialog box of Flash Programmer.“Browse” and locate the software upgrade file as shown in figure.
Example: Locating the IPOD and Power Box software upgrade files (Motorola S Format *.s32)
  • After locating the software upgrade file, click OK in Object File tab of Setup Dialog Box. The Setup Dialog Box will disappear.
Note: If communication between the devices is not ready, the error message as described in figure 18 might appear. Just click “OK” to make it disappear.
  • Press the Reset button (the white button) on the Programming Interface Board.
  • When the devices (programming interface board and target module) are ready, there will be indicated as “Connected” in status bar at the bottom of the Flash
  • Programmer Main Window as shown in figure. Erase all data in the target module as shown.
  • Message box asking for erasing all data in target device will pop up as shown in figure 19. Click “Yes” Button to ease all data.
  • In case the message box for chip erasing does not pop up automatically, click E (Erase Button) to erase all data in target device. Chip Erase message will then pop up as shown. Click “Yes” to erase all data.
  • After the chip erasing has been completed, click P (program) button. This will download the software into the target module as shown in figure. When the software upgraded is completed the message box as shown in figure will appear.
  • Check the software version of the target module to confirm that it has been upgraded.
Reprogramming of DVD Version Matrix
After repair, the customer setting and region code may be lost. Reprogramming will put the set back in the state which it has left the factory, i.e. with the default setting and the allowed region code.
To reprogram, do as follows:
  1. Power up the set and select DISC source
  2. Open the tray with remote control or front panel key
  3. Press the following buttons on the Remote Control
<9><9><9><9> <SUBTITLE> <1>… for HTS8140/05/12
<9><9><9><9> <SUBTITLE> <2>… for HTS8140/37
<9><9><9><9> <SUBTITLE> <3>… for HTS8140/55
<9><9><9><9> <SUBTITLE> <4>… for HTS8140/98
<9><9><9><9> <SUBTITLE> <5>… for HTS8140/93
<9><9><9><9> <SUBTITLE> <6>… for HTS8140/75
The display shows “YYYY-ZZ”and the tray will close
YYYY = model number (e.g. 8100, 8140, 6600, etc.)
ZZ = stroke version (e.g. 12, 37, 59, etc.)
TRADE MODE
Trade mode is a feature that will block all set keys when enabled. It is for dealers to prevent customers from moving disc, changing source etc. using the set keys on the touch panel. Rotary and Remote Control (RC) keys are still allowed in Trade Mode.
To activate Trade Mode:
  • Power up the set and select DISC source.
  • Open DVD Door by pressing “OPEN/CLOSE” button on Remote Control.
  • Then press buttons <2> <5> <9> on the RC.
  • The TV Screen will show ‘TRA ON’ and the DVD Door will close.
  • Trade Mode is then enabled.
To deactivate Trade Mode:
  1. Power up the set and select DISC source.
  2. Open DVD Door by pressing “OPEN/CLOSE” button on Remote Control.
  3. Then press buttons <2> <5> <9> on the RC.
  4. The display will show ‘TRA OFF’and the tray will close.  
  5. Trade Mode is then disabled.
TO CHANGE TUNING GRID
In some countries, the frequency step between adjacent channels in FM band is 50 kHz or 100 kHz (AM/MW band is 9 kHz or 10 kHz).
  • Press RADIO repeatedly to select ‘FM’ or ‘AM/MW’ band.
  • Press [STOP].
  • Press and hold [>|| ] ‘GRID 9’ or ‘GRID 10’ is displayed.
  • ‘GRID 9’ for FM 50 kHz (or AM 9 kHz) and ‘GRID 10’ for FM 100 kHz (or AM 10 kHz).
Note: This feature only applicable for certain region. Change tuning grid erases all preset radio stations.

HAIER L40R1 - TROUBLESHOOTING - DEFECTIVE SCREEN SHOTS

$
0
0


TROUBLESHOOTING [GENERAL CHECK UPs]
LCD IS NOT BRIGHT        {Click on images to Enlarge}
NO PICTURE
First, check cables which connect with Power Supply Unit [PSU] then check as follows
  • Check input voltage (CNA1)
  • Check output voltage (CND1)
NO SOUND
First check cables, which connect with PSU then check as follows
  • Check input voltage as NO picture
  • Check speaker output.
POWER SUPPLY UNIT FAILURE
First, check cables, which connect with PSU, then check as follows
  • Check PSU input voltage AC input (CON1)
  • Check PSU output voltage orderly (CON2)
FAILURE SYMPTOMS
Block Defect :TCP cracking or cracking
Dim or L/D :TCP Sunken
TCP lead cracking
ACF bonding short
Awful environment and something electric enter into
LCD
Mis-align between TCP and Panel
Panel failure
TCP failure.

Dot Defect.
  • Bright dot dark dot in panel.
  • Panel or Polarlzer.

  • Polarizer Bubble.
Bladder between Polarizer and top glass.


  • Polarizer Scratch.

Tine or rigidity arose.

  • F/M inside Polarizer.
Eyewinker inside Polarizer.
Abnormal Display.  Flashing.  Bright and dark display alternately.
  • Chip lose action
  • IC Abort or jointing bad
  • Panel and VSC connect bad
  • White Screen.  B/L normal, only white screen display.
  • Black Screen.  B/L normal, only Black screen display.
  • Maybe caused by surge current and EDS.

  • FIicker or Crosstalk. è LCD Vcom imbalance.
Abnormal Color.  Capacitance improper bring crosstalk inside LCD panel. [OR] 
  • Chip lose action.
  • IC short or joint bad.
  • Panel and VSC connect bad.

  • Mechanlcal Noise.  èCaused by Mechanica noise of backlight unit.
  • Ripple.  Connectric circle.  è Causeed by between mechanism and Panel.
  • B/L off. B/L lose action.
Connect badness between wire and electrode.
  • B/L dark.
Connect badness Short between wire and electrode.
  • B/L wire damaged.  Operation abnormal or systemic noise.
  • B/L wire open.  Operation abnormal or systemic noise.
  • B/L shut down.  Short between lamp housing and wire, because consume power too much.
F/M.  F/M in B/L ,white, back Rotundity or wire like. è F/M in B/L unit.
Light leakage.  Brightness at bottom of LCM brighter than normal. è B/L unit badness.
Mechanical or B/L.  B/L brightness asymmetric. è Sheet in B/L unit is uneven.

Mount hole. è Lack screw Screw damage.
The above given screenshot can be taken as a reference to most of the flat panel televisions.
[B/L > Back Light.]
[F/M > Frequency Modulation]
[PSU > Power Supply Unit]

HAIER L40R1 - FLAT PANEL TV - CIRCUIT BOARDS DETAILS & CONNECTOR PIN VOLTAGES - LCD PANEL VOLTAGE DETAILS

$
0
0

LOCATION OF CONTROLS & COMPONENTS


A Board è 0094000731 è Power Board.
B Board è 0090714766B è Main Board.
MAIN BOARD {Process signal, which incept from exterior equipment then translate into signal that panel can display.}

CONNECTIONS
Power connector(CNA1)          {Click on images to Magnify}
IR connector (CNE1)

Key connector(CNE2)
Backlight control connector (CN1)
LVDS Signal connector (CND1)
AMP & Speaker connectors (CNA2) & CNC1
POWER BOARD
Supply power for Main board, Panel and DC/DC power board.
CONNECTOR (CN2 CN3)
CONNECTORS (CN5) & (CN4)
LCD PANEL
CONNECTOR VOLTAGES


HOW TO UNLOCK THE CHILD LOCK OF APEX TELEVISIONS - UNIVERSAL REMOTE SETUP CODES

$
0
0

APEX AT-3208
Push and hold the "F" button on the remote and press mute. Release then press 6688.
APEX GT-2711
Enter the pass code of 1225 to clear.
APEX PF-2020
Push display for 10 seconds and enter 3308.

UNIVERSAL REMOTE CONTROL SETUP CODES FOR APEX
RCA 403R - 0748, 0765
RCA D770 - 1236, 1240, 1241
RCA 300U - 023, 032
RCA RCR 311W - 1137, 1141, 1235
RCA RCR 312W - 10156, 10748, 10879, 10765
RCA RCR 412BN - 10156, 10748, 10879, 10765
RCA RCU 300 - 023, 032

HP COLOR LASERJET - 2600N SERIES - COMMON CAUSES OF PAPER JAMS

$
0
0


CAUSES FOR PAPER JAMS

Occasionally, paper or other print media can become jammed during a print job. Some causes
include the following events:
PAPER PATH
The input trays are loaded improperly or overfilled
Remove any excess paper from the input tray. Make sure that the paper does not exceed the maximum stack height mark in the input tray.

Tray 2 or optional Tray 3 is opened during a print job
Make sure that Tray 2 or optional Tray 3 is closed.

Too many sheets accumulated in the output area or sheets blocked the output area
Remove any accumulated sheets and clear the output area.  For information about clearing jams from the output area.

The print media that is being used does not meet HP specifications
Use only paper that meets HP specifications. For more information, see the HP LaserJet Printer Family Print Media.

The environment in which the print media was stored is too humid or too dry.
Make sure that the printer environment is within humidity specifications. For more information.

A supply item is installed incorrectly, causing repeated jams
Verify that all print cartridges and the ETB are correctly installed.

Print media is skewed.
Input tray guides are not adjusted correctly. Adjust input tray guides so they hold the print media firmly in place without bending it.  Do not fan paper. Fanning can create static
electricity, which can cause the paper to stick
together

Print media is binding or sticking together.
Remove paper, flex it, rotate it 180 degrees, or flip it over.  Reload paper into the input tray

Print media is removed before it settles into the output bin
Reset the printer. Wait until the page completely settles in the output bin before removing it.

Print media is in poor condition
Replace the paper

Print media is not picked up by the internal rollers from Tray 2 or Tray 3.
Remove the top sheet of paper. If the paper is heavier than 163 g/m2(43 lb), it may not be picked from the tray.

Print media has rough or jagged edges
Replace the paper.

Print media is perforated or embossed.
This paper does not separate easily. Feed single sheets from Tray 1

The printer supply items have reached the end of life.
Check the printer control panel for messages prompting a replacement of supplies, or print a supplies status page to verify the remaining life of the supplies.

Print media was not stored correctly.
Replace the print media. Print media should be stored in the original packaging in a controlled environment.


HP COLOR LASERJET - 2600N SERIES - FORMATTER REMOVAL AND REPLACEMENT

$
0
0

REMOVAL OF FORMATTER
  • Remove the cassette dust cover (RC1–5200–000CN).
  • Remove nine (9) screws from the rear plate (RC1–5227–000CN).
  • Remove the rear plate.
  • Unplug three (3) connectors: two (2) data connectors and one (1) power connector.
Remove four (4) screws from the formatter.
  • Lifting it up, remove the formatter.
  • To replace the formatter, follow steps 1 through 6 above in reverse order.
When replacing the right cover, align the tabs on the upper edge of the right cover and lower edge of the face-down cover with their respective slots.


HP COLOR LASERJET - 2600N SERIES - LASERJET - DC-CONTROLLER REMOVAL & REPLACEMENT

$
0
0


DC-CONTROLLER REMOVAL
  • Remove the cassette dust cover (RC1–5200–000CN).
  • Remove nine (9) screws from the rear plate (RC1–5227–000CN).
  • Remove the rear plate.
  • Gently unplug 16 connectors.
  • Remove four (4) screws from the DC controller.
  • Remove the DC controller PCB assembly (RM1–1975–000CN).
  • To replace the DC controller, follow steps 1 through 6 above in reverse order.

MITSUBISHI LT-3280D - LT-3780D - INITIAL SETUP - DEFAULT DATA VALUES

$
0
0

OPTION MENU SETUP
  • Disconnect the HD-4001.
  • Place the Remote control in the “TV” layer.
  • Select the "MENU" display by pressing the "TV MENU" button once.
  • Press the number buttons "2", "0", "7", "0" in sequence to select the "OPTION MENU" display.
  • Press the "ADJUSTST UP/DN " buttons to select "INITIALIZE."
  • Press "ENTER."
DEFAULT DATA VALUES
{Click on images to Enlarge}

MITSUBISHI LT-3280D - LT-3780D - LCD TV - DISASSEMBLE PROCEDURE

$
0
0

DISASSEMBLY
  • REMOVE STAND-KIT.
  • REMOVE BACK COVER KIT.
Click on images to view details
  • REMOVE WALL MOUNT BRACKET
  • REMOVE SHIELD-POWER-SUB & SHIELD-CASE MAIN.
(LT-3280D)(NOT NECESSARY FOR PANEL REPLACEMENT)
REMOVE:
  • PLATE-MAIN-SIDE
  • SERVICE-KIT
  • PLATE-MAIN-BOTTOM
  • PLATE-POWER-BOTTOM
(LT-3780D)REMOVE:
  • PLATE-MAIN-SIDE
  • SERVICE-KIT
  • PLATE-MAIN-BOTTOM
  • (NOT NECESSARY FOR PANEL REPLACEMENT)
  • PLATE-POWER-BOTTOM
(LT-3780D ONLY) REMOVE SHIELD-INVERTER
  • REMOVE FUNCTION-KEY-KIT
  • REMOVE IR-KIT
  • REMOVE SA-PWB-LED
  • REMOVE POWER-KIT & SPEAKER CONNECTOR
(LT-3280D)
(NOT NECESSARY FOR PANEL REPLACEMENT)
REMOVE:
  • A-PWB-MAIN 2
  • SA-PWB-POWER
  • A-PWB-POWER-SUB2
(LT-3780D)
REMOVE:
  • A-PWB-MAIN 2
  • SA-PWB-POWER (NOT NECESSARY FOR PANEL REPLACEMENT)
  • A-PWB-POWER-SUB2
(LT-3780D)REMOVE PANEL_BKT
(LT-3280D)REMOVE FRONT-KIT & SPEAKER
(LT-3780D)REMOVE FRONT-KIT & SPEAKER
(LT-3280D) REMOVE PANEL_BKT

(LT-3780D)REMOVE SUPPORT-PANEL-BKT-RIGHT, LEFT, TOP, BOTTOM

PHILIPS HTS-8140 - SOUND BAR DVD HOME THEATER SYSTEM - FLASH PROGRAMMING PROCEDURE - Electronics Repair

$
0
0

FLASH PROGRAMMING
“The Flash Programming Software Kit 9965 100 17380.zip”includes the following application and driver software for firmware upgrading of IPOD, HDMI CEC and Power Box software in HTS8140:
  • Flash Programmer (Flash MCU Programming Software)
  • PL-2303 USB-to-Serial Driver.
Here it is generally describes how to install the driver, how to prepare the Flash Programmer Application, and how to upgrade the software of the target module. The service manual of the set will include the information on software upgrading and other software features for service in more details.
Installing USB-to-Serial Driver in service PC
  • Extract “PL-2303 Driver Installer” from “Flash Programming Software Kit.zip” into a destination folder in service PC. PL-2303 Driver should appear as an icon in destination folder as shown.
  • Double-click the icon to run the InstallShield Wizard and follow the on-screen instructions then to install the driver.
  • When the driver installation is completed, go to Control Panel -> System -> Hardware tab -> Device Manager-> Ports (COM & LPT). If the interface programming interfaces board is connected to service PC via USB cable, it should appear as “Prolific USB-to-Serial Comm Port (COMx)” in Device Manager.
  • Take note of the COM Port number to use it for setting the Flash Programmer Communication configuration, which will be described.
Note: the USB-to-Serial Comm Port will not show up in Device Manager if the programming interface board is not connected to service PC via USB cable.
Preparing Flash Programmer Software
  • Open zip file “Flash Programmer.zip” from “Flash Programming Software Kit.zip” and extract all the files as shown in figure 4. A folder “Flash Programmer” and 8 setup files should appear in the destination folder as shown.
Preparing the Flash Programmer
Configuring the work environment features
To use the flash programmer application to download the software upgrade to the target board, the following work environment features must be configured:
  • The setup file to be used
  • The target device name
  • The COM port and data transfer rate
Follow the procedure below to configure the work environment features:
  • Run the flash programmer”FlashProg.exe”. The Flash Programmer main window will appear. Go to Setup -> Setup File as shown.
  • Setup dialog box will then pop up. Go to “Setup File” tab, “Browse” the folder that contains the setup files as shown in figure.
  • locate setup file
  • For example, if the target board is MPEG Board for downloading the IPOD software, then the setup file should be HTS8140_IPOD_V1.0.ini.
  • Go to Device tab as shown in figure 9. Choose the MCU series and type for the target module as described in to table 3 (in next coming section). Click “Apply” to confirm selection. The MCU type will appear in “Chosen Device” box.
  • Series and Device
  • For example, if the target board is MPEG Board for downloading the IPOD software, then the target device is TMP91FW60 in series 900/L1. After clicking “Apply” button, the chosen device TMP91FW60 should appear in the Chosen Device box.
  • Go to communication tab as shown in figure.  Choose the USB-to-Serial COM Port number from the COM port drop down list.
Choose COM Port and Data Rate
For example if the target module is MPEG board for downloading IPOD software, then the data rate should be 19200 bps
Note: The COM port number for USB-to-Serial COM Port will not appear in the drop down list in the Communication tab of the Setup dialog box if the programming interface board is not connected to service PC via USB cable.
Select the Data Rate as described in table.
Procedure to upgrade the firmware via Programming Interface Board
  • Download the software upgrade file into service PC. The software upgrade files should be placed into the same folder as the setup files (*.ini) to make it easier to locate in Flash Programmer software for downloading them to the target module.
  • Connect the programming interface board to the Service PC via USB Cable.
  • Connect the target module to the programming interface board. Configure DIP switching settings, and jumper settings.
  • Run the Flash programmer application and configure work environment features. (see  previous section for details)
MPEG Board Download Setup
MPEG Board download set up (IPOD software upgrade)
Hints:
  • Dismantle the Main Unit, and take out the MPEG Board 1010.
  • Connect 6-pin cable from connector 1109 on Programming Interface Board to connector 1300 on MPEG Board,
  • Set DIP switch pin 2 (Boot) = ON (refer to table 1),
  • Connect jumper to apply +5 V to target module (refer to table 2).
HDMI Board downloads setup
HDMI Board download set up (HDMI CEC software upgrade)
Hints:
  • Dismantle the Main Unit, and take out the HDMI Board 1060.
  • Connect 6-pin cable from connector 1109 on Programming Interface Board to connector 1201 on HDMI Board,
  • Set DIP switch pin 1 (Boot) = ON.
  • Connect jumper to apply +5 V to target module.
Subwoofer Power Box Module Download Setup

Subwoofer Power box download set up (Subwoofer Power Box software upgrade)
Hints:
  • Supply AC Mains to the Active Subwoofer Power Box
  • Connect 13 pin cable from the Subwoofer Power Box to the connector 1103 on Programming Interface Board. 
  • Set DIP switch pin 2 (Boot) = ON, pin 4 (CU_DET) = ON, pin 6 (M_CTR) = ON (refer to table 1)
DIP SWITCH SETTINGS
JUMPER SETTINGS & CABLES NEEDED
FLASH PROGRAMMER WORK ENVIRONMENT CONFIGURATION
  •  Go to the “Object File” tab in Setup Dialog box of Flash Programmer. “Browse” and locate the software upgrade file as shown in figure.
Example: Locating the IPOD and Power Box software upgrade files (Motorola S Format *.s32)
Example: Locating the HDMI CEC software upgrade file (iHEX format *.h20)
  • After locating the software upgrade file, click OK in Object File tab of Setup Dialog Box. The Setup Dialog Box will disappear.
Note: If communication between the devices is not ready, the error message as described in figure might appear. Just click “OK” to make it disappear.
  • Press the Reset button (the while button) on the Programming Interface Board.
  • When the devices (programming interface board and target module) are ready, there will be indicated as “Connected” in status bar at the bottom of the Flash Programmer Main Window as shown in figure. Erase all data in the target module as shown in figure.
  • Message box asking for erasing all data in target device will pop up as shown in figure. Click “Yes” Button to ease all data.
  • In case the message box for chip erasing doesn’t pop up automatically, click E (Erase Button) to erase all data in target device. Chip Erase message will then pop up as shown in figure. Click “Yes” to erase all data.
  • When all data in the target module has been erased, the message box as shown in figure will pop up.
  • After the chip erasing has been completed, click P (program) button. This will download the software into the target module as shown in figure. When the software upgraded is completed the message box as shown in figure.
  • Check the software version of the target module to confirm that it has been upgraded.

ONE FOR ALL URC-7950 - URC-7955 - SETUP CODE LIST FOR TVs - Universal Remote Control

$
0
0

SETUP CODE LIST FOR TELEVISIONS
TV 888 0264  0412
A.R. Systems 0037  0352  0556  0374
0455
Accent 0009  0037  0556
Acer 1339  1509
Acoustic
Research 1296
Acura 0009
Adcom 0625
Addison 0653  0108
ADL 1217
Admiral 0093  0163  0363  0418  0264
Advent 0876
Adyson 0217  0216
AEA 0037  0556
AEG 1556  0606  1163
Agashi 0216  0264  0217
AGB 0516
Aiko 0009  0037  0556  0216 0371  0035  0433  0072 0361  0191  0264  0217
Aim 0037  0072  0412  0556 0753  0208  0706  0805 0698
Airis 0844
Aiwa 0701  1916  1908  1505
Akai 0009  0361  0208  0556 0037  0371  1442  1537 0433  0745  0191  0035 0218  0672  0329  0072 0753  0163  0412  0729
0714  0516  0715  0602 0548  0480  1074  0217 0631  0216  0264  0178 0377  0606  1037  1908 0473  0648  1259  1248 1935
Akashi 0860  0009
Akiba 0218  0282  0455  0037 0556
Akira 0418
Akito 0037  0556
Akura 0037  0218  0264  0556 0668  0412  0009  0282 0714  1982
Alaron 0216
Alba 0009  0037  1037  0556 0036  0714  0218  0418 0370  0371  0668  0355 0216  0247  0163  0487 1908  0443  1935
Alfide 0672
Alkos 0035
All-Tel 0865
Allorgan 0217
Allstar 0037  0556
Ambassador 0177
Amplivision 0217  0370  0320
Amstrad 0009  0177  0037  0516
0264  0362  0371  0218
0412  0433  0556  1037
0648  1982
Anam 0037  0556  0009  0650 0861
Anam National 0037  0556  0650
Andersson 1163  1149
Anglo 0009  0264
Anitech 0009  0264  0037  0556 0102
Ansonic 0370  0037  0556  0009 0668  0374  0163  01020411  0259  0247  1437 0104
AOC 0009  0060  0093  0108 0178
Aolingpike 0264  0412
Apollo 0473
Arcen Ciel 0109
Arcam 0216  0217
Ardem 0486  0714  0037  0633 0556
Aristona 0556  0037
Arthur Martin 0163
ASA 0104  0105  0346  0070
Asambal 1046
Asberg 0037  0556  0102
Asora 0009
Astra 0037  0556
Asuka 0218  0217  0216  0264 0282
ATD 0698
Atlantic 0037  0556  0216  0320 0259
Atori 0009
Auchan 0163
Audiosonic 0009  0037  0374  0820 0109  0556  0714  0715 0217  0370  0337  0264
0218  0486  1308
Audioton 0217  0486  0370  0264
Audioworld 0698
Aumark 0060
Autovox 0217  0247
AVP 1908
AWA 0009  0011  0036  0374 0412  0037  0556  0216 0606  0217  0108  0264 1376
Axxent 0009
Axxon 0714
B&D 1217
Baier 0876
Baihe 0009  0264  0412
Baile 0001  0009  0374  0661
Baird 0109  0343  0193  0072 0073  0217  0208  1196
Bang & Olufsen 0565
BaoHuaShi 0264  0412
Baosheng 0009
Barco 0163
Basic Line 0009  0374  0037  0218 0163  0668  0556  0282 0217  0455  0339  1037
Bastide 0217
Bauer 0805  0009
Baur 0009  0037  0361  0512
0535  0195  0556  0191 1505
Bazin 0217
Beaumark 0178
Beijing 0001  0009  0208  0226 0264  0374  0412  0482 0661  0821
Beko 0370  0714  0035  0486
0715  0037  0418  1037
0556  0606  0808
Belson 1191  0894
Bennett 0556  0037
BenQ 1756
Beon 0037  0556  0418
Berthen 0668
Best 0337  0370
Bestar 0037  0556  0370  0374
Bestar-Daewoo 0374
Binatone 0217
Black Diamond 0614  0820  1037  0556
0821  0753  1163
Black Panther 0102
Black Star 0247
Black Strip 0035
Blackway 0282  0218
Blaupunkt 0195  0191  0535  0200
0327  0328  0455  0170 0036
Blue Sky 0037  0218  0556  0668 0714  1037  0487  0715 1909  0282  0455  1908
1191  0808  1363
Blue Star 0282
Bondstec 0247
Boots 0217  0009
Bosch 0320  0327
BPL 0037  0282  1440  0556
1046  1242  0208  0896
1233  1472  1227  1443
1476  1477  1432
Brandt 0109  0625  0335  0287
0343  0560  1365
Brandt Electronique 0287  0335
Brinkmann 0037  0556  0668  0519
0418  0486
Brionvega 0037  0362  0556
Britannia 0216  0217
Brother 0264
Bruns 0486
BSR 0163  0361
BTC 0218
Bush 0009  0614  0036  1037
0037  0660  1473  0218
0714  0282  0668  0355
0163  0371  0374  0519
0698  0363  0264  0361
0487  0208  0217  1556
0556  1900  1908  0778
1259  1248  1916  1652
Caihong 0009
Caishi 0891
Canton 0218
Capsonic 0264
Carad 0610  0037  0556  0668 1037
Carena 0455  0037  0556
Carrefour 0036  0070  0037  0556
Carver 0170
Cascade 0009  0037  0556
Casio 0037  0556  0163
Cathay 0037  0556
CCE 0037  0217  0556  0329
CE 1046
Celestial 0819  0820  0821  0767
Centrex 0780  0891
Centrum 1037
Centurion 0037  0556
Century 0247
CGE 0074  0084  0247  0418 0370  0163
Changcheng 0001  0009  0264  0374
0412  0661
Changfei 0009  0329  0374
Changfeng 0264  0412  0753
Changhai 0009  0329
Changhong 0767  0820  0009  0264
0508  0821
Chengdu 0009
Ching Tai 0009
Chun Yun 0009
Chunfeng 0009  0264
Chung Hsin 0108  0036
ChungFeng 0412
Chunsun 0009
Cimline 0009  0218
Cinema 0672
Cinex 0648  1556
Citizen 0060
City 0009
Clarivox 0037  0418  0556  0070
0102
Clatronic 0037  0247  0370  0371
0714  0218  0264  0556
0217  0009  0102  0320
0648  0606  1163
Clayton 1037
CMS 0216
CMS hightec 0217
Cobolt 0891
Combitech 1908
Concorde 0009
Condor 0320  0037  0370  0556
0216  0009  0282  0102
0247  0418  0411  0163
0264
Conia 0754  0821  0894  0820
Conrac 0808
Conrad 0037  0556
Conrowa 0009  0264  0412  0698
0753  1170
Contec 0009  0216  0036  0011
0264  0037  0556
Continental
Edison 0109  0287  0487
Cosmel 0009  0337  0037  0556
Crosley 0074  0247  0084  0163
Crown 0009  0712  0037  0370
0486  0556  0418  0487
0714  0606  0672  0715
0208  0653  0339  1037
Crown Mustang0672
CS Electronics 0216  0218  0247
CTC 0247
CTX 1756
Curtis Mathes 0060  0093  0166
Cybertron 0218
Cytronix 1298
D-Vision 0037  1982  0556
Daewoo 0634  0661  0374  1909
0499  0037  0556  0009
0216  0218  0217  1137
0178  0170  1902  1908
0880  0108  1307  1598
0876  0865  0672
Dainichi 0218  0216
Daitsu 1267
Danichi 0218
Dansai 0037  0556  0264  0035
0216  0009  0036  0217
0208
Dansette 0412
Dantax 0370  0486  0714  0606
0715  1908
Datsura 0208
Dawa 0009  0037  0556
Daytek 0698  1207  0706  1376
0672  1374
Dayton 0009  1207  1374
Daytron 0009  0374  0037  0556
Dayu 0374  0661
de Graaf 0208  0044  0548  0163
0363
DEC 0795  0860  0891
Decca 0037  0072  0516  0556
0217  1137  0621  1908
Deitron 0037  0556  0374  0218
Dell 1264
Denko 0264
Denver 0037  0556  0606  1189
0587
DER 0193
Desmet 0320  0037  0556  0009
Diamant 0037  0556
Diamond 0264  0698  0009  0825
0216  0371  0860  0820
Digatron 0037  0556
Digihome 1149
Digiline 0037  0556  0105  0668
DigiLogic 0037  0556
Digitex 0820
Digitor 0037  0556  0888  0861
Digivision 0361
DigiX 0880
DiK 0037  0556
Dixi 0009  0037  0556  0247
0217
DL 0891  0780  0037  0587
0865
DMTECH 1964  1338
Domeos 0668
Domland 0394
Dongda 0009
Donghai 0009
Dream Vision 1704
DSE 0888  0861  1556  0820
DTS 0009
Dual 0519  0217  0343  0037
0556  0259  0352  0394
0163  1137  0631  1149
1037
Dual Tec 0217
Dumont 0070  0104  0102  0217
0072
Dunai 0163
Durabrand 0037  0178  1437  0556
Dux 0037  0556
DVX 0891
Dynatron 0037  0556
e:max 0606
Easy Living 1248  1259
Ecco 0773  0706
ECE 0037  0556
Edison-Minerva 0487
Elbe 0259  0435  0362  0370
0163  0037  0556  0218
0191  0411  0610  0217
0516  0361  0630
Elbe-Sharp 0516
Elcit 0247  0516  0102  0163
Elekta 0009  0037  0556  0264
0282
Elfunk 1208  1037
ELG 0037  0556
Elin 0037  0216  0548  0556
0105  0104  0361  0163
0009
Elite 0218  0037  0320  0556
Elman 0102
Elta 0009  0264  0216
Emco 0247
Emerson 0177  0178  0714  0247
0037  0556  0371  0070
0282  0320  0361  1909
0486  0370  0163  0321
0668
Emperor 0282
Enzer 0753
Erae 1371
Erres 0037  0556
ESC 0037  0556  0217
Estèle 0163
Ether 0009
Etron 0001  0009  0037  0556
0163  0820
Eurofeel 0264  0217
EuroLine 0037
Euroman 0216  0264  0037  0556
0217  0370
Europa 0037  0556
Europhon 0037  0516  0102  0163
0217  0556  0247  0216
Evesham 1248  1259
Excel 0037  0556
Expert 0259  0163
Exquisit 0037  0556  0247
Fagor 0037  0556
FairTec 1191
Family Life 0037  0556
Feilang 0009
Feilu 0009
Feiyan 0264  0412
Feiyue 0009
Fenner 0374  0009
Ferguson 0037  0073  0109  0625
0287  0335  0343  0560
0193  0556  0035  0653
0104  0108  0361  0548
0443  1037  1471  1916
1908
Fidelity 0163  0216  0512  0361
0363  0037  0556  0371
0412  0193  0264  1908
Filsai 0217
Finlandia 0208  0346  0548  0361
0163  0363  0072  0287
0343  0045
Finlux 0037  0105  0070  0104
0072  0556  0714  0346
0411  0516  0217  0163
0715  0102  0631  0492
0480  1556  0473  0418
0606  0621  0808
Firstar 0009
Firstline 0009  0037  0216  0556
0217  0374  0247  0668
0321  0714  0163  1909
0102  0411  0072  0208
0361  1037  1191  0808
1363  1163  1371
Fisher 0104  0217  0036  0208
0370  0555  0045  0361
0163  0072
Flatdisplays 0874
Flint 0037  0455  0556  0610
0072  0218  0264
FNR 0102
Fonda 1239
Force 1149
Forgestone 0193
Formenti 0037  0163  0320  0556
0486  0216
Formenti-Phoenix 0216  0320
Fortress 0093
Fraba 0037  0556  0370
Friac 0009  0037  0556  0102
0370  0499  0655  0610
Frontech 0163  0247  0264  0363
0217  0009
Fujimaro 0865
Fujitsu 0683  0072  0102  0853
0217  0163  0009  0352
0037  0556  0361  0259
Fujitsu General 0009  0217  0163
Fujitsu Siemens 1298  1259  1248  1373
1163  0808
Funai 0668  0264  0412
Furi 0264  0412
Furichi 0860
Futronic 0264  0795  0860
Future 0037  0556
G-Luxon 0844
Galaxi 0102  0037  0556  0361
0163
Galaxis 0370  0418  0037  0102
0556
Galeria 0009
Gateway 1756
GBC 0163  0009  0374  0218
0363
GE 0343  0178  0282  0560
0287  0109  0335  0625
Geant Casino 0163
GEC 0037  0163  0361  0072
0217  0516  0556
Geloso 0009  0247  0363  0163
0374
General 0109  0287
General Electric 0343  0287
General Technic 0009
Genesis 0009  0037  0556
Genexxa 0163  0218  0037  0556
0412  0009
Gericom 0865  1298  1206  1217
0880
Gevalt 1371
Giant 0217
Gintai 0721
Goldfunk 0668
Goldhand 0216
Goldline 0337
GoldStar 0001  0037  0009  0178
0370  0377  0217  0247
0556  0216  0163  0361
0109  0363  0606  0044
0714  0715  0455
Gooding 0487
Goodmans 0634  1259  0036  1037
1248  0037  0072  0499
0217  0556  0714  0343
0668  0371  1909  0374
0264  0516  0009  0487
0035  0480  0560  0335
0218  1908  0630  0661
1900  0880  1308  0587
1376
Gorenje 0370
GPM 0218
Gradiente 0653  0170  1053  0037
0556
Graetz 0163  0714  0361  0371
0037  0339  0556  1163
Gran Prix 0648
Granada 0037  0045  0072  0556
0208  0226  0217  0339
0516  0108  0036  0473
0335  0560  0163  0363
0225  0343  0548
Grandin 0037  0282  0556  0009
0163  0610  0714  0715
0668  0374  0320  0218
0455  1037  0865  1191
0880  1374  1377
Gronic 0102  0217  0163
Grundig 0195  0508  0535  1371
0037  0070  0191  0487
0556  0587  0443  0672
0706  0009  0036  0370
1935  1908  0630  1223
1916  1308  0178  1376
0343
Grunkel 1163
H&B 0808
Haaz 0706
Haier 0698  0264  0779
Haihong 0009
Haiyan 0264  0412
Halifax 0264  0216  0217
Hallmark 0178
Hammerstein 0264  0060
Hampton 0216  0217
Hanimex 0218  1908
Hankook 0178
Hanseatic 0037  0320  0556  0361
0499  0519  0163  0661
0282  0394  0634  0370
0009  0217  0377  0714
0808  0486
Hantarex 0009  0516  0037  0556
0102  1338  1465
Hantor 0037  0556
Harsper 0865
Harwa 0773  1196  1269
Harwood 0009  0412  0037  0556
0487
Hauppauge 0037  0556
Havermy 0093
HCM 0009  0282  0412  0037
0556  0217  0218  0418
0264
Hedzon 0556  0037
Hema 0217  0009
Hicon 1467
Hifivox 0109
Higashi 0216
Highline 0264  0037  0556
Hikona 0218
Himitsu 0779
Hinari 0009  0208  0036  0037
0556  0218  0163  0355
0443  0487  0264  1908
Hisawa 0282  0218  0455  0610
1908  0714
HISense 1363  0208  0009  0508
0753  0821  1170  1208
0780  0556  1074
Hitachi 0225  1225  0009  0578
0036  0044  0108  0473
0163  0343  0217  0109
0194  0178  0516  0072
0481  0499  0037  0508
0556  0548  0363  0719
0634  0744  1037  1137
1170  0105  0492  1481
0361  0512  0480  1045
1576  1149  0877
Hitachi Fujian 0108  0225
Hitsu 0009  0610  0455  0218
HMV 0193
Höher 0714  1556  0865  1163
Home
Electronics 0606
Hongmei 0009  0093  0264
Hongyan 0264  0412
Hornyphon 0037  0556
Hoshai 0218  0455  0282
Hua Tun 0009
Huafa 0009
Huanghaimei 0009
Huanghe 0009
Huanglong 0009
Huangshan 0009  0264  0412
Huanyu 0216  0374  0264
Huaqiang 0264  0412
Huari 0264  0412
Hugoson 0890  1217
Hygashi 0217  0216
Hyper 0009  0216  0217  0247
Hypersonic 0361
Hypson 0037  0264  0556  0282
0714  0715  0217  0455
1908  1037  0668  0486
Hyundai 0037  0865  1468  0556
0706  0860  0753  1152
1244  0876  1598  1556
1518  1532
Iberia 0037  0556
ICE 0217  0264  0037  0371
0009  0556  0218  0216
Ices 0218  0216
Ict 0037  1137  0556
Igo 1224
IISonic 1376
Iiyama 1217  0890
Imperial 0037  0074  0163  0247
0370  0418  0084  0556
0630  0411  0361
Imperial Crown 0001  0009  0264  0374
0412  0661
Indiana 0037  0556
InFocus 1164  1206
Ingelen 0163  0487  0610  0714
0361
Ingersoll 0009
Inno Hit 0009  0072  0516  0037
0556  0218  0217  0247
0102  0282  1163
Innova 0037
Innovation 0519  0037  0556
Innowert 0865  1298
inotech 0773  0820
Interactive 0037  0556  0512  0327
0163  0361  0370  0109
0411
Interbuy 0009  0037  0264  0247
0512  0556
Interfunk 0037  0163  0556  0247
0361  0512  0327  0370
0109  0200
Internal 0037  0556  0499  0374
1909
International 0216
Intervision 0037  0282  0217  0102
0455  0264  0371  0377
0519  0486  0370  0394
0487  0218  0163  0247
0009  0556
Irradio 0009  0037  0556  0218
0247  0371
IRT 0698
Isukai 0218  0037  0556  0282
0455
ITC 0217  0320
ITS 0037  0371  0218  0282
0264  0216  0009  0556
ITT 0163  0361  0480  0548
0473  0193  0346  0339
0208  0610
ITT Nokia 0361  0548  0163  0473
0480  0346  0208  0339
0606  0610  0631  0363
ITV 0264  0037  0556  0247
0374
JDV 1982
Jean 0036  0721  0009
JEC 0035
Jialicai 0009  0264  0412
Jinfeng 0208  0226
Jinque 0009  0264  0412
Jinta 0009  0264  0412
Jinxing 0009  0264  0698  0821
JMB 0037  0499  0634  0374
0556  0443  1908
JNC 1964  0876
Jocel 0712
Jubilee 0556
Juhua 0264  0412
JVC 0653  0036  1053  0371
0508  0606  0683  0193
0218  0418  0731  0093
0650
Kaige 0009  0264  0412
Kaisui 0009  0218  0216  0282
0037  0217  0556  0455
Kambrook 0377
Kamp 0216
Kanghua 0896
Kangli 0001  0009  0264  0374
0661
Kangyi 0009  0264  0412
Kapsch 0163  0361  0259  0104
Karcher 0037  0556  0370  0610
0163  0282  0102  0264
0778  0714  1556  0606
Kathrein 0556  0037
Kawa 0371
Kawasho 0216
KB Aristocrat 0163
Kendo 0037  0610  0362  0556
0163  0519  0512  0370
0377  0363  0411  0102
0247  0648  1037  1437
0486
Kennedy 0163  0435
Kennex 1037
Kenwood 0105
KIC 0217  0329
Kingsley 0216
Kiota 0001
Kioto 0556  0706
Kiss 0800
Kiton 0556  0037  0668
KLL 0037
Kneissel 0037  0259  0370  0610
0411  0374  0499  0556
0435  0362  1908
Kobra 1467
Kolin 0108  0036
Kolster 0037  0556  0102  0247
0218
Kongque 0009  0264
Konichi 0009
Konka 0037  0556  0371  0714
0418  0218  0641  0587
0754  0779  0894  0795
Kontakt 0487
Korpel 0037  0556
Korting 0370  0320
Kosmos 0037  0556
Kotron 0412  0264
Koyoda 0009
KTV 0217
Kuaile 0009  0264  0412
Kuba 0163
Kuba Electronic 0163
Kulun 0009
Kunlun 0208  0226  0264  0374
0661
Kyoshu 0412  0418  0264
Kyoto 0163  0216  0217
L&S Electronic 0865  0714
LaSAT 0486  0370
Lavis 1037  0037  0163
Leader 0009
Lecson 0037  0556
Legend 0009  0337
Lemair 0411
Lenco 0037  0721  0009  0163 0374  0556  0104  0587 1037
Lenoir 0009
Lesa 0247
Levis Austria 0037  0556
Lexsor 1196
Leyco 0037  0264  0072  0556
LG 0178  0001  0037  0370 1423  0377  1265  0556 0009  0714  0217  0216 0644  0060  0163  0108 0606  0109  0698  0715 1637  1148  1191  1252 1305  0247  0361
Liesenk & Tter 0037  0327  0556
Liesenkotter 0037  0327  0328  0556
Lifetec 0037  0009  0519  0374
0668  0512  0655  1037
1137  0556  0218  0264
0683  1248  1259  0714
Lloyd's 0001  0009
Local Calcutta TV 1417  1239  1242  1046
Local Chennai TV 0371  1417  0264  0602
1418  1239  1412  1425 0009
Local Delhi TV 1442  1473  1417  1418
1239
Lodos 1037  1149
Loewe 0512  0633  0790  0037 0556  0655  0370  0362 0516
Logik 0001  0011  0060  0698 0773  0009  0193  0264 0371  0880  1217  1037
Logix 0668  0519
Longjiang 0264  0412
Luker 1982
Luma 0037  0363  0163  0411 0556  0374  0009  0362 0259
Lumatron 0363  0037  0556  0362
0163  0259  0361  0217
0264  0073
Lux May 0037  0009  0556
Luxor 0194  1163  0361  0363 0480  0492  0208  0548 0163  0346  0473  1037 0631
LXI 0178
Madison 0037  0556
Magnadyne 0102  0247  0516  0163
Magnafon 0102  0516  0216  0073
Magnavox 0037  0556  0036  0706
0780
Magnum 0648  0714  0037  0556
0715  1289
Mandor 0264
Manesth 0037  0217  0556  0264 0320  0035  0163  0363
Manhattan 0037  0876  0556  0668 1037  1267  0163  0778
Marantz 0037  0556  0412  1532 Mark 0037  0556  0217  0216 0374  0009  0714  0715


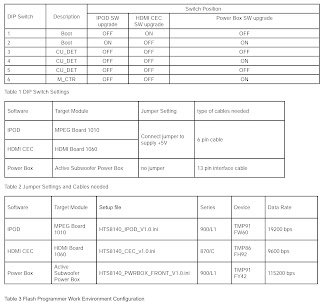
Master's 0499  0037
Masuda 0218  0371  0009  0264
0037  0217  0556
Matsui 0009  0037  0011  0556
0035  0487  0036  0072
0177  0208  0355  0217
0371  0443  0433  0516
0363  0455  0163  0045
0195  0191  0335  0714
1908  1037  1916
Matsushita 0650
Matsuviama 0587
Maxam 0264
Maxdorf 0773
Maxim 1982  1556
MCE 0009
ME 1046
Mediator 0037  0556
Medion 0037  0668  0714  1037
0808  0519  0556  0512
1137  0698  1908  1437
1900  1248  1259  0880
1289  1916
Megas 0610
Megatron 0178
MEI 1037  0037  0556
Meile 0264  0412
Melectronic 0009  0346  0037  0512
0104  0109  0343  0163
0247  0105  0217  0287
0374  0480  0492  0216
0411  0556  0634  0361
0191  0195  0661  0714
1652
Memorex 0009  0178  1037  0650
0060
Memphis 0337  0072  0009
Mercury 0001  0037  0009  0698
0264  0556  0329
Merritt 0548  0361  0163
Metronic 0625
Metz 0388  0535  0447  0746
0367  1163  0195  0191
0037  0556  0587  0668
1037  1533
MGA 0178  0037  0556  0218
0104
Micromaxx 0037  0556  0668  1037
0630  0808
Microstar 0808
MicroTEK 0820
Mikomi 1149
Minato 0037  0556
Minerva 0070  0487  0535  0195
0191  0516  0108
Minoka 0412  0037  0556
Mirror 1900
Mistral
Electronics 0193
Mitsubishi 0108  0093  0512  0037
0178  0036  0193  0535
0556  0208  1037  1393
Mitsuri General 0163
Mivar 0216  0516  0370  0609
0217
Monaco 0009
Morgan's 0037  0556
Motorola 0093
MTC 0060  0370  0512  0163
0216  0361
MTlogic 0714  1308
Mudan 0009  0208  0226  0264
0412
Multibroadcast 0193
Multistandard 0102
Multitec 0037  0556  0486  0668
1037  1556
Multitech 0009  0102  0363  0216
0486  0037  0217  0370
0556  0247  0264
Murphy 0104  0216  0072  0163
Musikland 0037  0218  0247  0556
MyCom 1376  0178
Myryad 0556  0037
NAD 0166  0178  0361  0163
Naiko 0037  1982  0606  0556
Nakimura 0374  0037  0556
Nanbao 0009  0264  0412
Nansheng 0264  0412
Naonis 0363  0163
Narita 1982
NAT 0226
National 0226  0208  0508
NEC 0170  0587  1170  0178
1270  0009  0036  0320
0455  0374  0217  0037
0556  0011  0264  0704
0412  0508  1704  0499
0653  0661
Neckermann 0037  0191  0370  0556
1505  0200  0163  0327
0418  0247  0217  0411
320        0363  0512
NEI 0037  0337  0556  0371
0163
Neovia 1206  0865  1964  1373 1371  0876  1376  1384 1338
Nesco 0247  1908
Netsat 0037  0556
Network 0337
Neufunk 0037  0009  0556  0610
0218  0282  0714
New Tech 0037  0009  0556  0343
0217
New World 0218
Newave 0009  0721  0178  0093
Nfren 0800
Nicamagic 0216
Nikkai 0072  0035  0218  0037
0556  0216  0217  0264
0337  0009  0036
Nikkei 0714
Nikko 0178
Nippon 1239
Nishi 0482
Nobliko 0102  0070  0216
Nogamatic 0109
Nokia 0361  0163  0473  0480
0548  0606  0492  0631
0339  0208  0374  0346
0320  0610  0109
Nordic 0217
Nordmende 0109  0714  0891  0287
0343  0560  0195  0037
0556  0335  0163  1259
1248
Norfolk 0163
Normerel 0037  0556
Novak 0037  0556
Novatronic 0037  0105  0374  0556
Novita 1384
NU-TEC 0455  0698  0820  0037
0556
Nurnberg 0163  0361
Oceanic 0163  0361  0208  0473
0548  0480
Odeon 0264
Okano 0370  0037  0556  0264
0072  0009
Olidata 1376
Omega 0264
Omni 0780  0891  0698
Onida 1046  1231  1224  1253
0653
Onwa 0371  0602  0218  0433
0102
Opera 0037  0556
Optimus 0650  0166
Optonica 0093
Orbit 0037  0556
ORcom 1504  1512
Orion 0037  0177  0443  0355
0556  1954  0714  0320
0655  0321  0011  0516
0009  0102  0264  0412
1916  1908  0880  1196
Orline 0037  0218  0556
Ormond 0668  1037  0037  0556
Orsowe 0516
Osaki 0072  0218  0217  0264
0412  0037  0374  0355
0556
Osio 0037  0556
Oso 0218
Osume 0072  0036  0218  0037
0556
Otto Versand 0036  1505  0037  0217
0320  0343  0093  0512
0535  0556  0195  0191
0361  0109  0226  0247
0009  0282  0516  0519
Pace 1908
Pacific 0037  0556  1137  0714
1037  0443
Pael 0216
Palladium 0370  0037  0418  0655
0411  0630  0714  1137
0191  1505  0200  0556
0247  0327  0163  0519
0217  0363
Palsonic 0264  0412  0773  0037
0779  0217  0377  0218
0698  0556  0001  0418
1183  0778  1196  1269
Panama 0009  0217  0264  0216
0037  0556  0247
Panashiba 0001
Panasonic 0650  0226  0108  0037
0556  0163  0208  0361
0367  0508  0896  0516
0548  1310  0850  0001
0853  0178  0060
Panavision 0037  0411  0556
Panda 0009  0208  0226  0264
0412  0508  0698  0821
Papouw 0037  0556
Pathe Cinema 0163  0216  0320  0370
Pathe Marconi 0109
Pausa 0009
Peng Sheng 0891
Penney 0060  0178
Perdio 0320  0072  0163  0037
0216  0282  0556
Perfekt 0037  0556
Philco 0084  0074  0418  0247
0037  0556  0163  0370
0178  0519  0481
Philex 0193  0163
Philharmonic 0217
Philips 0037  0556  0721  0191
0193  0343  0178  0108
0374  0772  0009  0200
1756  1506  0361
Phocus 1289  1308  0714
Phoenix 0037  0556  0370  0486
0163  0072  0216  0320
Phonola 0037  0556  0193  0216
Pilot 0556  0037  0712  0706
Pioneer 0760  0011  0166  0037
0109  0170  0163  0679
0556  0287  1260  0370
0343  0361  0486  0512
Pionier 0370  0486
Plantron 0037  0556  0264  0009
Playsonic 0714  0037  0217  0339
0715  1652
Policom 0102  0109  0361  0163
0070  0074  0084  0535
Polytron 0282
Poppy 0009
Portland 0374  1909
Powerpoint 0487  0037  0556  0698
0894
Prandoni-Prince 0247  0516  0361  0363
Precision 0217
Premier 0009  0264
President 0860
Prima 0009  0264  0412  1269
Princess 0698
Prinston 1037
Prinz 0072  0361  0194
Profex 0009  0163  0361  0363
Profi 0009 
Profitronic 0037  0556  0102
Proline 0037  0321  0556  0625
0634  0630  0411  0072
0621  1376
Prosonic 0037  0556  0370  0374
0371  0668  0714  0216
0217
Protech 0009  0037  0556  0102
0217  0247  0264  0337
0418  0668  0282  0163
0486  1037
Proton 0001  0178  0009  0644
Provision 0499  0037  0556  1037
0714
PVision 1191  0876
Pye 0037  0556  0374  0412
Pymi 0009
Qingdao 0208  0226  0264  0412
Quadral 0218
Quasar 0247  0650  0865  0009
Quelle 0011  0037  1505  0070
0074  0104  0361  0412
0109  0535  0512  0191
0036  0217  0247  0327
0084  0328  0105  0668
0556  0195  0200  0264
1037  0346  0009
Questa 0036
R-Line 0037  0556  0163
Radialva 0109  0218  0163  0037
0556  0287  0337
Radiola 0037  0556  0217
Radiomarelli 0516  0247  0037  0556
RadioShack 0037  0556  0178
Radiotone 0009  0037  0556  0370
0418  0412  0648  0668
0264  1037
Rank 0070
Rank Arena 0036  0602  0753
RBM 0070
RCA 0625  0060  0093  0178
0560  0335  0618  0343
0679  0753
Realistic 0178
Recor 0037  0418  0556
Rectiligne 0037  0556
Rediffusion 0361  0548  0036  0346
Redstar 0037  0556
Reflex 0037  0556  1037  0668
Relisys 0865  0876  0877  1206
1207  1214  1298
Reoc 0714  0634  1909
Revox 0037  0556  0370
Rex 0163  0259  0264  0363
0411  0247
RFT 0370  0072  0264  0037
0556  0486
Rhapsody 0216
Ricoh 0037  0556
Rinex 0773  0418
Roadstar 0009  1037  0218  0264
0418  0037  0556  0714
0668  0282  1916  1189
1900
Rodex 0037  0556
Rover 0036  0877
Rowa 0037  0264  0698  0009
0217  0712  0216  0587
0556
Royal Lux 0370  0412  0335
Rukopir 0556  0037
Saba 0109  0625  0163  0287
0560  0335  0343  0516
0361  0498  0548  0650
0714
Sagem 0610  0455  0282  0830
618        1596
Saige 0009
Saisho 0009  0011  0516  0177
0264  0217  0163
Saivod 0037  1982  0556  1163
0668  0712  1037
Sakaï 0163
Sakyno 0455
Salora 0163  0194  0361  0548
0516  0363  0339  0208
0480  0621
Salsa 0335
Sambers 0102  0516
Sampo 0009  0036  0093  0178
0650  0721
Samsung 0618  0644  0060  0587
0037  0178  0556  1249
0009  0093  1630  1235
0482  0217  0370  0264
0329  0216  0072  0208
0519  0163  0226  0625
1584  1619  0766  0821
Sandra 0216  0217
Sanjian 0264  0412
Sansui 0037  0655  0729  0556
0706  0371  0727  1412
0861  1236  0602  0455
0888  0753  1371
Santon 0009
Sanyo 0208  1208  0721  0011
0036  0045  0370  0339
0072  0216  0104  0217
0555  0412  0009  0508
0163  0037  0108  0556
0486  0170  0704
Sanyuan 0009  0093
Save 0037  0556
Saville 1908
SBR 0037  0556  0193
Schaub Lorenz 0361  0548  0714  0606
0486  0374  1191
Schneider 0037  1137  0218  0247
0556  0371  0519  0668
0394  0352  0259  0343
0217  0361  1037  0163
0648  0714  1909  1908
1982  1916  0070
Scotch 0178
Scotland 0163
Scott 1189  0178
Sears 0178
Seaway 0634
Seelver 0556  1037  0037
SEG 0036  0037  0217  0556
0264  1037  0668  1437
0487  0009  0163  0634
0102  0247  0362  0216
1163  0218  1909  0714
SEI 0102  0177  0516  1505
0163  0037  0556
Sei-Sinudyne 0102  0516  1505  0037
0556
Seitech 1217
Seleco 0163  0259  0362  0363
0411  0371  0036  0264
0346  0435
Sencora 0009
Sentra 0035  0218  0009
Serino 0610  0455  0216  0093
Shancha 0264  0412
Shanghai 0009  0208  0226  0264
0329  0412
Sharp 0093  0009  1193  0036
0653  0193  0650  0516
0200  0760  1393  1163
Shen Ying 0009
Shencai 0009  0264  0412
Sheng Chai 0009
Sheng Chia 0009  0093
Shenyang 0009  0264  0753
Sherwood 0009
Shintoshi 0037  0556
Shivaki 0037  0556  0443  0374
0178
Show 0418  0009  0072
Siarem 0102  0516  0163
Siemens 0037  0191  0195  0535
0200  0327  0328  0556
0361
Siera 0037  0556  0587
Siesta 0370
Silva 0037  0556  0216  0361
0648
Silva Schneider 1556
Silver 0036  0037  0455  0361
0556  0715  0163
SilverCrest 1037  0037  0556
Singer 0009  1537  0037  0556
0102  0247  0435  0335
0163
Sinotec 0773
Sinudyne 0102  0177  0516  0163
0361  1505  0037  0556
1908
Sky 0037  0282  0880  0178
0556  1504
Skymaster 0105
Skysonic 0753
Skyworth 0037  0556  0009  0264
0698  0727  0753
Sliding 0865  0880  1374  1377
0800
SLX 0668
Smaragd 0487
Soemtron 0865  1298
Sogera 0320
Solavox 0163  0361  0072  0548
0037  0556
Sonawa 0218
Sonber 0102
Songba 0009
Soniko 0037  0556
Soniq 1467
Sonitron 0208  0370  0339  0217
Sonneclair 0037  0556
Sonoko 0009  0037  0556  0264
0282  0217
Sonolor 0163  0208  1505  0548
0361  0282
Sontec 0037  0556  0370  0009
Sony 1505  1651  0011  0036
0650  1625  1751  0353
0102  0037  0556  0093
0170  0074
Sound & Vision 0102  0218  0374  0037
0556
Soundesign 0178
Soundwave 0037  0418  0556  0320
0715
Sowa 0060  0226  0036  0178
Soyea 0773
Spectra 0009
Ssangyong 0009
Staksonic 0009
Standard 0009  0037  0217  0556
0218  1037  0320  0374
Starlite 0009  0163  0037  0556
0264  0412
Stenway 0282  0218
Stern 0163  0259  0363  0264
0411  0435
Stevison 1982  1556
Strato 0037  0556  0264  0009
Strong 1163  1149  1037  0037
556        0874
Stylandia 0217
Sunic Line 0037  0556
Sunkai 0321  0355  0455  0218
0610  0037  0556  0487
0865
Sunstar 0371  0037  0556  0009
0264
Sunwatt 0455
Sunwood 0037  0556  0009
Superla 0516  0216  0217
Supersonic 0208  0556  0698  0264
0805  0455
SuperTech 0009  0216  0037  0556
0218
Supra 0178  0374  0009
Susumu 0218  0335  0287
Sutron 0009
SVA 0587  0865
Svasa 0805
Swissline 0247
Swisstec 1504  0880
Sydney 0216  0217
Synco 0036  0060  0093  0178
Sysline 0037  0556
Sytong 0216
T+A 0447
Tacico 0178  0009
Tai Yi 0009
Taishan 0009  0374
Tandberg 0367  0411  0109  0337
0362  0361  0163
Tandy 0218  0072  0093  0217
0163  0247
Targa 1371
Tashiko 0036  0721  0217  0650
0170  0216  0163  0363
Tatung 1556  0009  0036  0037
0556  0072  0516  0060
0217  0011  0621  1908
1756  1371  1259  1248
1191
TCL 0727  1046  0412  0698
TCM 0714  1289  0808
Teac 0009  0698  0037  0512
0264  0282  1437  0412
1037  0418  0556  0455
0712  0668  0217  0706
0721  1909  0178  0170
0714  1149  1755
TEC 0217  0247  0009  0335
0337  0259  0037  0556
0361  0163
Tech Line 0037  0556  0668  1437
1163
Tech Lux 1189
Techica 0218
Technema 0320
Technica 1982
Technics 0650
TechniSat 0655  0037  0556  0163
1267
Technisson 0714  1289
Technosonic 0037  0556  0499
Techwood 1163
Tecnimagen 0556
Teco 0009  0036  0093  0178
0218  0264  0653
Tedelex 0217  0698  0606  0706
0037  0418  0009  1537
0208  0891  0587  0556
Teiron 0009
Tek 0795
Teknika 0060
Tele System 0876
Teleavia 0109  0343  0287
Telecor 0037  0556  0163  0218
217        0259  0394
Telefunken 0625  0074  0560  0109
0587  0335  0698  0343
0712  0498  0820  0896
0754  1504  0780  0287
0891  0084  0073  0037
0556  0486  0714  1556
0346  0821
Telefusion 0037  0556
Telegazi 0037  0163  0259  0218
0264  0556
Telemeister 0320  0037  0556
Telesonic 0037  0556
Telestar 0009  0037  0556  0412
Teletech 0009  0037  0556  0668
0247  0337  1037
Teleton 0036  0217  0163  0259
0363
Televideon 0320  0163  0216
Teleview 0037  0556
Telexa 0102
Tempest 0009  0037  0556  0264
Tennessee 0037  0556
Tensai 0104  0218  0320  0037
0556  0217  0009  0105
0374  0371  0377  0247
0715  0163  1037
Tenson 0320  0009
Tesla 0037
Tevion 0519  0894  1248  1298
0037  1259  0556  0767
1556  0648  0808  0668
0865  1137  0714  1037
1289
Texet 0216  0217  0218  0374
0009
Texla 0780
Thomson 0109  0320  0625  0287
0560  0343  0335  0037
0556  0216
Thorn 0035  0108  0193  0037
0109  0072  0073  0225
0074  0343  0104  0361
1505  0084  0499  0512
0535  0556  0011  0335
0036  0045  0374  0070
Thorn-Ferguson0104  0108  0343  0109
0193  0361  0335  0499
0073  0035
Tiane 0093
Tiny 1196  1269
Tiny Digital 0660
TMK 0177  0178
Tobishi 0218
Tobo 0009  0264  0412
Tokai 0072  0037  0556  0337
0668  0163  0217  0374
0009  1037
Tokaido 1037
Tokyo 0216  0035  0329
Tomashi 0282  0218
Tongguang 0264  0412
Tongtel 0780  0587
Topline 1037  0668
Toshiba 0508  0060  1508  0009
0035  0036  1289  0070
0093  0102  0714  0264
0217  0412  0109  0718
0195  0618  0191  0644
0650  0821  1916  1908
0698  0037  1945  1164
1163  1935  1556  1265
1704
Towada 0102  0217
Toyoda 0009  0371  0264
Trakton 0009  0264  0217
Trans Continens 0668  0217  1037  0037
556        0486
TRANS-continents 0621  1374  1377  0865
0556
Transonic 0037  0698  0556  0712
0455  0587  0512  0264
0418  0009
Transtec 0216
Triad 0037  0556  0218
Trident 0516  0217
Tristar 0264  0218  0193
Triumph 0177  0516  0346  0556
0037
Tsoschi 0282
Tuntex 0009
TVTEXT 95 0556
Uher 0320  0037  0556  0374
0418  0486  0370  0259
0480
Ultravox 0102  0374  0247  0216
0163  0037  0556
Unic Line 0037  0556  0473  0455
United 0714  0037  0715  0556
1916  1908  1037  0587
1982
Universal 0714  0037  0556
Universum 0037  0346  0074  0105
0104  0195  0264  0473
0370  0535  0361  0247
0492  0480  0200  0418
0011  0512  0036  0070
0163  0556  0411  0327
0328  1505  0668  0217
0109  0362  0337  0177
0631  0009  0084  1037
1437  0170  1163  1149
0618
Univox 0037  0556  0337  0163
Utax 0163
V7 Videoseven 1755  0178  0880  1376
1217
Vestel 0037  0163  0217  0556
0668  1037  1163
Vexa 0009  0037  0556
Victor 0653  0036  0650
Videocon 0508  1450  1449  1448
0329  1452  1442  1540
Videologic 0218  0216
Videologique 0216  0218  0217
Videosat 0247
VideoSystem 0037  0556
Videotechnic 0216  0217  0320  0374
Videoton 0163
Vidikron 0102
Vidtech 0036  0178
Viewpia 0876
ViewSonic 1755  1330
Viper 0337
Visiola 0216
Vision 0037  0320  0264  0556
0217
Vistar 0361
Vortec 0037  0556
Voxson 0163  0178  0037  0556
0363  0418
Waltham 0217  0418  0287  0037
0556  0668  0109  1037
0163  0443
Wards 0178
Warumaia 0374  0661
Watson 0037  1037  0320  1248
1259  0556  0163  0009
0668  0218  0519  0394
1908  1437  1376  1512
0327
Watt Radio 0102  0163  0216
Wega 0036  0037  0556
Wegavox 0009  0037  0556
Weipai 0009
Welltech 0714
Weltblick 0037  0556  0320  0217
Weltstar 1037
Weston 0037  0556
Wharfedale 0037  0861  0519  0896
0556  1556
White
Westinghouse 0037  0320  0216  0556
0337  1909
Windsor 0668  1037
Windstar 0282  0337
Windy Sam 0556
Wintel 0714
World-of-Vision 0880  0890  0865  1289
1298  0877  1217
Worldview 0455  0045
X-View 1191
Xenius 0634  0661
Xiahua 0009  0264  0412  0698
0773  0779
Xianghai 0009
Xiangyang 0264  0412
Xihu 0264  0412
Xinaghai 0412
Xingfu 0009
Xinghai 0264
Xingyu 0009
Xinsida 0329
Xlogic 0698  0860
Xoro 1196  1217
Xrypton 0037  0556
Yamaha 0650  1576
Yamishi 0282  0455  0218  0037
0556  0217
Yingge 0009
Yokan 0037  0556
Yoko 0037  0217  0264  0556
0218  0009  0370  0339
0216  0247
Yonggu 0009
Yorx 0218
Yousida 0009
Yuhang 0009
Zanussi 0363  0217
Zenith 0178  1909
Zenor 0339
Zhuhai 0009  0374
Zonda 0698  0779
ZX 1908

AKIRA PLT-42TT PLASMA TV - PCBs - PART NAME and PART NUMBER - TV repair

$
0
0


IMAGE BOARD ASS’Y è DPWB11393-1G-S
AC MASTER POWER SWITCH B/D ASS'Y.  è DPWB11398-1G
AUDIO AMPLIFIER BOARD ASS'Y è DPWB11372-1G-SS
FRONT BUTTON CONTROL BOARD ASS'Y è DPWB11372-1G-KS
AV MODULE BOARD ASS'Y è DPWB11372-1G-TS
INTERFACE BOARD- Y ASS’Y è LJ92-00569B
LOGIC BOARD ASS'Y è LJ92-00573
PANEL POWER SUPPLY ASS'Y è LJ44-00025A
POWER INPUT MODULE ASS'Y è LJ92-00579A
INTERFACE BOARD- X ASS'Y è LJ92-00568B
LOGIC E-BUFFER ASS'Y è LJ92-00581A
Y AMP BOARD-UPPER ASS'Y è LJ92-00570A
Y AMP BOARD-LOWER ASS'Y è LJ92-00571A
LOGIC F-BUFFER ASS'Y è LJ92-00582A
ELECTRONIC MODULES LIST

AKIRA PLT-42TT PLASMA TV - TROUBLESHOOTING CHART - TV Repair

$
0
0

TROUBLESHOOTING                [Click on images to Enlarge]
NO POWER
NO PICTURE
VERTICAL LINE FAIL
HORIZONTAL LINE FAIL
NO CONTROL BY REMOTE COMMANDER
FRONT PANEL BUTTONS FAIL
                               For details about circuit boards, see the previous post here.
NG = Not Good.  G = Good.  N = No


AKIRA PTV-4300 - 43" PROJECTION TV - CONVERGENCE ADJUSTMENT PROCEDURE - TV repair help

$
0
0

CONVERGENCE ADJUSTMENT
When performing after sales service or repair, you usually need only to fine-adjust the crosshatch in red and blue and make them be lined with green crosshatch on the basis of green crosshatch. It is no necessary to perform other adjustments.
In the convergence mode, if the first two displayed characters are "P", it means PAL, and if "Q", it means NTSC. In the two modes of DVD, the character display is the same as the two above-mentioned modes. "V" stands for VGA mode. These characters are omitted in the following OSD display description.
CONVERGENCE ADJUSTMENT IN PAL

  • With receiving of PAL signal, and the volume to 0, press and hold MUTE button until the red "MUTE" character becomes three colors (or white), then press MENU button on front panel of TV to enter "S" mode (Press "S" button on the jig to enter "S" mode directly when in production). Press yellow RECALL button to enter the phase of convergence adjustment, and the red convergence crosshatch displays in the screen. Press DISPLAY button to switch into green crosshatch signal.
Note Generally speaking, you can go to Step IV, V, VI and VII directly.
  • Press TEXT button to clear fine/coarse adjusted data of the six channels in the RAM of convergence IC.
Note: Normally speaking, do not reset the RPTV to0. If it is necessary, exit convergence mode and time it before your resetting.

  • Adjustment of static convergence in green.Press PIP button until the video image super-imposes crosshatch testing signal. Press PICTURE MODE SELECTION button until char-acter "DCGH" appears, then press POSITION UP/DOWN buttons to call up "DCGH"( DCGV). Press VOLUME UP/DOWN buttons to make the center of green line (field) of 5-CH video test pattern locate at the center of the screen. Then press PIP button to conceal the video image.
Phase adjustment
Adjustment of H. fine adjustment and phase of horizontal test
  • Instate of crosshatch in green, press PICTURE MODE SELECTION button to call up " FINE NODE", and press SWAP button to switch the cursor into green. Press MUTE button until "P LOCK" appears. Now press POSITION UP button to display the GV value of fine adjusted convergence at H#4/V#4 point as the maximum value on the screen.
  • Press AV button to call up "FINE PHASE", Press VOLUME UP/DOWN buttons to make the peak appear at the vertical line at the right of horizontal center.
  • Press AV button to call up "TEST PHASE". Adjust VOLUME UP/DOWN button to make the cursor locate at the peak.
  • Reset GV value at H#4/V#4 to "0".
Setting of start lines of fine-adjusted convergence (setting of STARTLINES)
  • In the state of crosshatch in green, press PICTURE MODE SELECTION button to enter "FINE MODE", then press VOLUME UP/DOWN buttons to set the GH fine adjustment value at H#4/V#4 as maximum, and make the peak displays on the screen.
  • Press AV button to call up "STARTLINES", then press VOLUME UP/DOWN buttons till the peak displays at the center of the field. (Note: "START LINES" value can only be odd number).
  • Return the GH fine adjusted value at H#4/V#4 to "0".
  • Press PICTURE MODE SELECTION button to display "DCRH". Press POSITION UP/ DOWN buttons to call up "KGV3", and press VOLUME DOWN button to set KGV3 as a larger data. If the cursor is off the horizontal center, press AV button to call up "COAR PHASE", then press VOLUME UP/DOWN buttons to return the cursor to the original position.
  • Press PICTURE MODE SELECTION button until "DCRH" displays on the screen. Press POSITION UP/DOWN buttons to call up "KGH3", and adjust VOLUME UP/DOWN but-tons to set "KGH3" as a larger data. If the cursor is off the field center, press AV button to call up "START VALUE", then press VOLUME UP/DOWN buttons to return the cursor to the original position.
"COUNTUP" Setting
  • Press and hold AV button till "COUNTUP" appears, and press VOLUME UP/DOWN buttons to make crosshatch signal basically be straight in the V/H direction. (The recommended COUNTUP data: PAL 3D, and NTSC 3D.
Coarse-adjustment of convergence in green
  • Press PICTURE MODE SELECTION button till "DCRH" appears, then press POSITION UP/DOWN buttons to select coarse adjustment order as follows:
  • Trim horizontal skewin green (KGH3).
  • Trim green horizontal pincushion distortion (KGH1)
  • Trim green horizontal amplitude (KGH2).
  • Trim green field pincushion distortion (KGV2).
  • Trim field keystone distortion (KGV1).
  • Trim green field skew (KGV3).
Fine-adjustment of convergence in green

  • Press PICTURE MODE SELECTION button to call up "FINE MODE", press SWAP but line to turn the cursor into green. Press DIGIT SELECTION button to select the point or line adjustment. Press MUTE button to move or fix the cursor: (When OSD is "POINT MOVE" or "LINE MOVE", press VOLUME UP/DOWN or POSITION.UP/DOWN buttons to move the cursor up, down, left and right. When OSD is "POINT LOCK" or "LINE LOCK", press VOLUME UP/DOWN or POSITION UP/DOWN buttons to adjust the dot or line data).
Notes:
  1. In the process of fine adjustment, the cursor will change into 3 colors automatically. Press MUTE button after adjusting a data, the cursor will return to original color.
  2. It is recommended to perform trimming fine errors from the center of the screen toward out-side area in circumference inaccordance with such an order as whirlpool-shape. In other word, at first, trim fine error at the point of H#4/V#4 of the screen center, next trim each fine point in circumference around outside of the 8 points, then trim other points in the same way.
  3. If adjusting one point to increase fine error of nearby ones, which are not adjusted, you should adjust the data at your target point to make the error of nearby ones in the permissible range. Otherwise the fine adjustment data of nearby point might not meet the requirement even if the data reaches maximum.
  4. You can save the adjusted data by pressing MENU button. When OSD displays "DATA OK", the data is saving, and when " DATA OK" disappears, it indicates the saving is complete.
  5. When adjusting the parameters of coarse and fine adjustment in green, it will activate the convergence of the other two guns at the same time.
Adjustment of convergence in red
  • In convergence mode, press DISPLAY button to switch crosshatch state into red and green.
  • Adjustment of static convergence in red, adjust "DCRH" and "DCRV" of coarse adjustment convergence, so that superimpose the center of line-field in red with center of line-field in green.
  • Trim horizontal skew in red (KRH2)
  • Trim horizontal linearity distortion in red (KRH1)
  • Trim horizontal amplitude in red (KRH3)
  • Trim field keystone in red (KRV1)
  • Trim field skew in red (KRV2)
  • Adjusting procedures of fine adjustment data in red is the same as that in green, but crosshatch on the screen is yellow.
Adjustment of convergence in blue
  • In convergence state, press DISPLAY button so that crosshatches in red and blue appear on the screen, and press PIP button to make the cursor become blue.
  • Adjustment of static convergence in blue. Press and hold PICTURE NODE SELECTION button until "DCBH" appears, Press POSITION UP/DOWN buttons to call up "DCBH" and "DCBV", and press VOLUME UP/ DOWN buttons to position the line-field center of convergence in blue at the center of screen.
  • Trim horizontal skew in blue (KBH2),
  • Trim horizontal linearity distortion in blue (KBH1).
  • Trim horizontal amplitude in blue (KBH3).
  • Trim field keystone in blue (KBVI).
  • Trim field skew in blue (KBV2).
Saving
  • Press MENU button to save the adjusted data.
  • Press STILL/MOVABLE PICTURE ADJUSTMENT button to copy the adjusted data to the corresponding mode of DVD 
CONVERGENCE ADJUSTMENT IN OTHER MODES
Repeat the above-mentioned procedures for NTSC and VGA.
CONVERGENCE ADJUSTMENT IN DVD MODE
In DVD mode, it requires fine trimming PAL and NTSC.

SONY TELEVISIONS - SERVICE MODE ENTRY METHODS

$
0
0

SERVICE MODE ENTRY PROCEDURE
KL-37W1U KL-50W1U KL-50W2U LE-1 chassis
To enter the service mode:
  • Turn the mains power on while holding the "PROG +" and the "PROG -" buttons on the set simultaneously.
  • "TT" will appear at the top right hand corner of the screen
  • Press "01" on the remote control to see the service menu on screen
  • Press the "arrow up" and the "arrow down" buttons on the remote control to navigate the menus
  • Press the "OK" button to select an adjustment
  • Press the "arrow up" and the "arrow down" buttons to highlight an adjustment, and press the "OK" button to allow adjustment.
  • Use the "arrow up" and the "arrow down" buttons to adjust the value
  • Press the "OK" button to store
  • Turn off the power to exit the service mode
Test mode 2 allows entry of TT numbers to perform some functions. The important numbers for this chassis are given below:
TT00 switch the TT mode off
TT08 set the set to shipping condition
TT15 Factory reset values
TT16 User defined reset values
TT16 loads the contents of the NVM when the set was last switched off
TT15 loads the factory defaults. To do this press TT15 followed by TT16.
KV25F1U -KV29F1U -KV25F2U -KV29F2U -KV25F3U -KV29F3U - KV25X1U -KV29X1U -KV24WX1U -KV28WX1U -KV24WS2U - N28WS2U - KV28WF1U -KV32WF1U -KV29FX11U -BE-3D chassis
KV28DS20U KV28DX20U KV32DS20U KV32DX20U BE-3E chassis
  1. Turn the set on and then put into standby.
  2. Press the On Screen Display button
  3. Press the "5" button
  4. Press the "VOLUME +" button
  5. Press the "TV" button
  6. Press the "MENU" button on the remote control to bring up the test screen
  7. Use the joystick on the remote control to navigate the service menu (< > ^ v keys BE-3E)
  8. Press the right joystick to enter the selected adjustment
  9. Turn off the power to store and exit the service mode
Test mode 2 allows entry of TT numbers to perform some functions. The important numbers for this chassis are given below:
TT00 switch the TT mode off
TT08 set the set to shipping condition
TT24 Set CTV to UK model (PAL I)
TT44 Set all favorite pages to 100
 To re-initialize the NV Ram follow the procedure below:
  • Set the TV to channel 59
  • Select TT49
  • Switch off at the mains supply, wait for one minute and switch the set back on
  • Select channel 59, and enter the service mode
  • Select TT24, (UK destination)
  • Select TT42, (general reset)
  • Switch off at the mains, wait for one minute and switch on again
  • Auto tune the channels and carry out a complete adjustment on the set.
KP-41S3U RE-1 chassis.
  1. Turn the set on and then put into standby
  2. Press the On Screen Display button
  3. Press the "5" button
  4. Press the "VOLUME +" button
  5. Press the "TV" button.
  6. Use buttons "1" and "4" on the remote control to navigate the service menu
  7. Use buttons "3" and "6" to adjust the selected data
  8. Press the "MUTE" button and then the "0" button to store the data
  9. Press the "5" button and then the "0" button to initialise the set.  (Note, this is an extreme measure and should be used with caution)
  10. Turn the set off to exit.
KP-41S3U RE-1 chassis
  • Turn the set on and then put into standby
  • Press the On Screen Display button
  • Press the "5" button
  • Press the "VOLUME +" button
  • Press the "TV" button
  • Use buttons "1" and "4" on the remote control to navigate the service menu
  • Use buttons "3" and "6" to adjust the selected data
  • Press the "MUTE" button and then the "0" button to store the data
  • Press the "5" button and then the "0" button to initialise the set. (Note, this is an extreme measure and should be used with caution)
  • Turn the set off to exit.
KP-41DS1U RE-2D chassis
  1. Turn the set on and then put into standby
  2. Press the On Screen Display button
  3. Press the "5" button
  4. Press the "VOLUME +" button
  5. Press the "TV" button
  6. Use the JOYSTICK Up / Down on the remote control to navigate the service menu
  7. Move the JOYSTICK to the right > to enter the selected adjustment
  8. Press OK on the JOYSTICK to EXIT
  9. Press the "MUTE" button and then the "0" button to write data
  10. Press the "On Screen Display" button to copy data
  11. Turn the set off to quit the service mode when adjustments are complete.
KV-14V4U TE-1 chassis
  • Turn the set on and then put into standby
  • Press the On Screen Display button
  • Press the "5" button
  • Press the "VOLUME +" button
  • Press the "TV" button
  • Use buttons "1" and "4" on the remote control to navigate the service menu
  • Use buttons "3" and "6" to adjust the selected data
  • Turn off the power to store and exit the service mode
The codes on screen are as follows:
ODL Power On Delay
OSH On screen H-position
MUT FTZ muting on *Do not adjust
VAM V. size
VBC V breath correct *Do not adjust
PAM Parabola amp. *Do not adjust
PTI Parabola tilt *Do not adjust
VLI V-linearity
CCR Corner correction *Do not adjust
HAM V. cent *Do not adjust
BIN Blue intensity
GIN Green intensity
RIN Red intensity
CLS Colour system
SCO Sub contrast
SBR Sub brightness  
SSA Sub saturation
SHU Sub hue
SSH Sub sharpness
G2 adj G2 adjustment
32K adj

KV-16WS1U KV-21X1U KV-21X4U KV-20WS1U BE-5 chassis
  • Turn the set on and then put into standby
  • Press the On Screen Display button
  • Press the "5" button
  • Press the "VOLUME +" button
  • Press the "TV" button
  • Press the "MENU" button on the remote control to see the service menu on screen
  • Use the "blue" button and the "green" button on the remote control to navigate the service menu
  • Use the "Yellow" button and the "red" button to adjust the selected data
  • Turn the set off to exit and store
Test mode 2 allows entry of TT numbers to perform some functions. The important numbers for this chassis are given below:
TT00 switch the TT mode off
TT08 set the set to shipping condition
TT26 Set CTV to UK model (PAL I)
TT41 Re-initialize NVM
TT43 Re-initialize geometry settings
Note: For TT numbers above 41, the channel number needs to be 59.

KV-32WS4U KV32WX4U KV32WX2U AE-4 chassis
  • Turn the mains power on while holding the "PROG +" and the "PROG -" buttons on the set simultaneously.
  • "TT" will appear on the top right hand corner of the screen.
  • Press "MENU" on the remote control to get the service menu on screen
  • Navigate the menu by moving the joystick up and down.(green and blue)
  • Press the joystick down to select an adjustment.
  • Turn TV off to exit service mode
Test mode 2 allows entry of TT numbers to perform some functions. The important numbers for this chassis are given below:
TT00,10,20,30,40 pressing these numbers will switch the TT mode off
TT01 switch service menu on
TT08 set the set to shipping condition
TT21 picture rotation automatic function
TT25 Status menu display
TT49 New initialization

KV28FD1E KV28FD1K KV32FD1E KV32FD1K GE-1 chassis
  1. Turn the mains power on while holding the "PROG +" and the "PROG -" buttons on the set simultaneously.
  2. "TT" will appear on the top right hand corner of the screen.
  3. Press "MENU" on the remote control to get the service menu on screen
  4. Navigate the menu by moving the joystick up and down.(green and blue)
  5. Press the joystick down to select an adjustment.
  6. Turn TV off to exit service mode
The main adjustments are:
MCP CXA2101 -picture (color, drives, brightness etc)
Deflection control SDA9361 –geometry

KV-29X5U FE-1 chassis
  • Turn the set on and then put into standby
  • Press the On Screen Display button
  • Press the "5" button
  • Press the "VOLUME +" button
  • Press the "TV" button
  • Use buttons "^"(Green) and "v"(Blue) on the remote control to navigate the service menu
  • Press YELLOW button to enter required menu
  • Use buttons "<" and ">" to adjust the selected data
  • Press the "MENU" button to store the data and exit
Test Menu
Picture -(RGB. Drives & Cut offs, Sub Colour, Sub brightness)
Geometry -(Vert. and Horiz. adjustments)
Sound -(NICAM Information)
TV Status -(Destination and Country info.)
AGC. Adjust

SONY TRINITRON COLOR TVs - STANDBY LIGHT BLINKING CODES

$
0
0

BLINKING CODES

  • Unit is dead, No blinks - Problem in the standby power section. Might check fuse, R607, Q601, IC601, R612 and VDR601 (should show open).
  • Continuous blink once a second, no pausing - No reply from the jungle IC301 (data bus is busy, shorted to ground, or held high), IK video path is defective.
  • Two blinks - B+ over current protection (OCP), unit goes to the standby mode then displays the 2 blink fault. Could be a short in the power supply of any of the circuits.
  • Three blinks - B+ over voltage protection (OVP), unit goes to the standby mode then displays the 3 blink fault. This is also a problem in the power supply circuit, check T603 and R672.
  • Four blinks - No vertical Deflection (V STOP), Screen goes to a single horizontal line then the video signal muted. Check IC1509, Q1505
  • Five blinks - AKB circuit (automatic kine bias), the timer/standby indicator blinks for about 30 seconds then goes to the self-diagnosis function. Something is wrong with the video. Check video out, Q705, 732, 761 and other components on the C board, also check Q218, 219, 220 on the A board. In addition, unit could be in IK blanking, try turning up screen slightly.
  • Six blinks - No Horizontal (H STOP), no raster, goes to the blinking self-diagnosis function immediately. Check C515 & 516 and the jungle IC, IC206.
  • Seven blinks - High voltage shutdown. The high voltage has exceeded 33k and the unit goes immediately into safety shutdown. Check power supply regulation and horizontal circuits.
  • Eight blinks - Problem with the audio (AUDIO), unit goes to standby and blinks the self-diagnosis code. Check IC406 audio amp, PS401, and 402. On some projection models of Sony TV sets, this code means that T8005 (flyback transformer), or the associative components in the high voltage circuits are defective on the D board.
  • Nine blinks - Replace D 6116 and D 6301 on the “G” board, do not re-solder as this will fix the problem temporary. Or Panel Module Error or Thermal Error. If it is intermittent 9 blinks, meaning sometimes the TV comes on and other times you get flashing, then change the switching regulator on the “G” board or check connections. Make sure the regulator is -12 or -13 (negative).
  • Ten blinks - Check Q8014 and Q8013 for shorts, leakage, or bad solder connections on the “ D” board. If the transistors are bad, check R8051 and IC8005, also on the “D” board.


One blink is not used for self diagnosis.
Intermittent problems 
This is a great feature. You can also bring up these fault codes on-screen to see a list of the problem numbers with the abbreviation of the problem and the number of times this problem has occurred. This is slightly different than entering the service mode. To see the diagnostic screen, press the following buttons: Display, Channel, 5, volume Minus, ( not plus ) then Power. This brings up a screen with a list of the problems and number of times they have occurred. Each of the problems named, are abbreviated as, “OCP”, “OVP”, “V STOP”, ETC. We have repeated them in parentheses in the text for the “Blinks” described above so you can correlate between the diagnostic screen and the blink codes.
Now that you know about these self-diagnostics, how do you use them? Say that you have a set with a black screen. You see that the LED is blinking four times. This would tell you that you have no vertical sweep, which is why the video is muted. If it was blinking 6 times, you would know that you have a horizontal fault. It’s not a sure cure..
IMPORTANT: After you repair the unit, you MUST clear the values on this diagnostic screen. These codes do not reset themselves after the fault is corrected, so if you don’t clear them, you’ll be seeing “old” fault codes the next time you enter this screen. Clearing is done by going into the service mode (display, channel, 5, volume plus, then power ). Press 8 and Enter, which returns everything to the factory preset condition.

PANASONIC PLASMA TV FAULTS - SYMPTOMS - REPAIR

$
0
0

GENERAL FAULTS AND REPAIR
TNPH0716XXX, TNPH0721XXX & TNPH0731XXX series
Once AC power cord is plugged in, unit will turn on by itself  Depends on factory settings, unit will either display Video, Component or Tuner icon. After few seconds, screen will change to service mode automatically.
NOTE: Since unit is in service mode, only buttons 1, 2, 3 or 4 on remote are working (rest of buttons are non-functional).
Cause: All new A boards supplied from factory needs to be initialized.
Perform HARD RESETof Plasma TV unit by pressing & holding VOL DOWN (-)on unit and MENU button on remote at the same time for about 3 seconds.
After hard reset, please confirm if Plasma TV powers ON in user mode and check overall functionality.
TH-42PX600 - TH-50PX600
Vibration noise from left or right speaker.
Speaker box is making direct contact with cabinet parts.
Installing mounting screw in the center of speaker box prevents from touching the cabinet parts and minimizes the risk of vibration noise.
Install screw, part number THEL049 to both speaker boxes as in attached picture.
TH42PX60
AC cord plugged in, relay clicks then TV shuts down with power LED 10 blinks.
No Vin supply to IC520 (power control IC) due to open R712 & shorted C527
TH-37PW5 series, TH-37PWD5 series, TH-42PW5 series, TH-42PWD5 series
TH-42PHD5 series, TH-42PHW5 series, TH-50PHD5 series, TH-50PHW5 series
Panel may show the color faulty in the part of TV screen.
Faulty IC(Video Amp ) in lot defect (Problem in IC production process)
Ref No.: IC9002(G-Ch), IC9003(B-Ch), IC9004(R-Ch) Part No.:C0ABHA000033
Replace IC9002, IC9003, IC9004 by new one. (Those ICs are located on D Board)
Affected Production Serial.:
Production from 2003/March(Y*321***) to 2003/June(Y*334***)
TH42PX600 - TH42PX60
Shuts down with power LED 10 blinks.
Missing 395Vdc output due to shorted Q412 & Q413 and open PR401.
Replace Q412, Q413, PR401 & check/replace Q408 and Q409.
Note: Always confirm condition of Q408 & Q409, in some cases could be shorted.
TH42PX60
Picture disappears after few minutes but sound is OK.
Low Ldo_5V supply to IC9800 (DC to DC Converter) due to leaky D9801.
Replace D9801 on the D board.
TH42PX600
Unit shuts down with power LED 10 blinks.
Shorted Q409 & open PR401
Replace Q409 & PR401 [P-Board]

PANASONIC TH-42PX75U - H-50PX75U - TH-42PX77U - TH-50PX77U - PLASMA TV - TROUBLEHOOT - LED BLINKS 1,2,3,4 &5 TIMES

$
0
0

SHUT-DOWN PROBLEMS
  • Normally, when there is a power problem, shutdown occurs immediately.  So, to resolve a power problem, voltage checks are necessary before shutdown.
  • Check if the power comes up after disconnecting the suspected board.  If power comes up  after disconnecting a board, the board is defective.   “Power comes up”equals “no shutdown”.
  • After exchanging the following boards, voltage adjustment is required.  P board, SC board, SS board.
LED BLINKING TIMING [Click on table to Magnify]
TROUBLEHOOT FOR ONE TIME BLINK
  • To confirm this, unplug the TV and disconnect connectors A5, A6, and A7 from the A board.
  • The TV should turn on automatically and display a white screen.
Trouble Mode => Communication Error
Defective Board => A Board
To find the defective board:
The A board is defective.
LED BLINKS 2 TIMES
TH-50PX77U = SS33
Trouble Mode => 5V down SOS
Defective Board (Possibility) => P, D, A, SC, SS Board (P > A, D, SC, SS)
TH-42PX75U = SS23
TH-42PX77U = SS23
TH-50PX75U = SS33
LED BLINKS 3 TIMES
Defective Board => D Board
Trouble Mode => .3V down SOS
LED BLINKS 4 TIMES
YES > Panel.
Trouble Mode è Power Supply SOS
Defective Board è Primarily P board or possible D board
Turn the unit on.
Is pin 12 of CN P25 of the P board high before shutdown?
NO > D Board.
YES > P Board
LED BLINKS 5 TIMES
Trouble Mode => 5V SOS
Defective Board => D, P, C, SC, SS board or Panel (DDIC)*1
Disconnect CN P12 of the power supply board. Measure the resistance of pin 1 of the lead cable to ground.
Is there a short to ground?
NO > Proceed to more extensive troubleshooting.
Warning: Disconnect AC Power prior to  making any disconnection or connection.

Viewing all 2033 articles
Browse latest View live


<script src="https://jsc.adskeeper.com/r/s/rssing.com.1596347.js" async> </script>