Quantcast
Channel: Electro help
Viewing all 2033 articles
Browse latest View live

HOW TO UPGRADE FIRMWARE _ SERVICE MODE - TROUBLESHOOT - PHILIPS - 231T1SB/00_231T1SB/62

$
0
0

FIRMWARE [SOFTWARE ] UPDATE
ISP Instruction
For the procedure you will require:
1.  A personal computer with web browsing capability.
2.  An archive utility that supports the ZIP-format (e.g. WinZip for Windows or Stuff It for Mac OS).
3.  Preferably empty USB memory stick.
Note: Only FAT/DOS-formatted portable memory is supported.
Software upgrades procedure
1.  Decompress the ZIP-file and copy the file upgrade.pkgto the root directory of the USB portable memory 
2.  Power off your TV and remove all memory devices.
3.  Insert the USB portable memory that contains the software upgrade.
4.  Switch on your TV with the power switch at the right side of the TV.
5.  At start-up the TV will scan the USB portable memory until it finds the update content. The TV will automatically go to the upgrade mode. The light will flash. After a few seconds it will display the status of the upgrade procedure.
6.  When the software upgrade was successful, remove the USB portable memory (not supplied) and restart your TV with the power switch  at the right side of the TV.
7.  Press the MENU button, and then press Number key 1 =>9 =>9 =>9on the remote control to enter the factory [Service] mode, and check the software version.
TROUBLESHOOTING
The TV does not switch on
Disconnect the power cable from the power outlet. Wait for one minute then reconnect it.
Check that the power cable is securely connected.
The remote control is not working properly:
Check that the remote control batteries are correctly inserted according to the + / - orientation.
Replace the remote control batteries if they are flat or weak.
Clean the remote control and TV sensor lens.
The standby light on the TV blinks red
Disconnect the power cable from the power outlet. Wait until the TV cools down before reconnecting the power cable. If the blinking reoccurs, contact Philips Consumer Care. 
You forgot the code to unlock the TV lock feature Enter ‘5351’.
The TV menu is in the wrong language
Change the TV menu to your preferred language.
When turning the TV on/off/to standby, you hear a creaking sound from the TV chassis:
No action is required. The creaking sound is normal expansion and contraction of the TV as it cools and warms up. This does not impact performance.
Previously installed channels do not appear in the channel list:
Check that the correct channel list is selected.
No digital channels were found during the installation
Check that the TV supports DVB-T or DVB-C in your country. See the listed countries on the back of the TV.
The TV is on, but there is no picture:
Check that the antenna is properly connected to the TV.
Check that the correct device is selected as the TV source.
There is sound but no picture:
Check that the picture settings are correctly set.
There is poor TV reception from an antenna connection:
Check that the antenna is properly connected to the TV.
Loud speakers, unearthed audio devices, neon lights, high buildings and other large objects can influence reception quality. If possible, try to improve the reception quality by changing the antenna direction or moving devices away from the TV.
If reception on only one channel is poor, fine tune this channel.
There is poor picture quality from connected devices:
Check that the devices are connected properly.
Check that the picture settings are correctly set.
The TV did not save your picture settings:
Check that the TV location is set to the home setting.This mode offers you the flexibility to change and save settings.
The picture does not fit the screen; it is too big or too small:
Try using a different picture format.
The picture position is incorrect:
Picture signals from some devices may not fit the screen correctly. Check the signal output of the device.
There is a picture but no sound from the TV:
Note: If no audio signal is detected, the TV automatically switches the audio output off — this does not indicate malfunction.
Check that all cables are properly connected.
Check that the volume is not set to 0.
Check that the sound is not muted.
There is a picture but the sound quality is poor:
Check that the sound settings are correctly set.
There is a picture but sound comes from one speaker only:
Verify that sound balance is set to the centre.
HDMI connection issues
There are problems with HDMI devices:
Note that HDCP support can delay the time taken for a TV to display content from a HDMI device. 
If the TV does not recognize the HDMI device and no pictures are displayed, try switching the source from one device to another and back again.
If there are intermittent sound disruptions, check that output settings from the HDMI device are correct.
If an HDMI-to-DVI adaptor or HDMI to •DVI cable is used, check that an additional or AUDIO IN (mini-jack only).
Computer connection issues
The computer display on the TV is not stable:
Check that a supported resolution and refresh rate is selected on the computer.
Set the TV picture format to unscaled.


PHILIPS 20" COLOR LCD MONITOR 201B2CB/00 - 201B2CB/01 - HOW TO ATTACH AND DETACH THE BASE

$
0
0

BASE ATTACHMENT _ Applicable to Philips201B2CB/00 - 201B2CB/01 - 201B2CB/69 - 201B2CB/75 - 201B2CS/00 - 201B2CS/93 - 201BL2CS/00 - 201BL2CB/00 - 201BL2CB/27 - 201BL2CB/93
Place the monitor face down a smooth surface taking care to avoid scratching or damaging the screen.
Hold the monitor base stand with both hands and firmly insert the base stand into the base column.

Attach the monitor base stand to the base column then fasten base stand.
Caution:  Do not release the height adjustment pin lock from the base column before the base stand is firmly fixed.

POWER & INVERTER SCHEMATIC (Circuit Diagram) - PHILIPS 20" LCD MONITOR

$
0
0

POWER [SMPS]
CONVERTER
CLICK ON THE SCHEMATICS TO MAGNIFY

LCD PANEL FAILURE SYMPTOMS - for all type, dimension & brand

$
0
0

PANEL FAILURE [Common to all LCD panels; irrespective of its size and brand]
Presents problems that could be made by LCD panel.  It is not necessary to repair circuit board. Simply follow the mechanical instruction to eliminate failure by replace LCD panel.
* Vertical block defect.
* Vertical dim lines.
* Vertical lines defect (Always bright or dark)
* Horizontal block defect.
* Horizontal dim lines.
* Horizontal lines defect. (Always bright or dark)
* Has bright or dark pixel.
* Polarizer has bubbles
* Foreign material inside polarizer. It shows liner or dot shape.
* Concentric circle formed.
* Bottom back light of LCD is brighter than normal.
* Back light un-uniformity.
* Back-light has foreign material.  Black or white colour, liner or circular type.

HOW TO DISASSEMBLE PHILIPS 201B2_201BL2 - LCD MONITOR

$
0
0

APPLICABLE TO - PHILIPS
201B2CB/00_201B2CB/01_201B2CB/69_201B2CB/75_201B2CS/00_201B2CS/93_201BL2CS/00_201BL2CB/00_201BL2CB/27_201BL2CB/93
* Place the monitor face on a safe surface, and remove the four screws to remove the stand base ASSY from the monitor.
* Open the latches and along the red arrowhead direction as the picture to open other latches.
* Disconnect the key cable, headphone cable and speaker cable.
* Remove the two screws and disconnect the USB cable to remove the USB Board.
* Disconnect two connectors and four screws.
* Disconnect the FFC cable.
* Remove the four screws that secure the connectors.
* Remove the five screws to remove the power board and scaler board from the main frame.
* Disconnect all the connectors.
* Remove the speakers.

PHILIPS 201B2CB/CS - 201BL2CB/CS - Meridian-2 - SERIES LCD MONITOR - TROUBLESHOOTING - Service Mode (Factory Mode)

$
0
0

TROUBLESHOOTING
NO POWER
NO VIDEO [POWER LED - WHITE]
DIM
COLOUR IS NOT OPTIMAL
SERVICE MODE [FACTORY MODE]
> Press and ‘OK’  buttons at the same time, power on the monitor, and then press the menu again; the picture will appear on the top left corner. Choose “Input”item, and then choose “Factory”, you will enter into the factory mode.
> Press “MENU” to enter into user mode to restore the factory setting. Otherwise, monitor will not be able to save setting. If not save the setting, when AC ON/OFF, it will can’t find the boot LOG from the screen.

> Press “Exit” to save & exit service mode [factory mode].


KONKA KLC-2718UG - SMPS [POWER SUPPLY REGULATOR] - SCHEMATIC (Circuit Diagram)

$
0
0

SMPS SCHEMATIC                (Click on the Schematic to Zoom In)

HOW TO ENTER SERVICE MODE - ADJUSTMENTS - KONKA KDL26BZ31U KDL32BZ22U

$
0
0
SERVICE MODE ENTRY & ADJUSTMENTS
Applicable to KONKA - KDL26BZ31U KDL32BZ22U KDL32BZ23U KDL32BZ25U KDL32BZ25U-A KDL32BZ31U KDL37BZ23U KDL37BZ25U KDL37BZ25U-A KDL37BZ31U KDL42BZ23U KDL42BZ31U KDL42BZ25
The way to enter factory menu
* Press “Menu” button and then press “Pre.Ch” button five times, you can enter the factory   menu, and the software version information is shown in the last line.
The way to exit factory menu
* Press, “Exit” to exit the factory menu, the value you have changed will be save automatically.
Factory menu operation method
* Press the “Up / Dn” to select the item you desired change, and press “OK” to set the value.
White balance adjustment
* Receive black or white signal under AV or PC mode, adjusting brightness and contrast to set the brightness to 5 Nit in dark area and 90 Nit in bright area.
* Adjust white balance. Enter factory menu, select “White Balance” item, and enter to the White Balance Adjust Menu.
WBRO 0-100
WBGO 0-100
WBBO 0-100
WBRG 0-100
WBGG 0-100
WBBG 0-100
Adjusting chromaticity coordinates of black and white to fit the requirement.
Cool(9300K) x=0.283±0.015 , y=0.297±0.015
Normal(7500K) x=0.299±0.015 , y=0.315±0.015
Warm(6500K) x=0.313±0.015 , y=0.329±0.015
Gamma Table Loading
Enter factory menu, select “White Balance” item, and press “OK” to set the value.
Burn on
** When source is in TV mode, select the item of“Burn On” in factory menu, keep the state for “On” by pressing “OK” button. After putting on the burning switch, the TV set will be boot up straightly and keep in the snowflake burning on state if you put on the power supply. Here, the function that auto power-off after in 15 minutes while no signal input will be invalid. When the burning on finished, please change the “Burn on” state to “Off”.
Parameters Setting
* Select the item of “Parameters Setting” in factory menu, press “OK” to enter Parameters Setting Menu. Then you can set some value for volume and image features.
Auto Colour
Select the item of “Auto Colour” in factory menu, press “OK” to start auto adjust the colour.
AGC
* Select the item of “AGC” in factory menu, press “OK” to set the value (0/1/2/3/4/5/6), then choose the value for the best image effect.
Software Resetting
** In factory menu, select the item of “Set Default Value” , press “OK” button and turn off TV, then turn on. This operation can clean up all data that modified by users, and make the data go back to default settings.
Advanced Video Menu
* Select the item of “Advanced Video Menu” in factory menu, press “OK” to enter Advanced  Video Menu. Then you can set some value.


INFINITY BU2 - POWERED SUB-WOOFER - SCHEMATIC [CIRCUIT DIAGRAM]

$
0
0

SPECIFICATIONS
Driver ................12"Woofer
Nominal Impedance............4Ω
Enclosure Design.............Tuned Port
Amplifier Power .............100watts RMS
Frequency Response ...........30Hz-150Hz(±3dB)
Crossover Frequency ...........50to200HzContinuously Variable
Inputs
Line Level ...............RCA jacks
High Level...............(Speaker) Input terminals
Outputs................Full range Speaker
Sensitivity
Low Level ...............70mV
High level ...............1.7V
Input Impedance
Low Level ...............12KΩ
High level ...............4.7KΩ
Auto-Off Delay .............8minutes
Dimensions
Inches ................14½x14½x14½"
Metric ................36.8 x 36.8 x 36.8cm plus 1¼" (32mm) for feet
Shipping Weight.............43lbs/19.5 Kg.
                                   CLICK ON THE PICTURES TO ZOOM IN
POWER AMP
PRE-AMP
PRE-AMP CROSSOVER

SAMSUNG HT-Z120 - HT-Z120T/XET - HOW TO SET BUYER REGION CODE - OPTION TABLE

$
0
0

BUYER REGION CODE SETTING
* Turn on the set.  Press the ‘PORT’ button to change to USB function.
* Insert any kind or USB memory stick or MP3 player.
* Press ‘Stop’ button on the remote control [twice in case that a music or a video is playing]
* “Remove USB” appears on the VFD, the keep press ‘4’ button on the remote control. [Don’t pull out the USB stick]
* “TEST” appears on the VFD, then press ‘3’ ‘3’ on the remote control.
* “— ‘ appears on VFD, then press the two digit on the remote control according to the region code in the option table.
*The set automatically power off and the region setting is completed now.

When replacing the main PBA and system micom [UIC1] should be inserted the region code.  The set will not work properly if you don’t insert the region code.  The region code is inserted by the remote control.
OPTION TABLE

SAMSUNG BN-44 - POWER SUPPLY [SMPS] SCHEMATIC [ CIRCUIT DIAGRAM]

$
0
0

SCHEMATIC
CLICK ON THE SCHEMATIC TO MAGNIFY

HYUNDAI TV 800 - 7 INCH TFT LCD TV - SCHEMATIC (Circuit Diagram)

$
0
0

SCHEMATIC
CLICK ON THE SCHEMATICS TO MAGNIFY

GRUNDIG THARUS 51 - LCD 51-9410 DOLBY - DISASSEMBLE - ADJUSTMENTS

$
0
0

DISASSEMBLE PROCEDURE
Rear Panel

Unscrew 2 screws A and remove the rear panel.
ATS Reset
Press mains button "ON" while holding down the ">" button on the remote control.
The basic analogue values are loaded.
The ATS bit is set. When switching on the next time, this option releases the ATS euro plus function. The current program allocation (channels) is cleared.
Electronic Program Lock (parental lock)
Enter the key sequence "7 0 3 8 5 8 0" to cancel your personal code number.
Software Version Number
Call up the "EASY DIALOG" menu. Pressing the green button indicates the software version number.
Factory Settings
Press the "i", "red" and OK buttons to call up the factory settings.
Switching the Blue Screen Background On and Off
Call up the "Blue screen" menu via "EASY DIALOG"–> "Installation"–> "Dealer service menu"–> Code number "8500"–> "Picture settings".  Select "on" or "off".
Front-LED
Call up the "Front-LED" menu via "EASY DIALOG"–> "Installation"–> "Only for the retailer"–> Code number "8500"–> "Hardware equipment".  Select "3 Colors" or "1 Color".
Watchdog On/Off
Call up the "Watchdog" menu via "EASY DIALOG"–> "Installation"–> "Dealer service menu"–> Code number "8500"–> "Special functions".  If the Watchdog timer is not reset in regular intervals, a new start is initialized.  Set the Watchdog to "off" or "on".

PANASONIC · TX-32LE7P/SA - SERVICE MODE - SELF CHECK MODE - POWER SUPPLY SCHEMATIC

$
0
0

APPLICABLE TO PANASONICTX-32LE7FA/TX-32LE7LA/TX-32LE7PA/TX-32LE7F/SA/TX-32LE7P/SA/TX-26LE7FA/TX-26LE7LA/TX-26LE7PA/TX-R32LE7A/TX-R26LE7A
How to enter Service 1
* Set the Bass to maximum position, set the Treble to minimum position then keep pressing the INDEX button on the remote control and press the down button (-/v) on the TV set, this will place the TV set into the Service Mode 1.
Key Command
* Press the RED / GREEN buttons to step up / down through the functions.
* Press the YELLOW / BLUE buttons to alter the function values, to alter White Raster use +/-buttons
* Press the OK button after each adjustment has been made to store the required values.
* To exit the Service Mode, press the "N" button.
Self Check
Self-check is used to automatically check the bus lines and hexadecimal code of the TV set. To enter Self-Check mode, keep pressing the STATUS [i] button on the remote control and press the down (-/v) button on the TV set. 
To exit Self Check, switch off the TV set at the power button.
If the CCU ports have been checked and found to be incorrect or not located then " - - " will appear in place of "O.K."
SMPS SCHEMATIC
CLICK ON THE SCHEMATIC TO ZOOM IN

TOSHIBA LED LCD TV - SMPS & LED DRIVE CIRCUIT _ LE1956(A)W / LE2456(A)F / LE1958(A)W / LE2458(A)F )

$
0
0

SMPS SCHEMATIC   [CLICK ON THE SCHEMATICS TO MAGNIFY]
LED VOLTAGE DRIVE


TOSHIBA - 40XV700FDA SMPS - [LC4049FDA] - SCHEMATIC (Circuit Diagram)

$
0
0

LC4049FDA SMPS PWB
SCHEMATIC
CLICK ON THE SCHEMATIC TO ZOOM IN

EAY3280890 - PLASMA TV SMPS SCHEMATIC - [MC80F308, NCP1653A, NCP1217A, KIA34063A, KA755]

$
0
0

SCHEMATIC [SMPS]     CLICK ON THE SCHEMATICS TO MAGNIFY

HAIER HLC32A LCD TV - HOW TO ENTER SERVICE MODE [Factory Mode]

$
0
0

FACTORY MODE
Using the remote controller to enter into Factory Menu.
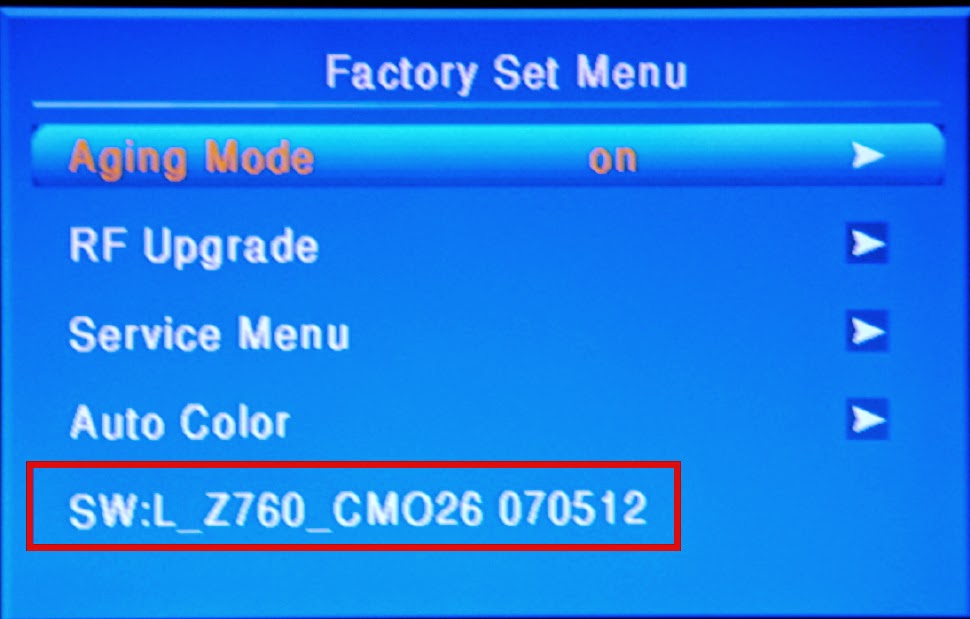
Press Menu to call main menu displaying on the screen. And then press “8”,“ 8”,“9”,“3”,“OK” in turn. You will see the screen displaying as following. You can check the version of the software, adjust some settings. But we don’t advise you change these settings. Because of the TV has already held in the state of optimality. If you have to change these settings, please connect with the local service center.
FACTORY MENU
CURRENT SOFTWARE VERSION
AGING MODE IS FOR FACTORY RUN IN TESTING
RF Upgrade is for debugging, and do not change anything commonly.
Service Menu is for debugging, and do not change anything commonly.
Auto Color is for debugging, and do not change anything commonly.
Remark: The date of the chart only is a example, please don’t adjust the factory mode base on it.

PHILCO MINI SYSTEM PH-800 - SMPS SCHEMATIC (Power Supply Circuit Diagram)

$
0
0

SMPS SCHEMATIC
CLICK ON THE SCHEMATIC TO MAGNIFY

PHILIPS - [PHILCO] - TV PH19D LED TV – POWER SUPPLY (SMPS) – SCHEMATIC (Circuit Diagram)

$
0
0

SMPS SCHEMATIC
CLICK ON THE SCHEMATIC TO ZOOM IN

Viewing all 2033 articles
Browse latest View live


<script src="https://jsc.adskeeper.com/r/s/rssing.com.1596347.js" async> </script>