Quantcast
Channel: Electro help
Viewing all 2033 articles
Browse latest View live

HOW TO ADJUST Va and Vs VOLTAGES TO LG PLASMA TVs

$
0
0
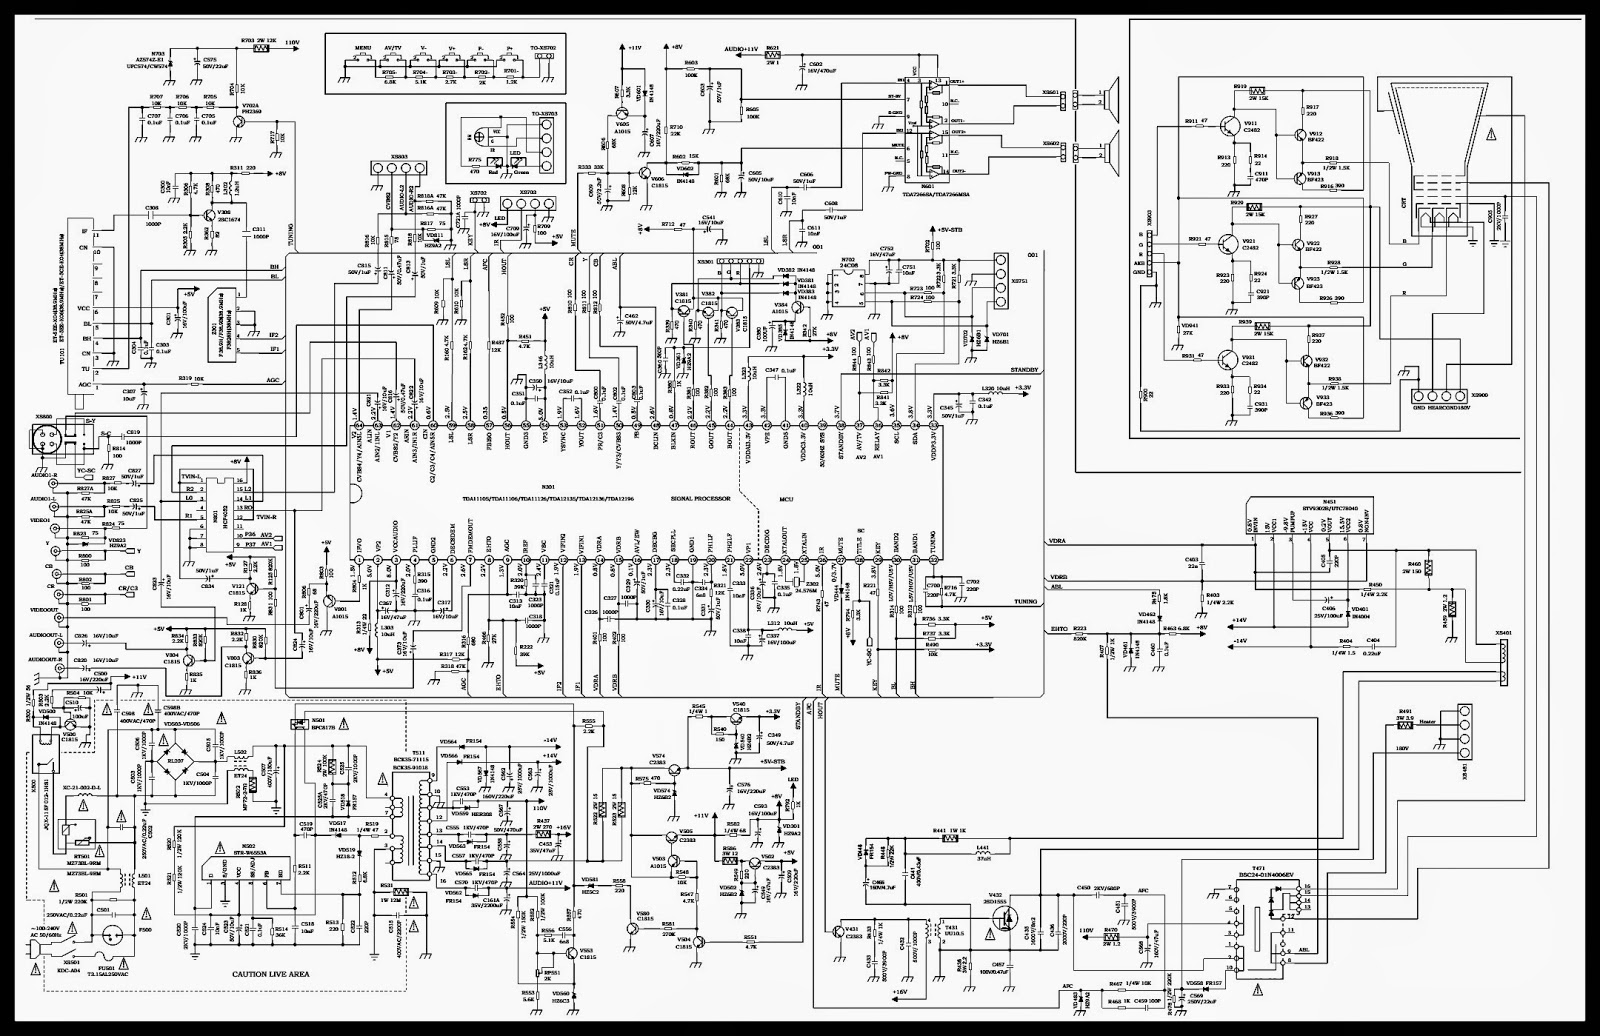
LG 32”XGA_50”_42”_60” Plasma TelevisionsDisplay Panel Voltage (Va& Vs) adjustment procedure
50” POWER PCB Ass’y Voltage Adjustment (Va, Vs voltage Adjustment).  50PG6000, 50PG6010
Va Adjustment.
* After receiving 100% Full White Pattern, HEAT RUN.
* Connect + terminal of D. M.M. to Va pin of P811, connect -terminal to GND pin of P811.
* After turning VR901,voltage of D.M.M adjustment as same as Va voltage which on label of panel right/top (deviation; ±0.5V)

Vs Adjustment
* Connect + terminal of D. M..M. to Vs pin of P811, connect -terminal to GND pin of P811.
* After turning VR951, voltage of D.M.M adjustment as same as Vs voltage which on label of panel right/top(deviation ; ±0.5V)

42” POWER PCB Ass’y Voltage Adjustment (Va, Vs voltage Adjustment)  42PG6000, 42PG6010

Va Adjustment.

> After receiving 100% Full White Pattern, HEAT RUN.
> Connect + terminal of D. M..M. to Va pin of P811, connect -terminal to GND pin of P811.
> After turning VR901,voltage of D.M.M adjustment as same as Va voltage which on label of panel right/top (deviation; ±0.5V)

Vs Adjustment
> Connect + terminal of D. M..M. to Vs pin of P811, connect -terminal to GND pin of P811.
> After turning VR951, voltage of D.M.M adjustment as same as Vs voltage which on label of panel right/top(deviation ; ±0.5V)

60”(FHD), 50”(FHD) POWER PCB Ass’y Voltage Adjustment (Va, Vs voltage Adjustment). 50PG7000, 60PG7000, 50PG4000

Va Adjustment.
* After receiving 100% Full White Pattern, HEAT RUN.
* Connect + terminal of D. M..M. to Va pin of P11, connect -terminal to GND pin of P11.
* After turning VR901,voltage of D.M.M adjustment as same as Va voltage which on label of panel right/top (deviation; ±0.5V)

Vs Adjustment.
* Connect + terminal of D. M..M. to Vs pin of P11, connect -terminal to GND pin of P11.
* After turning VR951, voltage of D.M.M adjustment as same as Vs voltage which on label of panel right/top(deviation ; ±0.5V)

32”(XGA) POWER PCB Ass’y Voltage Adjustment (Va, Vs voltage Adjustment). 32PG6000, 32PG6010

Va Adjustment.

1. After receiving 100% Full White Pattern, HEAT RUN.
2. Connect + terminal of D. M.M. to Va pin of P811, connect -terminal to GND pin of P811.
3. After turning VR901,voltage of D.M.M adjustment as same as Va voltage which on label of panel right/top (deviation; ±0.5V)

Vs Adjustment

1. Connect + terminal of D. M..M. to Vs pin of P811, connect -terminal to GND pin of P811.
2. After turning VR951, voltage of D.M.M adjustment as same as Vs voltage which on label of panel right/top(deviation ; ±0.5V)

The module keeping condition
* The normal temperature condition (more than 15°C)  >  Immediately the line supply.
* The module keeping condition: 0°C > The module must be kept for more than 2 hours at the normal temperature.
* The module keeping condition: -20°C > The module must be kept for more than 3 hours at the normal temperature.
* The case of Gu-mi factory at the winter season. > The module must be kept for more than 5 minutes at the heating zone (40°C~45°C)

Because this is not a hot chassis, it is not necessary to use an isolation transformer. However, the use of isolation transformer will help protect test instrument.
> Adjustment must be done in the correct order.
> The adjustment must be performed in the circumstance of 25±5°C of temperature and 65±10% of relative humidity if there is no specific designation.
> The input voltage of the receiver must keep 100~240V, 50/60Hz.
> The receiver must be operated for about 5 minutes prior to the adjustment.
 After RGB Full White in HEAT-RUN Mode, the receiver must be operated prior to the adjustment.

To Enter into HEAT-RUN MODE
* Press the POWER ON KEY on R/C for adjustment.

* Press the ADJ KEY on R/C and enter EZ ADJUST Select “3. Test Pattern” by using D /E (CH +/-) and press ENTER(V ) Select “White” by using F /G (VOL +/-) and press ENTER(V )
> Set is activated HEAT run without signal generator in this mode.
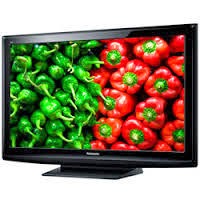
> Single color pattern (RED / BLUE / GREEN) of HEAT RUN MODE uses to check panel.
Caution:If you turn on a still screen more than 20 minutes (Especially digital pattern, cross hatch pattern), an after image may be occur in the black level part of the screen.


HOW TO ENTER SERVICE MODE – HITACHI 42PD7500 Plasma Display – ERROR CODES – LED BLINKING CODES – SELF DIAGNOSIS – BURN-IN MODE

$
0
0
How to enter Service Mode _ Error Display Codes _ LED blinking codes _ Self Diagnosis _ Signal circuit Self Diagnosis _ Burn in mode – Factory Reset - Memory Initialize HITACHI 42PD7500 – Plasma Display

LED BLINKING CODES
Self-Diagnosis Function
This chassis has 2 modes of self-diagnosis function.
1.  PDP panel check mode. It indicates the one latest record of the PDP panel failure with blinking of the power indication light (LED).
2. Signal circuit check mode.
 It indicates the check result on some points of the signal circuit and the history of them with On-Screen Display (OSD).

PDP panel self-diagnosis function
This function is for a PDP panel failure with no picture.
To enter to this Self-Diagnosis mode, follow the next steps:
Preparation
1. The Power Cord should be connected to AC line and the Main Power switch should be turned on.
2. Turn the power off by the SUB-POWER button of the monitor or the remote control.
Procedure
1. Press the SUB-POWER button and  button on the bottom of the monitor at the same time, and keep it for more than 5 seconds after the power turned on.
2. It generates red blinking series of the power indicator light.
3. Any operation would cancel the Self -Diagnosis mode.
4. The next table shows the PDP PWB in which failure most probably would be allocated according to the number of blinks.

Signal circuit self-diagnosis function
This function is for the failure of the signal circuit, for example the phenomenon as below:
"Sometimes power turns off abnormally.""Sometimes picture disappears abnormally."
To enter to this Self-Diagnosis mode, follow the next steps
Preparation
1. The Power Cord should be connected to AC line and the Main Power switch should be turned on.
2. Turn the power off by the SUB-POWER button of the monitor or the remote control.
Procedure
1. Press the SUB-POWER button and  button on the bottom of the monitor at the same time, and keep it for more than 5 seconds after the power turned on.
2. The monitor will be turned on, and it will display On-Screen Display of the Self-check result and the failure history as below.
3. Any operation would cancel the Self -Diagnosis mode.
4. The following table shows the OSD symbols and contents of failure PWB in which failure most probably would be allocated according to the number of blinks.

If you clear history of failure, make FACTORY RESET: enter the factory setting mode; press the SUB-POWER( ) button, INPUT SELECT button and   button on the bottom of the monitor at the same time. And keep it for more than 5 seconds after the power turned on.
ERROR CODES DISPLAY
Factory Reset
After all of the adjustments of main chassis are finished, perform FACTORY RESET.
Press the SUB-POWER button, INPUT SELECT button and 
 button at the same time, and hold for more than 5 seconds.
The unit is set to factory settings.

Memory Initialize operation
NOTE:
The execution of this function returns the adjustment codes to the preset values, therefore, adjustment
data will be lost.
Procedure* Enter Adjustment Mode.
* Select MEMORY INIT adjustment code (No.658) and change the data value from 0 to 1.
* Activate MEMORY INIT by pressing OK button for more than 3 seconds.
* Select No.525 and change data value from 1 to 0.
* Check that the receiving channel goes to P1. Unit is set to preset values.

How to get to Burn-in mode
This mode displays the test patterns of some single color raster in turn. These signals are from built-in generator of PDP panel. So it can be presumed that maybe the panel has some trouble when the screen of Burn-in mode is abnormal.
Using the front control buttons with the set turned off (standby) can activate this mode. Press the SUB-POWER button, INPUT SELECT button and VOLUME DOWN button at the same time, and hold for more than 5 seconds.
The set turns on with single color raster and the OSD of [BURN IN: ON].
To escape from this mode, press the SUB-POWER button, INPUT SELECT button and button at the same time, and hold for more than 5 seconds. Burn-in mode will be released.

How to recover the remote and front key function
If remote and front key cannot operate after miss set special function by front keys, these functions can recover by below method.
Press the SUB-POWER button, INPUT SELECT button and 
 button at the same time, and hold for more than 5 seconds.
The set turns on the service menu mode.
Select No.535 and data set from [0] to [1], and select No.536 and data set from (0) to (1).
Or
Press the SUB-POWER button and Vol+ button at the same time, and hold for more than 5 seconds.

How to check method of the use accumulation time for panel.
Select No.518 of Service Adjustment Menu.

How to get to Adjustment (Service)  mode* Using the front control buttons with the set turned off (standby) can activate it.
* Press the SUB-POWER button, INPUT SELECT button and button at the same time, and hold for more than 5 seconds.
The set turns on in adjustment mode with OSD.

Changing data and Selecting Adjustment code
> When the set is in adjustment mode, the cursor ▲, ▼, ◄, ► and OK buttons of the remote control or front panel
may be used as the adjustment keys.

> , ▼buttons are used for selecting adjustment code.

> ◄, ►buttons are used for changing data values.

> OK button is used for confirming the data.
After finishing the necessary adjustment press MENU button. Adjustment mode is released and the set returns to normal condition.


PHILIPS 32PFL5505 - 42PFL5505 - 46PFL5505 – SOFTWARE UPGRADE – SCHEMATIC

$
0
0
USED ICs: MST6M68FQ_M24C04MN_M24C64_TAS5706_TDA9885T_AD4803_R18110_PHKD13N03LT_MP1482

How to upgrade the firmware _ Circuit diagram PHILIPS LCD TVs 
There are three method to upgrade firmware to these sets.
HOW TO ENTER DESIGN MODE MENU
To enter Dmode menu
Go into menu “Picture” and select “Contrast”, then input the following codes sequentially with remote control: “1” “9” “5” “0”.

DESIGN HOTKEY
Once “Hotkey” is enabled, Dmode menu can be accessed by pressing remote control key “GO BACK”.
To exit Dmode menu, use key “EXIT” on remote control.
To return to previous menu, use key “MENU” on remote control.
“DMode Menu” includes “factory menu” and “service menu”

FIRMWARE UPGRADE PROCEDURE
METHOD-1
Copy the software file to the root directory of USB-disk;

Rename the software file with “TCL_MS68.bin”

Plug USB-disk to the TV set.

Software update with USB in normal method

Power on the set;

Go to Menu “Picture” and select “Contrast”, then input the following codes sequentially with remote control: “9” “7” “3” “5”;

Now “Factory Menu” appears, select “9-Software update” and press “OK”;

Select “Yes”;

Software update will be finished in few minutes, and TV set will be reset automatically, don’t power off TV set before it.
METHOD – 2

If software update fails with USB-disk, “Mstar ISP tool” will be needed to renew the software.

METHOD – 3

Press and keep pressing key “Menu” of remote control;
Power on TV set, and don’t release key “
Menu”;
Keep pressing key “
Menu” for about 10 seconds, and then release it.
Software update will be finished in few minutes, and TV set will be reset automatically, don’t power off TV set before it.

Note: During software update process, panel may have no any info display, but LED indicator flashing of USB-disk can be seen, which means USB-disk working right.

VOLTAGE CHART DC/DC CHECK
Before Power On the chassis, please check and make sure that the following power supply circuits are not shorted to ground.  [Different models may have different configurations of DC/DC circuit.]

SCHEMATIC - Audio Out
TUNER PART
POWER PART
CLICK ON THE PICTURES TO ZOOM IN

COLOR TV CIRCUIT DIAGRAM - TDA11105 - TDA11106 SIGNAL PROCESSOR

$
0
0
ICs USEDTDA11105/TDA11106/TDA11126/TDA12135/TDA12136/TDA12196 (Micom – Signal Processor) – HCF4052 ( Input Selector) – TDA7266SA / TDA7266MSA (Audio Output) – 24C08 (System Memory) – STV9302 / UTC780 40 (Vertical Scan Output) – BSC24-01N4006EV (LOT) – ET-5EE-K04 / ET-55E-K06 / ET-5CE-K04 (TUNER)
CLICK ON THE SCHEMATIC TO MAGNIFY


SAMSUNG 920NW – 19 Inch LCD MONITOR Circuit Diagram – SMPS and Back-light Inverter

$
0
0
ICs USED: NCP1337 [Power Control] – AP2761I [FET] – LTV817M [Photo Coupler] – OZ9938G [INVERTER CONTROL] – AP9971GM [INVERTER DRIVE]
Default Password1234
SMPS & BACK-LIGHT INVERTER SCHEMATICS
EXPLODED VIEW
CLICK ON THE PICTURES TO MAGNIFY

MAGNAVOX - SYLVANIA and EMERSON- 40 Inch LCD TVs - Service Mode and Adjustments – Initialize – SMPS Schematic (Circuit Diagram)

$
0
0
40” 40MF430B/F7 MAGNAVOX _ 40” 40MF430B/F7 MAGNAVOX _ 40”LC407SS1 SYLVANIA _ 40” LC407SS1 SYLVANIA _ 40” LC407SS1 SYLVANIA _ 40” LC407EM1 EMERSON

Universal Remote control Set-up codes.
MAGNAVOX: 0018 0042 0049 0101 0152 0680

EMERSON: 0004 0042 0049 0065 0101 0113 0119 0145 0152 0166 0191 0214 0215 0225 0324 0378 0421 0456 0460 0604 0611 0654

SYLVANIA:  0392

ICs used in the main power regulator board [SMPS].
MIP2F30MSSCF (Switching) _ LTV817MCF (Opto-Coupler) _ HPA00651DR ( Switching Control) _ 2SK3561 (Switching FET) _ TK5A500 (Switching FET) _ TEA1611T (High-voltage Resonant Control)

SERVICE MODE
* Turn the power on.
* Press [MENU] button to display Setup menu.
* Select “Features”.
* Select “Current Software Info”.
* Press [0] [4] [2] [5] [7] [4] & [Info] buttons on the remote control unit in this order. The following screen appears.

PURITY CHECK MODE
This mode cycles through full-screen displays of red, green, blue, and white to check for non-active pixels.
> Enter the Service mode.
> Each time pressing [7] button on the remote control unit, the display changes as follows.

WHITE BALANCE ADJUSTMENT
The White Balance Adjustment should be performed when replacing the LCD Panel or Digital Main CBA 

Purpose: To mix red, green and blue beams correctly for pure white.
Symptom of Maladjustment: White becomes bluish or reddish.

> Operate the unit for more than 20 minutes.
> Input the White Raster(70%=70IRE, 40%=40IRE)

> Set the color analyzer to the CHROMA mode and bring the optical receptor to the center on the LCD-Panel surface after zero point calibration as shown. Note: The optical receptor must be set perpendicularly to the LCD Panel surface.
> Enter the Service mode. Press [VOLUME DOWN] button on the remote control unit and select “C/D” mode.

CUT-OFF
* Press [1] button to select “COR” for Red Cutoff adjustment. Press [3] button to select “COB” for Blue Cutoff adjustment.
DRIVE
* Press [4] button to select “DR” for Red Drive adjustment. Press [6] button to select “DB” for Blue Drive adjustment.

* In each color mode, press [CHANNEL UP/DOWN] buttons to adjust the values of color.
Adjust Cutoff and Drive so that the color temperature becomes 12000°K (x= 0.272 / y=0.278 ±0.005).
To cancel or to exit from the White Balance Adjustment, press [PREV CH] button.

HOW TO INITIALIZE THE LCD TV
The purpose of initialization is to place the set in a new out of box condition. The customer will be prompted to select a language and program channels after the set has been initialized.  To put the program back at the factory-default, initialize the LCD TV using the following procedure.
* Turn the power on.
* Enter the service mode. To cancel the service mode, press [POWER] button on the remote control unit.
* Press [INFO] button on the remote control unit to initialize the LCD television.
INITIALIZED" will appear in the upper right of the screen. "INITIALIZED" color will change to green from red when initializing is completed.

POWER SUPPLY [SMPS] SCHEMATIC (Circuit Diagram)
  Fixed voltage (or Auto voltage selectable) power supply circuit is used in this unit.  If Main Fuse (F1601) is blown , check to see that all components in the power supply
circuit are not defective before you connect the AC plug to the AC power supply.  Otherwise it may cause some components in the power supply circuit to fail.

CLICK ON THE PICTURES TO ZOOM IN

EMERSON and MAGNAVOX – 39 INCH LCD TV – POWER SUPPLY AND BACK-LIGHT INVERTER – CIRCUIT DIAGRAM

$
0
0
EMERSON LF391EM4 – EMERSON LF391EM1 – MAGNAVOX 39ME313V/F7 – POWER SUPPLY [SMPS] SCHEMATIC

  Fixed voltage (or Auto voltage selectable) power supply circuit is used in this unit.  If Main Fuse (F602) is blown, check to see that all components in the power supply circuit are not defective before you connect the AC plug to the AC power supply.  Otherwise it may cause some components in the power supply circuit to fail. Because a hot chassis ground is present in the power supply circuit, an isolation transformer must be used when repairing.    Also, in order to have the ability to increase the input slowly, when troubleshooting this type of power supply circuit, a variable isolation transformer is required.  For continued protection against risk of fire, replace only with same type 2.5A, 250V fuse. 
MAIN POWER REGULATOR SCHEMATIC
BACK-LIGHT POWER REGULATOR SCHEMATIC
POWER PWB - TOP & BOTTOM VIEW
CLICK ON THE PICTURES TO MAGNIFY

HOW TO DISASSEMBLE- SHARP CD-C661H

$
0
0
SHARP CD-C661H - CD-C661HR -- CD-C661Hmini component system consisting of CD-C661H (main unit) and CP-C661H (speaker system)_disassemble procedure.
Output power: PMPO; 880 W (total)  (CD-C661H Except for MPO; 440 W (220 W + 220 W) U.K./CD-C661HR) (DIN 45 324)  RMS; 300 W (150 W + 150 W) (DIN 45 324)
Output power
: RMS; 300 W (150 W + 150 W) (CD-C661H For U.K.) (10 % T.H.D.)
Output terminals: Speakers; 6 ohms
Headphones
: 16-50 ohms (recommended; 32 ohms)
CD digital output (optical)

Pickup Unit Ass’y: 92LHPC1MASY


Pickup Unit: (Not Replacement Item)

DISASSEMBLY
* Take cassette tape and compact disc out of the unit.
* Be sure to remove the power supply plug from the wall outlet before starting to disassemble the unit.
* Take off nylon bands or wire holders where they need to be removed when disassembling the unit. After servicing the unit, be sure to rearrange the leads where they were before disassembling.
* Take sufficient care on static electricity of integrated circuits and other circuits when servicing.

HOW TO OPEN THE CHANGER
Change, turn fully the lock lever in the arrow direction through the hole on the loading chassis bottom in this state.  After that, push forward the CD player base.
 [After removing the connector for the optical pickup from the connector, wrap the conductive aluminum foil around the front end of connector to protect the optical pickup from electrostatic damage.]

Be careful when installing the CD changer mechanism.  Install the CD changer mechanism on the CD player base after the shift lever has been set in the highest position.

DISASSEMBLING THE SPEAKER BOX
LOADING MOTOR & PICKUP REMOVAL
Remove the screws (A1) x 2 pcs., to remove the loading motor.

Remove the screws (B1) x 2 pcs., to remove the shaft (B2).
Remove the stop washer (B3) x 1 pc., to remove the gear (B4)

 [After removing the connector for the optical pickup from the connector, wrap the conductive aluminum foil around the front end of connector to protect the optical pickup from electrostatic damage.]

CLICK ON THE PICTURES TO ZOOM IN


SONY LCD TV - KDL-32EX725 - 40EX725 - 55EX725 – Standby LED BLINKING CODES DETAILS

$
0
0
Sony KDL-32EX725 - 40EX725 - 55EX725LED BLINKING CODES DETAILS _ Self-Diagnostic _ Troubleshooting by PWB Assy' _ Universal remote control set-up codes to check with Sony Brand Televisions


SELF CHECK DIAGNOSTIC HISTORY
* TV must be in standby mode. (Power off).
* Press the following buttons on the Remote Commander within a second of each other:

DISPLAYChannel 5> Volume( -- ) > POWER.  [NOTE: This differs from accessing Service Adjustments Mode (Volume +)]

SELF CHECK DIAGNOSTIC PAGE
CLEARING THE SELF CHECK DIAGNOSTIC LIST
Since the diagnostic results displayed on the screen are not automatically cleared, always check the self-diagnostic screen after you have completed the repairs to be sure you have cleared the result display to “0”.  To clear the Error history and Error count press 8> 0 .

RESETTING THE PANEL OPERATING HOURS
The 3 sets of numbers displayed on the lower left corner of the screen indicates the total accumulated operating hours of the television and the operating hours of the LCD panel. Total operating hours is on the left, boot count in the center and panel hours in the right group (The center numbers are not used.)  To clear the LCD Panel operating hours of the LCD Panel after replacing the panel, press 7> 0.
To exit the Self Diagnostic screen, turn off the power to the TV by pressing the POWER button on the remote or the POWER button on the TV.

STANDBY LED BLINKING CODES & DETAILS
These models have a self-diagnostic function. If an error occurs, the standby LED will automatically begin to flash. The number of times the LED flashes translates to a probable source of the problem.  

A history of the errors is stored on the Self Check diagnostic page.   The failure occurrence data stored in memory to reveal past problems and how often these problems occurred. If there is more than one error, the standby LED will identify the fist of the problem areas. If the Self Check screen displays a “0”, no error has occurred.

2 TIMES BLINKS
A 2X protection mode blink pattern can be activated due one of the following defects.
> Loss of REG12V (LVP)*
> Loss of -125V (Single Line)
> Excessive -125V Level (OVP)*
> Loss of Power-ON Signal
> Excessive PFC Voltage (OVP)
> Excessive PFC Temperature (OTP)

# Low Voltage Protection (LVP)
# Over Voltage Protection (OVP)

  A loss or excessive condition of the REG12VDC secondary voltage from the main power supply IC6351 will cause a 2X blink pattern on the standby LED. The 12Vdc can be checked at CN6704/pin 16.  If the measurement is 0V or rises above 12Vdc (approaches 15V) before the TV shuts down the Power Supply Board is defective.  If approximately 12Vdc is present and remains below 12Vdc before shutdown then further troubleshooting is necessary to determine the defective component.  After confirming proper REG12V levels, check the Negative LED Backlight supply levels. A loss or excessive condition of the negative supply will cause a 2X blink failure. The voltage level can be checked at CN6701/pins 1 & 3 before the TV shuts off. There will be 2 to 4 wires (Red & Blue) depending on the panel size. All individual wires should be checked for proper voltage level. In normal operation the voltage level will initially rise to approximately -175V and then should regulate down to between 89V and 125V depending on the Backlight adjustment in the User Menu. If one of the negative supplies is 0V or rises above -175V before shut-off then the Power Supply Board is defective, replace it to fix the problem.  A defective X-Reality processor on the Main Board or Switch circuit on the Power Supply Board will cause a loss of the Power-ON signal (2X). To determine which component is defective check the Power ON voltage level at CN6704/pin 1. In normal operation 3V should be measured. If the 3V is presented before shut-off then the Power Supply Board is defective. If 0V is measured before shut-off then the Main Board is defective.
  Finally, there are PFC protection circuits on the Power Supply Board that when activated will cause a 2X blink protection mode. The PFC circuit is monitored for both over-voltage and over-temperature.  Therefore, if all the previously discussed circuits checkout okay, there could still be a problem on the Power Supply Board in the PFC circuit causing the 2X blink. Replacing the Power Supply Board will fix the TV.

3 TIMES BLINKS
3X Blink- DC Regulator/Audio Error
The Audio error can occur due on of the following error conditions.
> Defective DC Regulator on Main Board
> Shorted or Damaged Speaker Connections
> Defective Audio Amplifir (Main Board)
> Loss of AU12V (Open F4200 on Main Board)
> Loss of AU12V (Open Fuse on Power Supply Board)

  The first thing to check when a 3X blink protection mode occurs is the physical condition of the speakers and speaker connections. The speakers should measure 8 ohms. Shorted speakers or connections can cause a 3X blink protection mode.  If the speakers and connections check okay, then the defective component is on the Main Board. An open F4200, defective DC Regulator, or defective Audio amplifier will cause a 3X blink protection mode. In any of these cases, replace the Main Board to fix this condition.  A defect on the Power Supply Board can cause a 3X blink protection mode and shut-off. Check the AU12V level at CN6704/pin 14. If 0V is measure before shut-off the Power Supply Board is defective.

4 TIMES BLINKS
4X Blink – Balancer Error

  The 4X error code is only used on models incorporating local dimming LED backlighting. If a failure occurs on the LD board the TV will shut down and display this diagnostic code. Models using conventional non-local dimming LED backlighting do not utilize this error code.

5 TIMES BLINKS
5X Blink - T-CON Error

  The 5X blink protection mode indicates a communications error between the T-CON Board and the X-Reality microprocessor on the Main Board. If the T-CON is available for replacement, replace the T-CON. [If the T-CON is not available, the LCD panel must be replaced since the T-CON circuit is part of the LCD panel assembly.]  In rare cases a loose or defective LVDS cable could also be the cause.

6 TIMES BLINKS
6X Blink - Backlight System Failure
NOTE: All models will make two attempts to power up before a 6X is activated. The SONY logo (Backlight) may or may not display on the screen. However, the splash tones will be heard two times. After the second attempt the TV will turn off and the standby LED will blink a 6X protection mode. (Note: The splash tone may not be heard if it is turned off or the volume is set to minimum.)  If a 6X blink pattern is activated then a defect has occurred in one of the following areas.
Defective Panel LED(s)
Defective Power Supply

When troubleshooting a 6X backlight system failure it is key to notice if the backlights illuminate before the TV shuts off. The following list shows the possible backlight status and blink pattern and the possible failed components.

* Momentary Backlight and 6X [Defective LED(s) (LCD Panel Assb.)]
* No Backlight and 6X [Replace Power Supply]

In most cases, if the Sony logo (Backlight) momentarily illuminates and the TV shuts off and a 6X is activated than one or more of the backlight LEDs are defective. The LCD Panel assembly panel must be replaced for a defective LED. However, before replacing the LCD panel assembly check for a complete loss of the Negative Backlight (-89V to -125V) power supply. The -89V to -125V power supply can be checked at CN6702/pins 1 & 3.

If there is no backlight before the TV shuts off and activates a 6X, than check the “Backlight ON” signal from the TV microprocessor and the Positive (+145V) Backlight power supply from the Power Supply Board. The BL-ON signal can be checked at CN6704/pin 5 and the +145V at CN6701/pins 1 & 3.  If the “Backlight-ON” signal is okay and the Positive Power supply is missing then the Power Supply Board is defective. However, if the Backlight-ON is missing then the X-Reality Microprocessor is defective and the Main Board must be replaced to repair the problem.
7 TIMES BLINKS
7X Blink - Temperature Failure

These models do not display a temperature warning OSD dialogue box before shutting off and going into a 7X standby LED blink pattern.  The main objective when a 7X blink pattern occurs is to determine which of the following possible defects is causing the excessive temperature condition indication.

1. Excessive Ambient Room Temperature
2. Dust or Debris Blocking the TV Ventilation Apertures
3. Defective Temperature Sensor or X-Reality Microprocessor (Main Board)
The first step is to notice how long it takes the TV to shut off and trigger a 7X blink protection mode.

If the TV has an actual excessive temperature condition it will take a considerable period of time to shut off and indicate a 7X blink protection mode. 
This is because it will take time for the TV components to heat up and for the temperature sensor to detect the excessive temperature and shut the TV off.

If the TV takes a considerable period of time to shut-off check the following items
> The TV should not be located too close to any heating devices.
> The TV should have at least 4 inches of clearance around the sides & rear, and 11 inches of clearance over the top to ensure adequate ventilation.
> Check that all vented areas on the TV are clear of all dust and debris.
If the TV shuts off immediately after Power-ON then one of the following components has failed (Not an Actual Excessive Temperature Condition).
* X-Reality Microprocessor (Main Board)
* Temperature Sensor (Main Board)
In either case the Main Board must be replaced to fix the problem.

CLICK ON THE PICTURES TO MAGNIFY

Universal remote control set-up codes to check with Sony brand Televisions [All types]
0018 0045 0101 0131 0154 0177 0211 0301 0302 0357 0358 0609 0785


SKYWORTH 19L121W LCD TV – SMPS and BACK-LIGHT INVERTER SCHEMATIC

$
0
0
19L121W LCD TV– SMPS and BACK-LIGHT INVERTER SCHEMATIC _ Skyworth 19" 
Used ICs: OZ9938GN (Back-light Controller) _ AM4502C-T1-PF (Back-light Driver) _ LD7575A (SMPS Control) _ STP10NK70ZFP (SMPS Switching FET)

BACK-LIGHT INVERTER
SMPS [Power Supply Regulator]
Click on the Schematics to Magnify

ACER AT2645 – AT2646 – LCD TV MONITOR – SMPS and AUDIO OUTPUT CIRCUIT DIAGRAM

$
0
0
ICs USED - TDA8932BTW (Audio Output) _ FAN7529MX _ TNY277PN-TL _ SI810SCL _ 2SK4085LS (FET)
  This monitor will appear to be non-functional if there is no video input signal. In order for this monitor to operate properly, there must be a video input signal.

  The  monitor is equipped with VESA DDC2B capabilities according to the VESA DDC STANDARD. It allows the monitor to inform the host system of its identity and, depending on the level of DDC used, communicate additional information about its display capabilities.

  This LCD TV l contain a main board (include audio), a switching power board, a function keyboard, an IR Board and a side board. The main board and power board will house the flat panel to control logic I2C bus, DDC, brightness control logic for LCD panel, DC-DC conversion to supply the appropriate power to the whole board and transmitting TTL level signals into LCD Module to drive the LCD display circuit.  The inverter board will drive the five CCFLs (Cold Cathode Fluorescent Lamp).
The switching power board will provides the power ON/OFF to control the TV and control LED indicator for DPMS. The function keyboard and Remote Control will provide the OSD control signal to the Main Board.


AUDIO OUTPUT CIRCUIT
SMPS [POWER] CIRCUIT and PWB
The following symptoms are normal with LCD TV monitor and do not indicate a problem.

> Due to the nature of the fluorescent light, the screen may flicker during initial use. Turn off the Power Switch and then turn it on again to make sure the flicker disappears.
> You may find slightly uneven brightness on the screen depending on the desktop pattern you use.
> The LCD TV screen has effective pixels of 99.99% or more. It may include blemishes of 0.01% or less such as a missing pixel or a pixel lit all of the time.
> Due to the nature of the LCD TV screen, an afterimage of the previous screen may remain after switching the image, when the same image is displayed for hours. In this case, the screen is recovered slowly by changing the image or turning off the Power Switch for hours.

Click on the pictures to Zoom In.

SONY HCD GPX5G - HOW TO RELEASE THE DIC TRAY LOCK – HOW TO TAKE DISC OUT AT EMERGENCY

$
0
0
SONY HCD GPX5G – HCD GPX7G HCD GPX8G

HOW TO RELEASE THE DISC TRAY LOCKS – HOW TO TAKE DISC OUT AT EMERGENCY & Mechanism Disassemble procedure
CD Mechanism Type => CDM74I-DVBU201//M

Optical Pick-up Name => CMS-ST6RFS3

HCD-GPX5G is the amplifier, USB, CD player and tuner section in MHC-GPX5.
HCD-GPX7G is the amplifier, USB, CD player and tuner section in MHC-GPX7.
HCD-GPX8G is the amplifier, USB, CD player and tuner section in MHC-GPX8

HOW TO OPEN THE TRAY WHILE POWER SWITCH TURN OFF
PRECAUTION WHEN INSTALLING A NEW OP UNIT/PRECAUTION BEFORE UNSOLDERING THE STATIC ELECTRICITY PREVENTION SOLDER BRIDGE
  When installing a new OP unit, be sure to connect the flexible printed circuit board first of all before removing the static electricity prevention solder bridge by unsoldering.  Remove the static electricity prevention solder bridge by unsoldering after the flexible printed circuit board has already been connected.  (Do not remove nor unsolder the solder bridge as long as the OP unit is kept standalone.)

DISC LOADING MECHANISM
The laser diode in the optical pick-up block may suffer electrostatic break-down because of the potential difference generated by the charged electrostatic load, etc. on clothing and the human body.  During repair, pay attention to electrostatic break-down and also use the procedure in the printed matter which is included in the repair parts.  The flexible board is easily damaged and should be handled with care. 

The laser beam on this model is concentrated so as to be focused  on the disc reflective surface by the objective lens in the optical pickup block. Therefore, when checking the laser diode emission, observe from more than 30 cm away from the objective lens.

TO RELEASE THE DISC TRAY LOCK
> Press [Power/ STANDBY] button to turn the power on.
> Press the [CD/DISC SKIP] button to select CD function.
> While pressing the [Stop] button, press the [ENTER] button for more 5 seconds).
> The message “UNLOCKED” is displayed and the disc tray is unlocked.
Note:
When “LOCKED” is displayed, the slot lock is not released by turning power on/off with the [Power/ STANDBY] button.


H BUSTER 42 inch LCD TV – HBTV 42D05FD – SMPS and BACK-LIGHT INVERTER SCHEMATIC

$
0
0
H BUSTER HBTV 42D05– LCD TV – Power Supply & Back-light Inverter Circuit Diagram
BACK-LIGHT INVERTER
MAIN POWER [SMPS] SCHEMATIC
CLICK ON THE SCHEMATICS TO ZOOM IN

FUNAI LDD A2006 - TV-DVD COMBO- HOW TO ENTER SERVICE MODE - FIRMWARE UPDATE

$
0
0
How to enter Service Mode_Firmware Update _ Initialize _  SMPS & Back-Light Inverter Schematics _  FUNAI 20 "LCD TV/DVD LDD-A2006 / LDD-B2006 / LDD-C2006 / LDD-D2006
HOW TO INITIALIZE
DVD Section

* Press [1], [2], [3], [4], and [DISPLAY] buttons on the remote control unit in that order.

* Press [CLEAR] button on the remote control unit.

* When “OK” appears on the screen, the factory default will be set.

* To exit this mode, press [CH▲/▼] or [SELECT] button to go to TV mode, or press [STANDBY] button to turn the power off.
LCD TV SECTION
> Turn the power on. (Use main power on the TV unit.)

> To enter the service mode, press [STANDBY], [2], [7], [1], and [MUTE] buttons on the remote control unit in that order within 5 seconds. [To cancel the service mode, press [STANDBY] button on the remote control.]

> To initialize the LCD television, press “DISPLAY” button on the remote control unit.

> Confirm "FF" indication on the upper right of the screen.

FIRMWARE RENEWAL MODE

* Turn the power on and press [EJECT] button on the remote control unit to put the LCD TV/DVD into DVD mode. Then remove the disc.

* To put the LCD TV/DVD into F/W version up mode, press [9], [8], [7], [6], and [MODE] buttons on the remote control unit in that order.

* Insert the disc for version up into the disc slot.

* The LCD TV/DVD enters the F/W version up mode automatically. Fig. c appears on the screen. If you enter the F/W for different models, “Disc Error” will appear on the screen, then the disc will be ejected automatically.

* After programming is finished, the disc will be ejected automatically. [At this time, no button is available.]

* Remove the disc.

* Press [CH ▲/▼] button on the unit to go to TV mode, or press [STANDBY] button on the unit to turn the power off.

* Press [EJECT] button on the remote control unit to put the LCD TV/DVD into DVD mode again.

* Press [1], [2], [3], [4], and [DISPLAY] buttons on the remote control unit in that order.

* Press [CLEAR] button on the remote control unit.


* To exit this mode, press [CH▲/▼] or [SELECT] button to go to TV mode, or press [STANDBY] button to turn the power off.

SMPS & BACK-LIGHT INVERTER SECTION CIRCUIT DIAGRAM
CLICK ON THE PICTURES TO MAGNIFY

PHILIPS 40PFL3606 - LCD TV - POWER SUPPLY SCHEMATIC

$
0
0
POWER SUPPLY [SMPS] CIRCUIT DIAGRAM - PHILIPS 40PFL3606 LCD TV
ICS USED: HS01G – NCP1207 – F6N80 – F5N50 - FSQ510 – OZ 9977
 
POWER SUPPLY CIRCUIT DIAGRAMS
Click on the diagrams to Magnify


PHILCO PH32M3 - CCE D32 LED TV - POWER SUPPLY - SMPS - SCHEMATIC

$
0
0
PHILCO LED TV PH32M3 - CCE D32 - POWER SUPPLY [SMPS] - CIRCUIT DIAGRAM
ICs Used - L6562 – F13N50 – LD7535 – SG6848 
SMPS PWB & SCHEMATIC
CLICK ON THE SCHEMATIC TO ZOOM IN

HANNSpree - 40 and 42 Inch LCD TV - HOW TO ENTER SERVICE MODE - ADJUSTMENTS

$
0
0
How to enter and Service Mode to adjust parameters to HANNSpree GT02-32E1 - GT03-37E1 & HANNSpree AT06 42 Inch LCD TV - LCD TV 
SERVICE MODE [Hanspree AT06 42" LCD TV] (Horizontal Frequency 31.5KHz to 48KHz)
* In the TV mode, adjust volume to Zero and press number keys 9 > 8 > 7 > 6 to enter service mode.

* To exit, press the EXIT button on the remote control.

SERVICE MODE (Hanhspree GT02 32E - GT03-37E1)
1 Switch on the LCD TV .
2 Press
991 on the remote control to enter the internal Service menu.
3 Press MENU to switch the service mode pages.
4 Press
▲▼to scroll through the various menu options.
5 Press
◄►to change the menu settings.
6 Press
MENUto save the new settings and switch to next page and press EXITto  exit from service mode to normal mode.

TV / AV / S-VIDEO / WHITE BALANCE / BRIGHTNESS & CONTRAST ADJUSTMENTS
WHITE BALANCE ADJUSTMENT
1 Press 991 on the remote control to enter the internal Service menu.
2 Press MENU to switch to the PW106 Scaler Menu page
3 Press
▲/▼to scroll to Page 2-3 options
4 Press
◄/►
 to adjust the Offset Red, Offset Blue, Gain Red, Gain Blue menu settings.
5 Press EXIT to save the new settings and exit. [Don’t adjust others setting in page 2-3]

Click on the Pictures to Zoom In
BRIGHTNESS ADJUSTMENT
1 Repeat the above mentioned step 1 to 2
2 Press
▲/▼to scroll to PW106 FE VDC Menu Page 2-1 options
3 Press 
►◄adjust the Brightness setting.
4 Press
▲▼to scroll to TV/AV/S Parameter=AV1 setting and pressuto run the setting. (This procedure will copy the settings of AV1 to S & TV)

ATSC DTV WHITE BALANCE / BRIGHTNESS / CONTRAST ADJUSTMENT
1 Repeat the above mentioned step 1 to 2
2 Press ▲▼ to scroll to PW106 Scaler Menu Page 2-3 options
3 Press◄,►to adjust the Offset Red, Offset Blue, Gain Red, Gain Blue menu settings
4 Press to save the new settings and exit. [Don’t adjust others settings in page 2-3]

YCbCr & YpbPr of COMPONENT 1, 2 WHITE BALANCE/BRIGHTNESS/CONTRAST ADJUSTMENT

Getting COMPONENT-1 connect to 1080i signal. (The settings could not be saved if signals input from COMPONENT 2 or connect to other sources such as 720P, 480P, 480i,etc.

WHITE BALANCE ADJUSTMENT OF Component

1] Repeat the above mentioned step 1 to 2
2] Press
▲/▼ to scroll to PE106 FE ADC page 2-3 options
3] Press
◄/►to adjust the Offset Red and Off Blue settings.
4] Press
◄/►to adjust the Offset Green setting.
5] Press
◄/► to adjust the Gain Green setting.
6] Press
◄/►to scroll to 480i/480P/720P Parameter=1080i setting and press ► to run the setting. (This procedure will copy the setting of 1080i to 480i/480P/720P)
7] Press EXIT to save the new settings and exit.

WHITE BALANCE ADJUSTMENT OF PC INPUT
1.Connecting to VGA Timing mode
2.Under service mode, Press▲▼to scroll to PE106 FE ADC page 2-2 options
3.Press 
►◄ to adjust the Offset Red, Offset Green and Off Blue settings.
4.Press 
►◄
to adjust the Gain Red and Gain Blue settings.
5.Press EXIT to save the new settings and exit.


PHILIPS DVP3320 and PHILIPS DVDR75 DVD VIDEO RECORDER – SMPS (Power Supply) SCHEMATICS

$
0
0
Power Supply [SMPS] Circuit Diagrams & PWBs – Philips DVP3320 & Philips DVDR75 (DVD Video Recorder)

Used ICs - DVP3320 – TNY176 / TNY177 – (Power Switching)

DVDR75 – TEA1507 (Power Control) - STP8NC50FP (Power switching FET)
 DVP 3320 SMPS & PWB
DVDR75 SMPS & PWB
CLICK ON THE PICTURES TO MAGNIFY

HOW TO ENTER SERVICE MODE - PANASONIC TX P42C - Plasma Television

$
0
0
Service Mode _ Hotel Mode _ Option Mirror _ Service Tool Mode _ Panasonic TX-P42C2B - TX-P42C2E - TX-P42C2L - TX-PR42C2 Plasma TV
SERVICE MODE

* While pressing [VOLUME ( - )] button of the main unit, press [0] button of the remote control three times within 2 seconds.

Key command
1. button...Main items Selection in forward direction
2. button...Main items Selection in reverse direction
3. button...Sub items Selection in forward direction
4. button...Sub items Selection in reverse direction
RED button...All Sub items Selection in forward direction
GREEN button...All Sub items Selection in reverse direction
VOL button...Value of sub items change in forward direction ( + ), in reverse direction ( - )

To exit - Switch off the power with the [POWER] button on the main unit or the [POWER] button on the remote control.

Contents of adjustment mode
* Value is shown as a hexadecimal number.
* Preset value differs depending on models.
* After entering the adjustment mode, take note of the value in each item before starting adjustment.

Option - Mirror
Picture can be reversed left and right or up and down.
00] Default (Normal picture is displayed)
01] Picture is reversed left and right.
02] Picture is reversed up and down.

If the defective symptom (e.g. Vertical bar or Horizontal bar) is moved by selection of this mirror, the possible cause is in A-board.

How to access Service tool mode
1. Select [SRV-TOOL] in Service Mode.
2. Press [OK] button on the remote control
Display of SOS History
SOS History (Number of LED blinking) indication.
From left side; Last SOS, before Last, three occurrence before, 2nd occurrence after shipment, 1st occurrence after shipment.
This indication will be cleared by [Self-check indication and forced to factory shipment setting].

POWER ON Time, On/Off
Note : To display TIME/COUNT menu, highlight position, then press MUTE for 3sec.
Time : Cumulative power on time, indicated hour : minute by decimal
On/Off : Number of On/Off switching by decimal
Note : This indication will not be cleared by either of the self-checks or any other command.

TO EXIT Disconnect the AC cord from wall outlet or switch off the power with [ Power ] button on the main unit.
Hotel mode: To restrict a function for hotels.
Access command to the Hotel mode setup menu
In order to display the Hotel mode setup menu, enter the following command (within 2 second).
ON [TV] : Vol. [Down] +
ON [REMOTE] : AV (3 times)
The Hotel mode setup menu is displayed.

To exit the Hotel mode setup menu Disconnect AC power cord from wall outlet.

Click on the Pictures to zoom in

PANASONIC TX-P42C - PLASMA TV - LED BLINKING CODES – SELF CHECK – DATA COPY PROCEDURE

$
0
0
LED BLINKING CODES – SELF CHECK – DATA COPY PROCEDURE _ PANASONIC PLASMA TV - 

TX-P42C2B - TX-P42C2E - TX-P42C2L - TX-PR42C2
SELF CHECK & LED BLINKING CODES
Use the self-check function to test the unit.
1. Checking the IIC bus lines
2. Power LED Blinking timing

Self-check indication only:  Produce TV reception screen, and while pressing [VOLUME ( - )] button on the main unit, press [OK] button on the remote control for more than 3 seconds.

Self-check indication and forced to factory shipment setting:  Produce TV reception screen, and while pressing [VOLUME ( - )] button on the main unit, press [MENU] button on the remote control for more than 3 seconds.

Disconnect the AC cord from wall outlet or switch off the power with [ Power ] button on the main unit.

Screen display & check points

POWER LED BLINKING TIMING CHART
When an abnormality has occurred the unit, the protection circuit operates and reset to the stand by mode. At this time, the defective block can be identified by the number of blinks of the Power LED on the front panel of the unit.

DATA COPY BY SD CARD
Board replacement (Copy the data when exchanging A-board):  When exchanging A-board, the data in original A-board can be copied to SD card and then copy to new A-board.

Hotel (Copy the data when installing a number of units in hotel or any facility):  When installing a number of units in hotel or any facility, the data in master TV can be copied to SD card and then copy to other TVs.

Preparation
Make pwd file as startup file for (a) or (b) in a empty SD card.
1 Insert a empty SD card to your PC.
2 Right-click a blank area in a SD card window, point to New, and then click text document. A new file is created by default (New Text Document.txt).
3 Right-click the new text document that you just created and select rename, and then change the name and extension of the file to the following file name for (a) or (b) and press ENTER.

a For Board replacement : boardreplace.pwd
b  For Hotel : hotel.pwd
Note: Make only one file to prevent the operation error.  No any other file should not be in SD card.

Data copy from TV set to SD Card
1 Turn on the TV set.
2 Insert SD card with a startup file (pwd file) to SD slot.  On-screen Display will be appeared according to the startup file automatically.
3 Input a following password for (a) or (b) by using remote control.
a For Board replacement : 2770
b For Hotel : 4850
Data will be copied from TV set to SD card.  It takes around 2 to 6 minutes maximum for copying.
4 After the completion of copying to SD card, remove SD card from TV set.
5 Turn off the TV set.

Following new folder will be created in SD card for data from TV set.
a For Board replacement : user_setup
b For Hotel : hotel

DATA COPY FROM SD CARD TO TV SET
1 Turn on the TV set.
2 Insert SD card with Data to SD slot.  On-screen Display will be appeared according to the Data folder automatically.
3 Input a following password for (a) or (b) by using remote control.
a For Board replacement : 2771
b For Hotel : 4851
Data will be copied from SD card to TV set.
4 After the completion of copying to SD card, remove SD card from TV set.
aFor Board replacement : Data will be deleted after copying (Limited one copy).
bFor Hotel : Data will not be deleted and can be used for other TVs.
5 Turn off the TV set.

[Depending on the failure of boards, function of Data copy for board replacement does not work.   This function can be effective among the same model numbers.]

CLICK ON THE PICTURES TO MAGNIFY

Viewing all 2033 articles
Browse latest View live


Latest Images